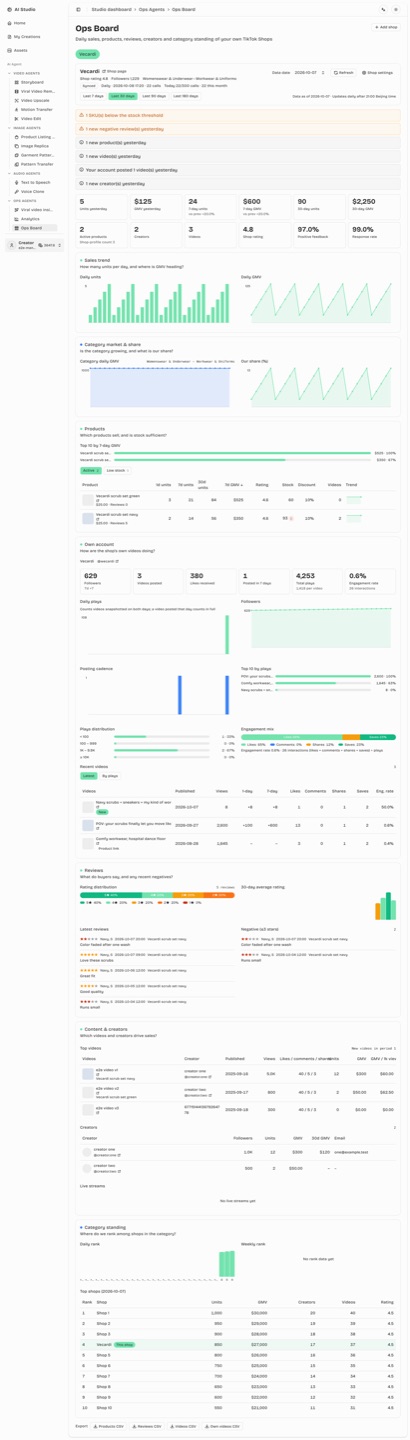
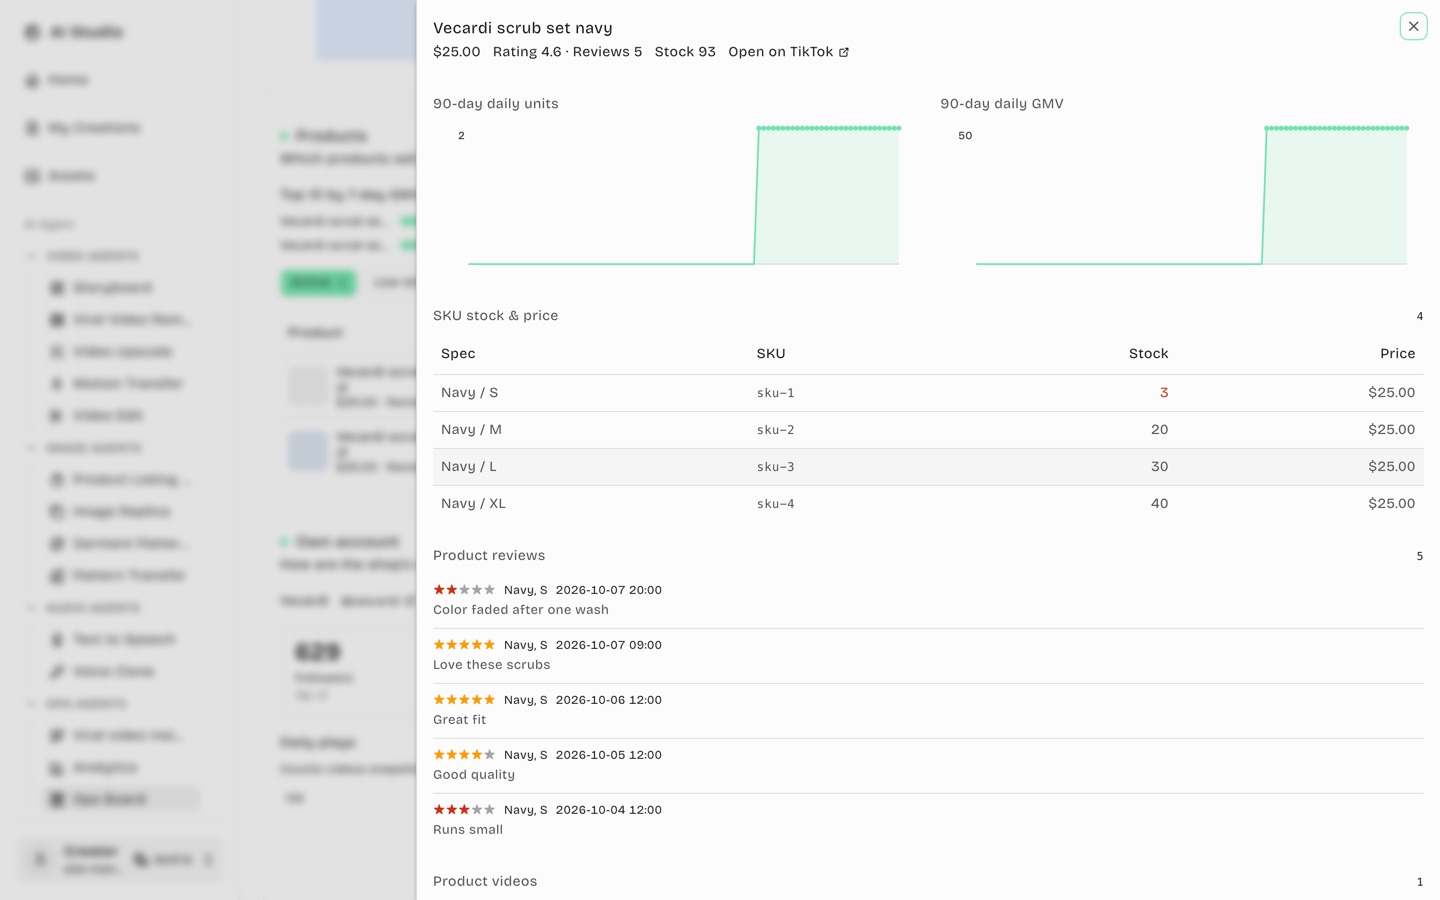
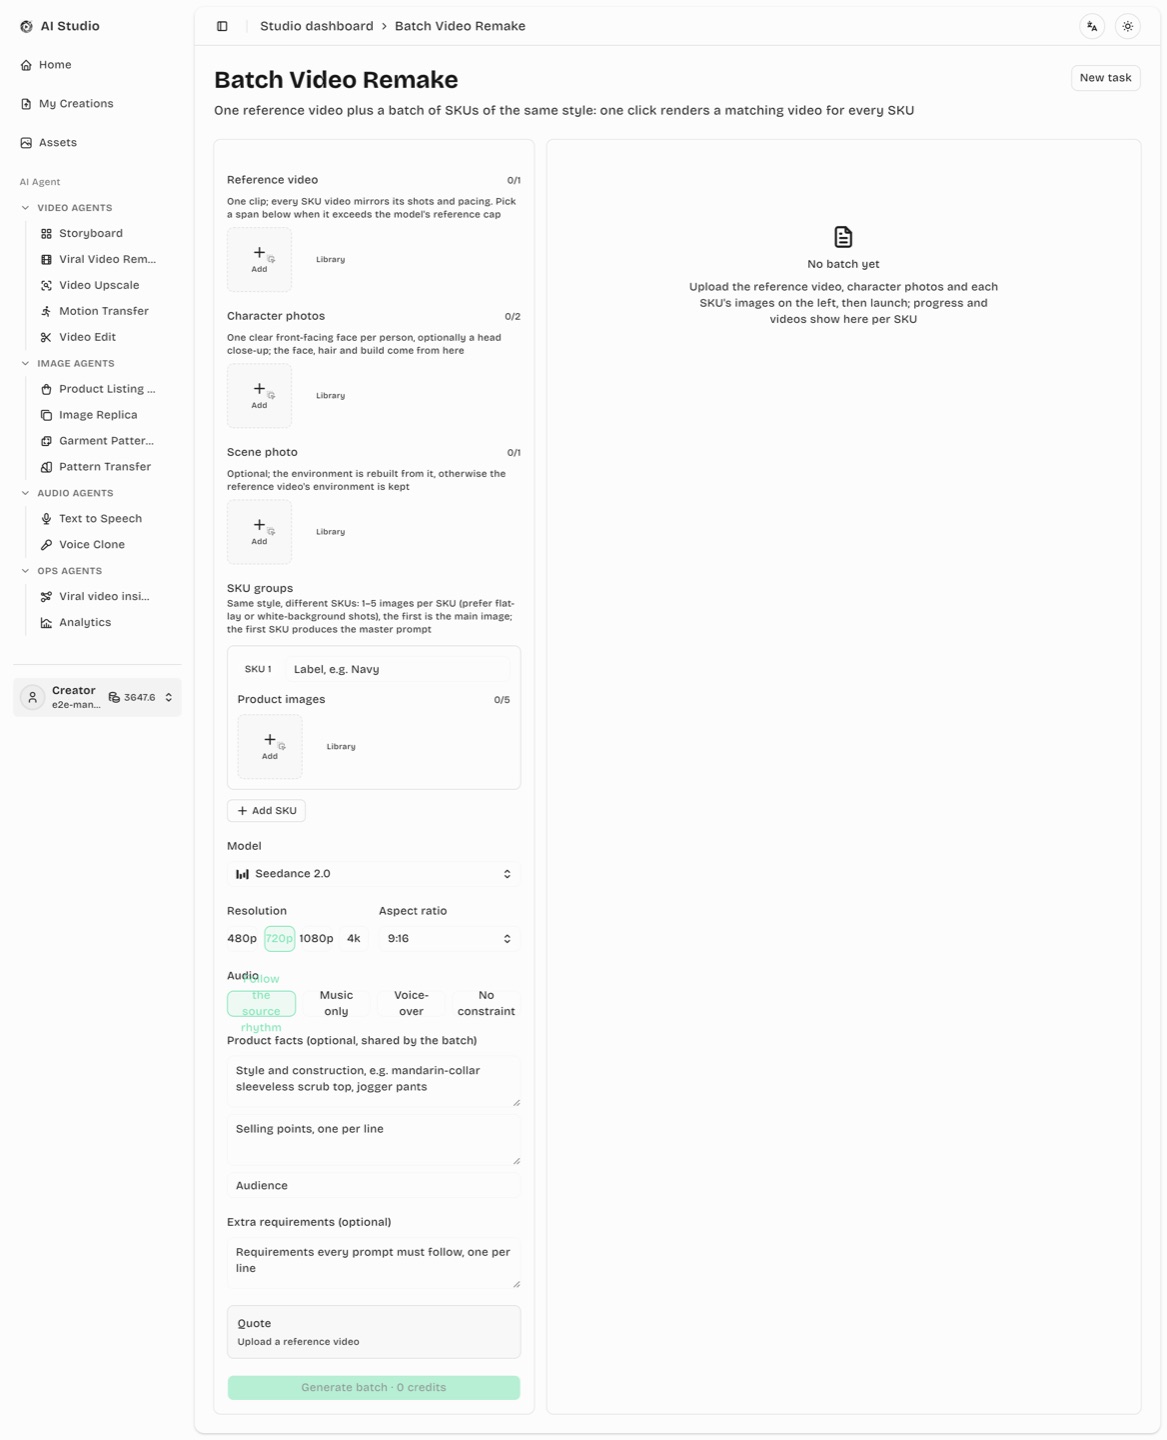
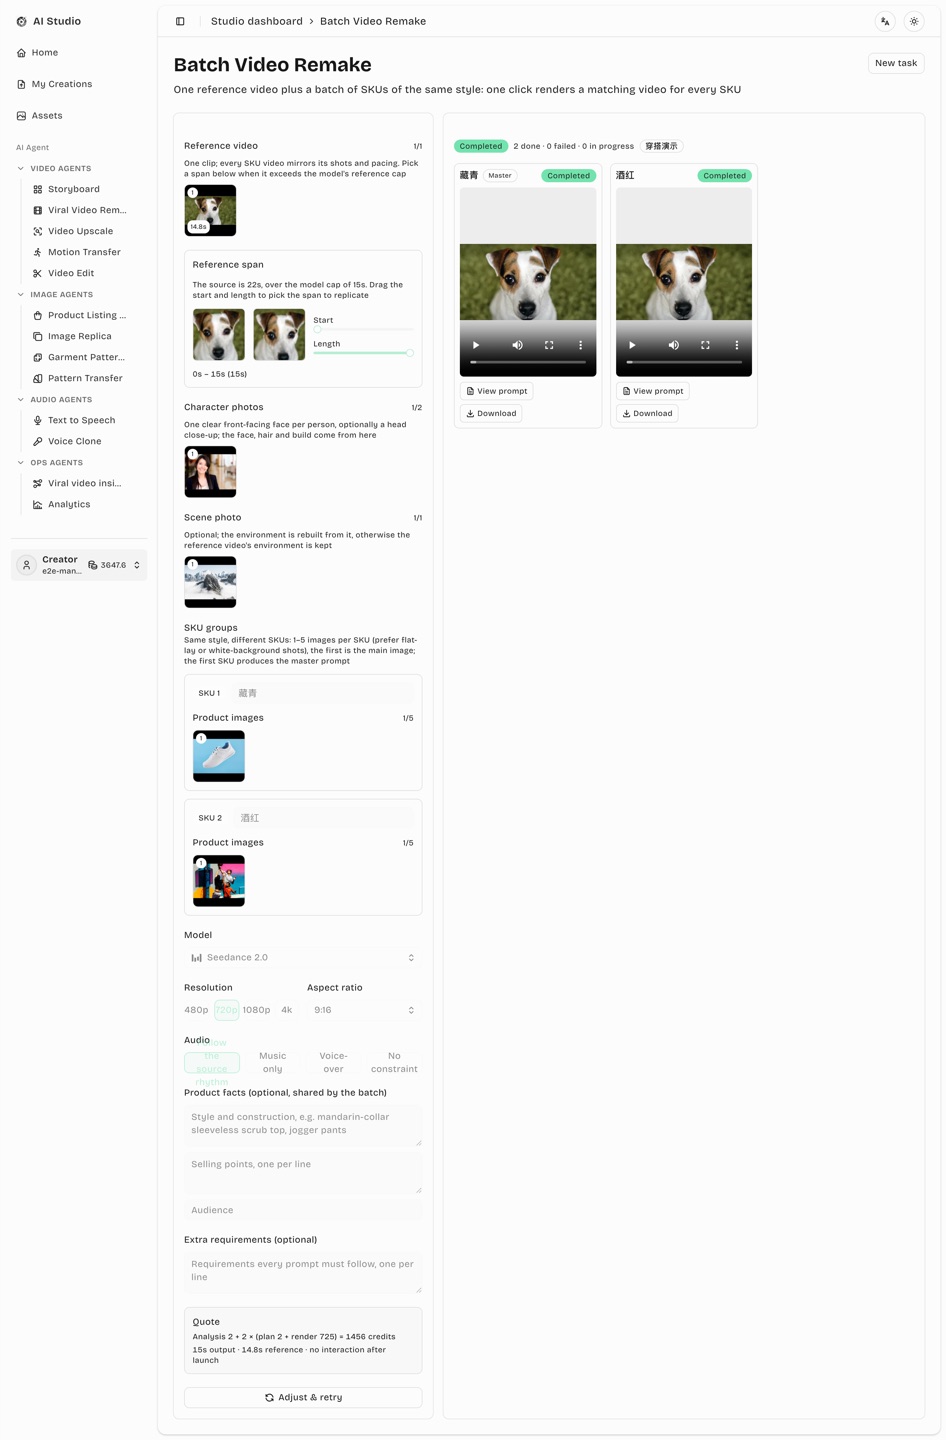
AI video & image creation workspace · A complete guide for creators
Version 5.1 (English) · Site: dingshengshijie.studio
First published: July 2026 · Updated: 12 August 2026
Contents
1Introduction & quick start
2Sign up & sign in
2.1 Email sign-up and sign-in
2.2 Sign in with Google
3Dashboard overview & navigation
4How credits work
5AI video generation
5.1 Text to Video
5.2 Image to Video
5.3 Reference to Video
5.4 Video model reference
5.5 Viewing & downloading results
6AI image generation
6.1 Text to Image
6.2 Image to Image & the asset library
6.3 Image model reference
6.4 AI prompt writer
7Smart edit
8Storyboard (AI Agent)
9Product Listing Set (AI Agent)
10Image Replica (AI Agent)
11Garment Pattern Variations (AI Agent)
12Pattern Transfer (AI Agent)
13Viral Video Remake (AI Agent)
14Video Upscale (AI Agent)
15Motion Transfer (AI Agent)
16Video Edit (AI Agent)
17Text to Speech (AI Agent)
18Viral Video Insights (Ops Agent)
19Viral Insights Analytics (Ops Agent)
20Listing image insights (ops agent)
21Image analytics (ops agent)
22Ops Board (Ops Agent)
23Batch Video Remake (Batch Production)
24Batch Image Swap (Batch Production)
25My Creations
26Asset library
27Account settings
26.1 Profile
26.2 Security & phone binding
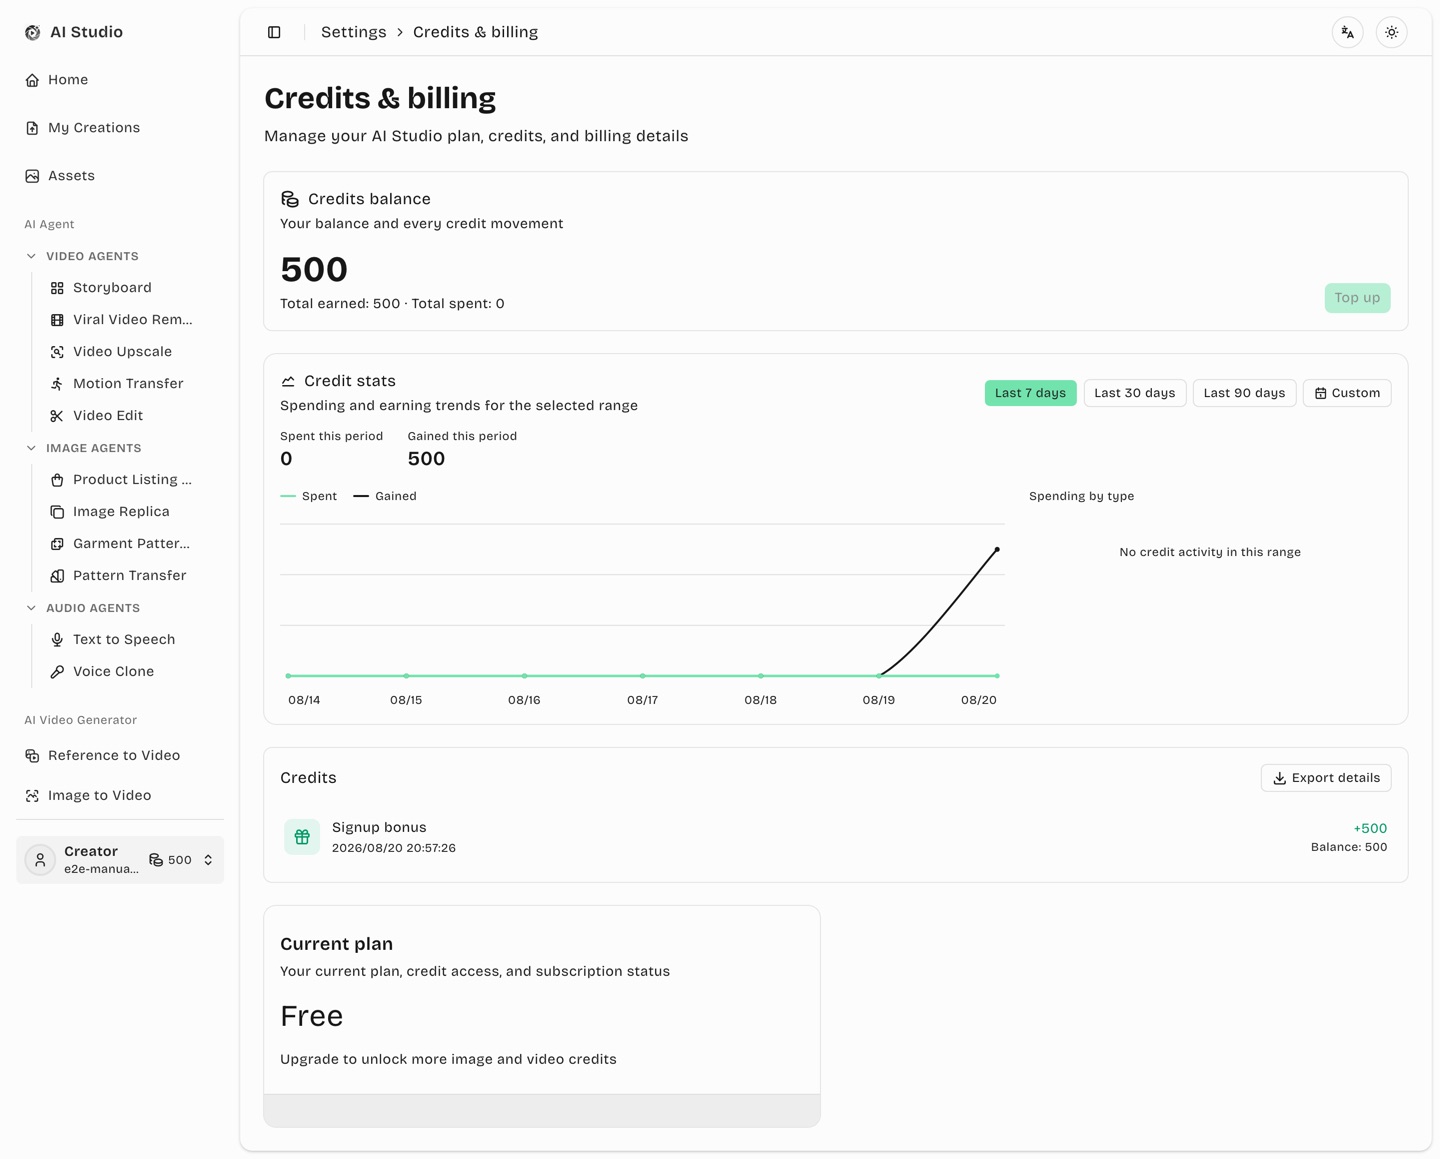
26.3 Credits & billing
28FAQ
1. Introduction & quick start
AI Studio is an AI video and image generation workspace for creators — generation, editing, and asset management all in one place.
Here is what you can do with it:
AI video generation: turn text, a single image, or multiple reference assets into short videos (Seedance, Kling, MiniMax H3, HappyHorse, Veo, Gemini and more).
AI image generation: generate images from text, or repaint uploaded images (GPT Image 2 / 2.5, Nano Banana Pro / 2 / 2.1, Seedream 5 Pro).
Smart edit: annotate a generated image by hand (markers, arrows, text) and let AI apply the changes in place.
Storyboard: upload product / character / scene material and get a multi-shot storyboard, then render it into a marketing video.
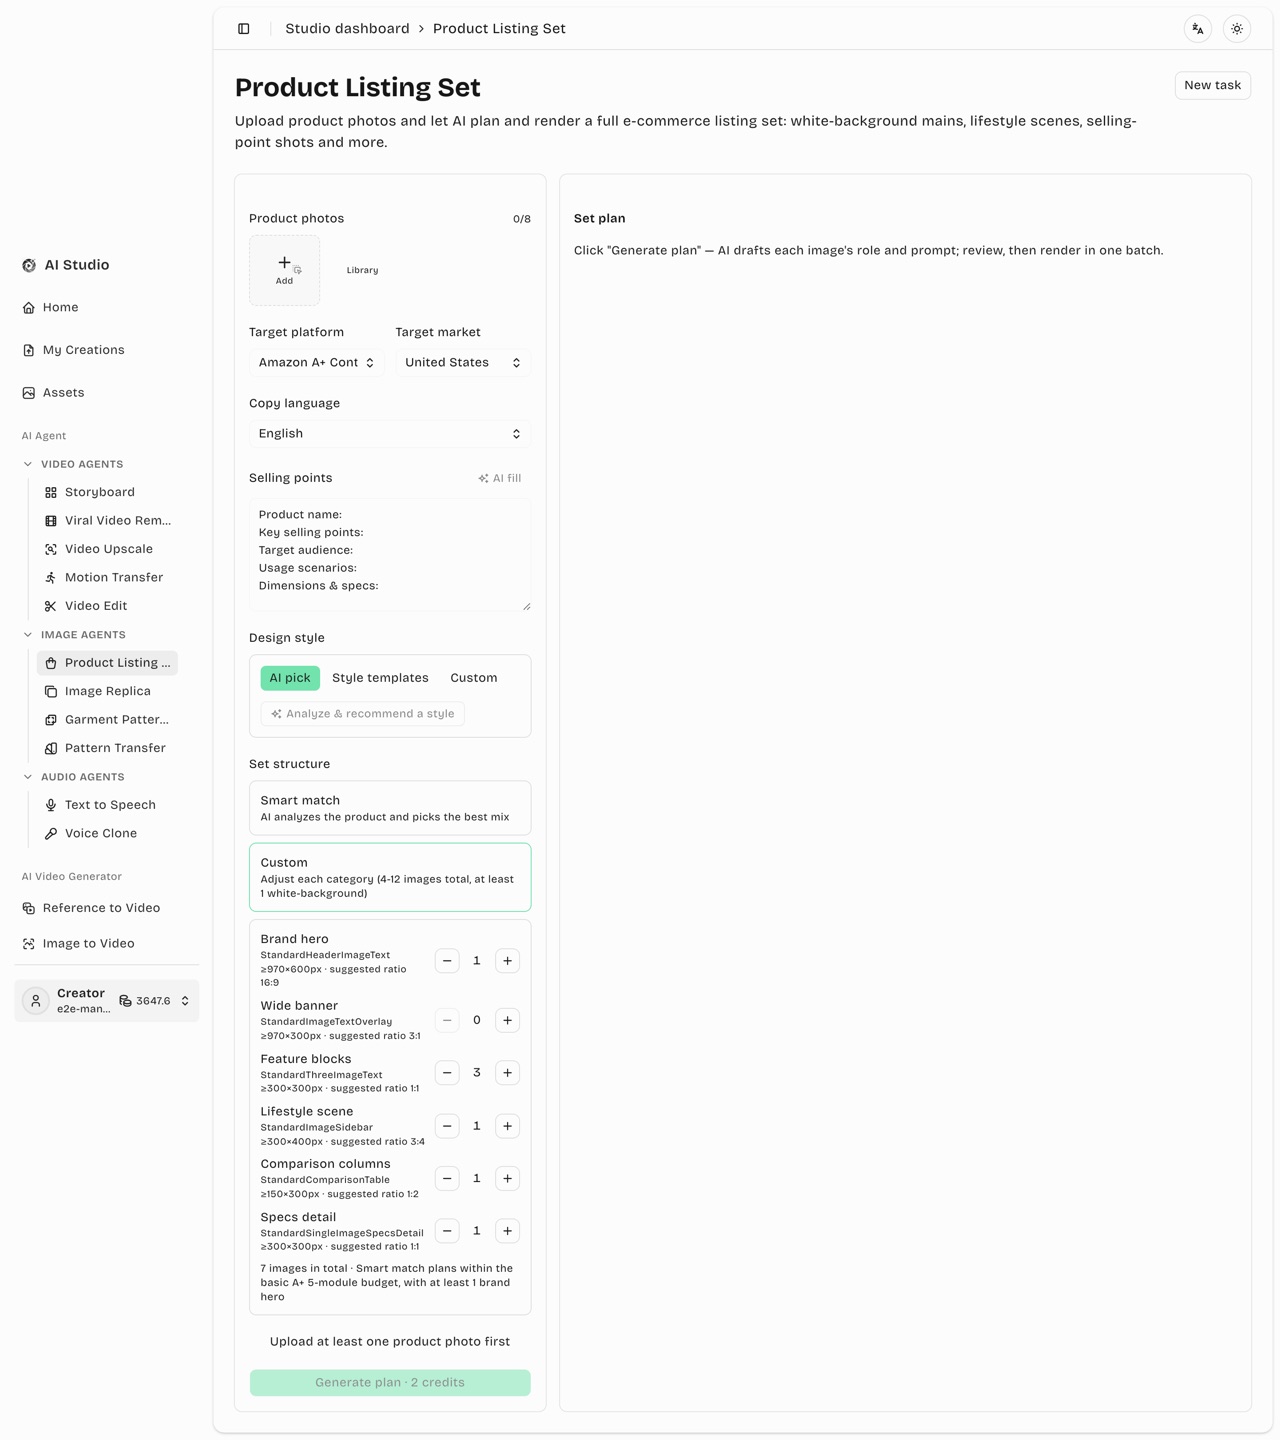
Product Listing Set: upload product photos and let AI plan and batch-render a full set of e-commerce listing images (white background, lifestyle, feature callouts), with 20 built-in design style templates; also plans Amazon A+ Content sets against the official module specs.
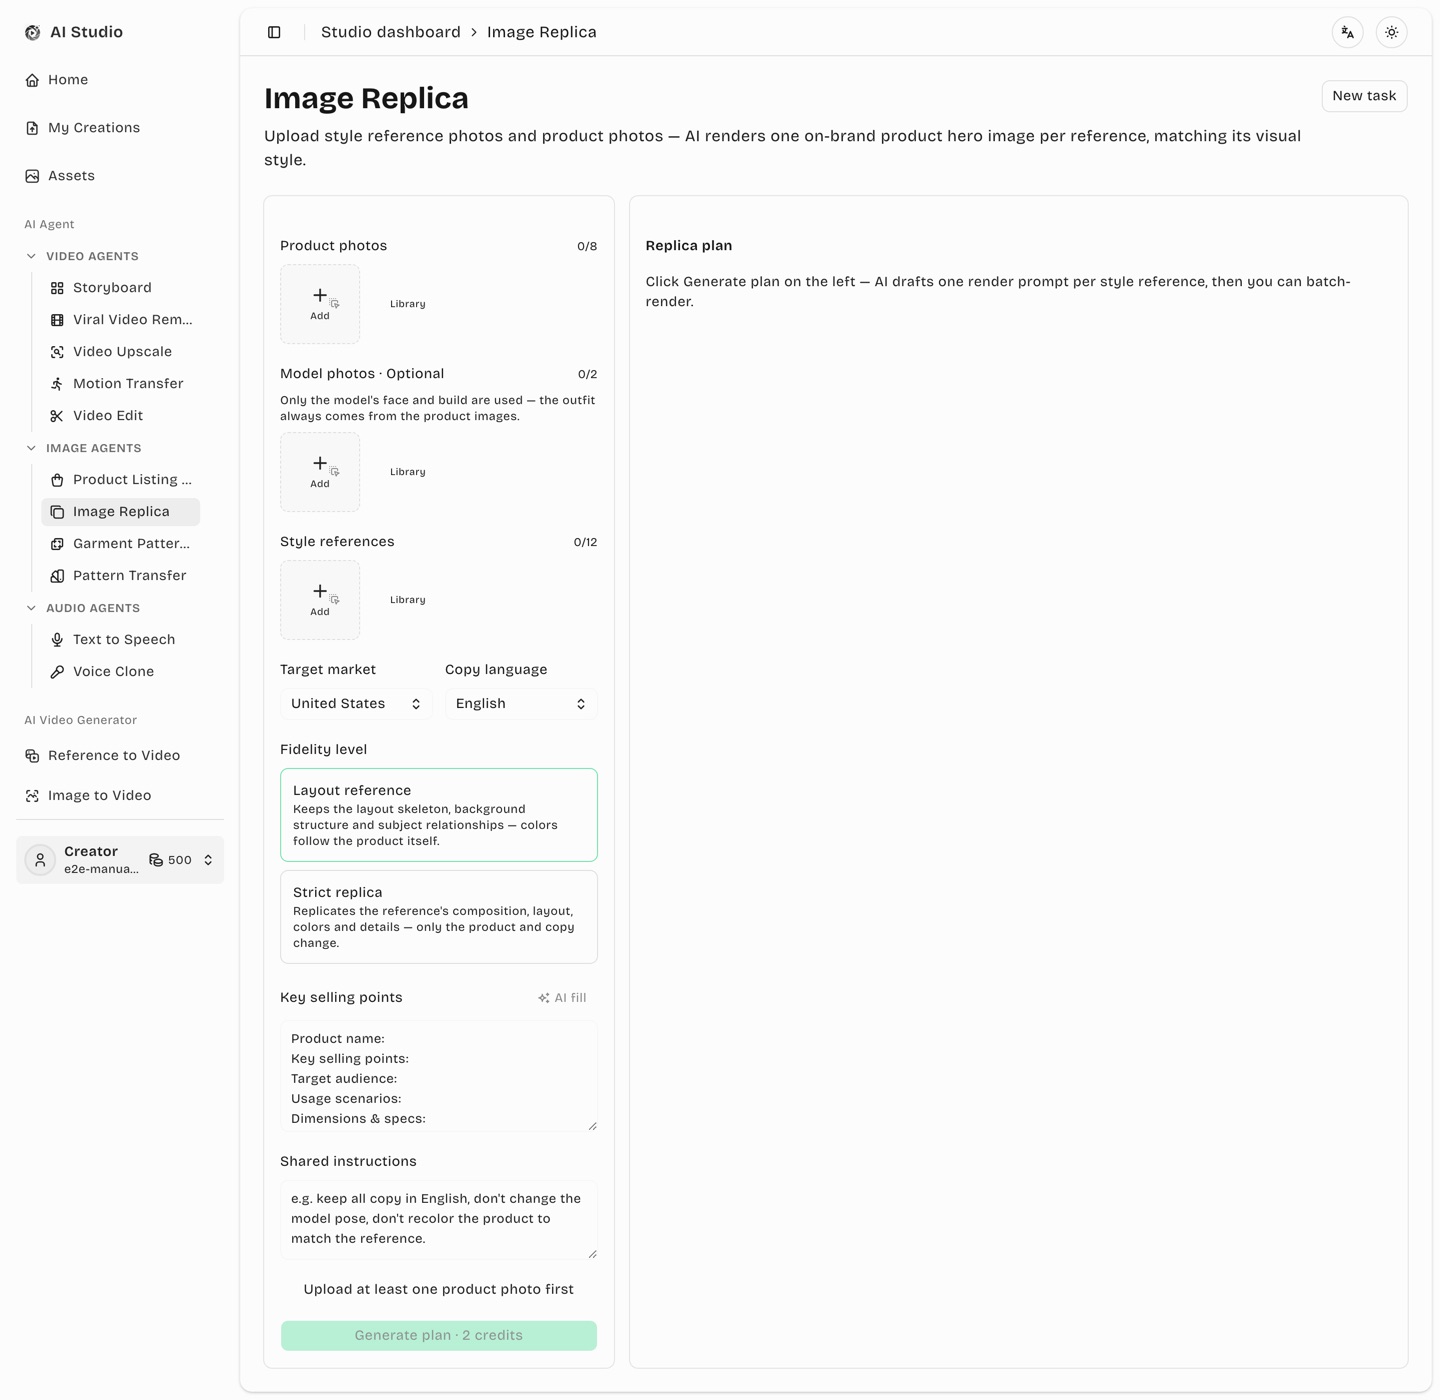
Image Replica: supply style reference images plus your own product photos, and AI batch-produces listing images that follow the reference layout.
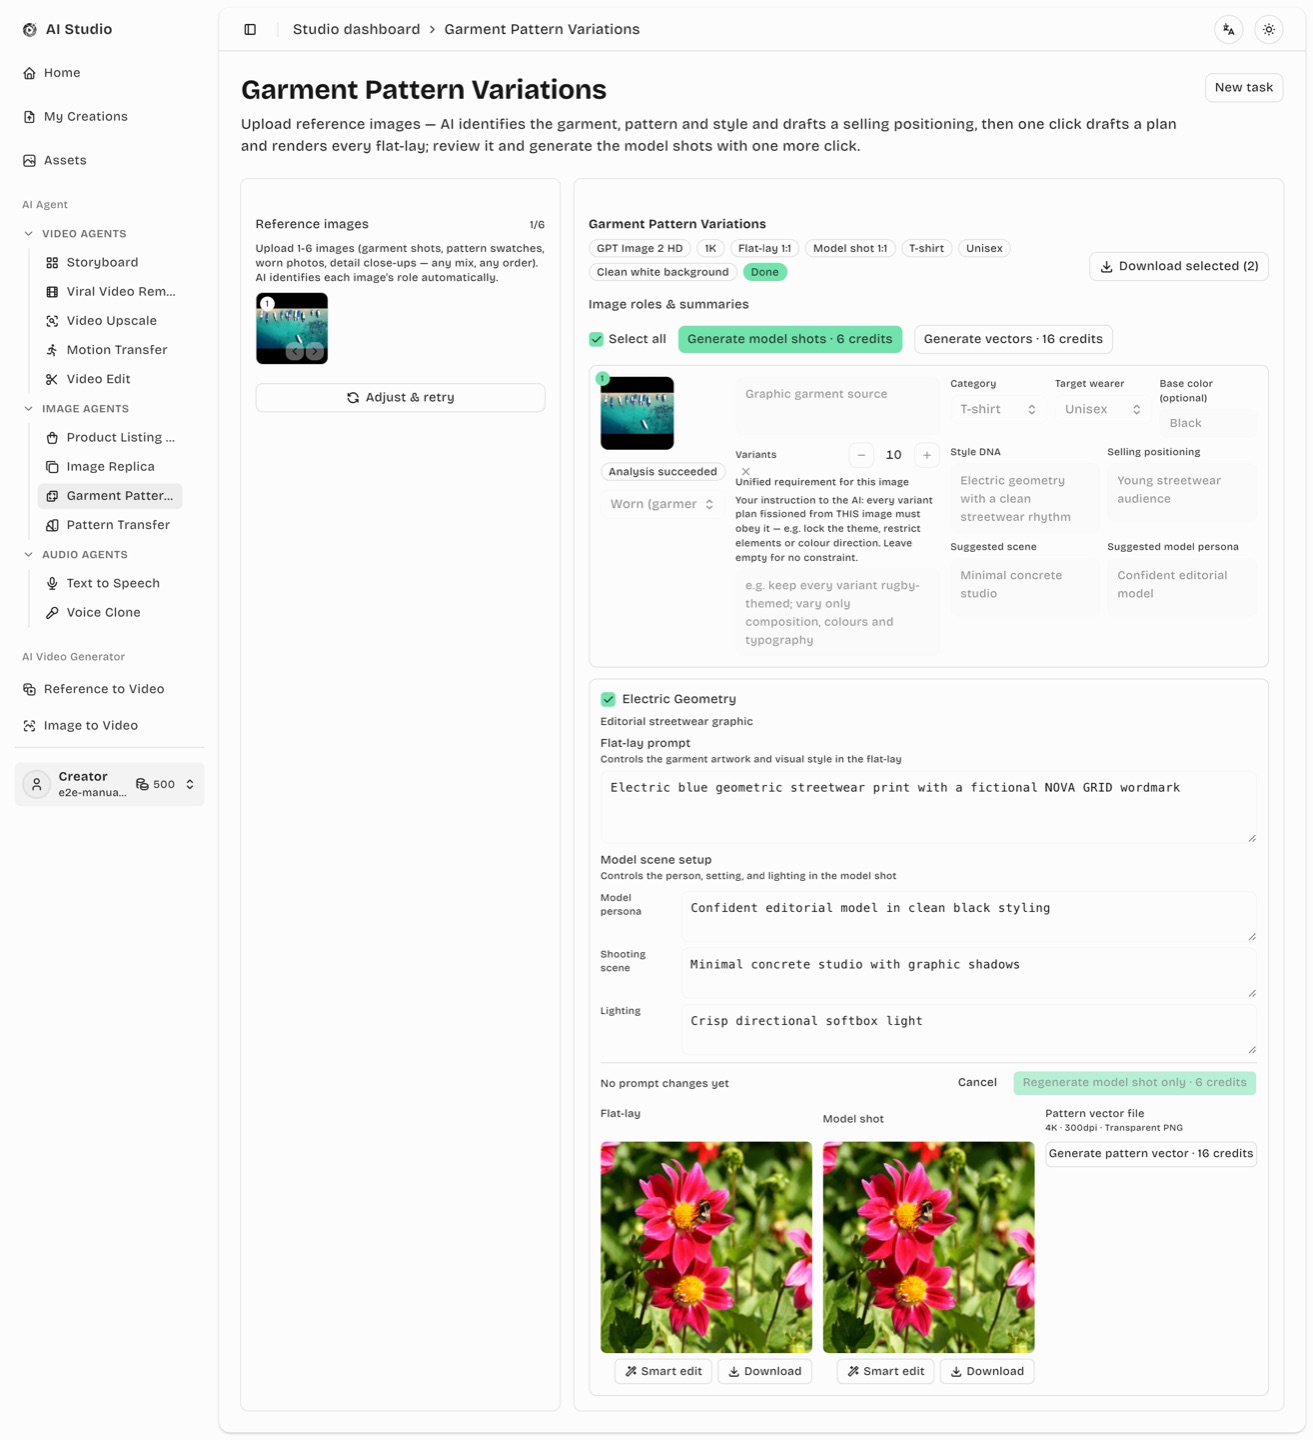
Garment Pattern Variations: upload 1–6 reference images (garment shots, pattern swatches, worn photos — any mix, no grouping needed); AI freely auto-identifies each image's role plus an overall style and selling positioning, and one submit after you confirm the details drafts the plan and renders every flat-lay automatically — approve them, then batch-generate the model shots with one click.
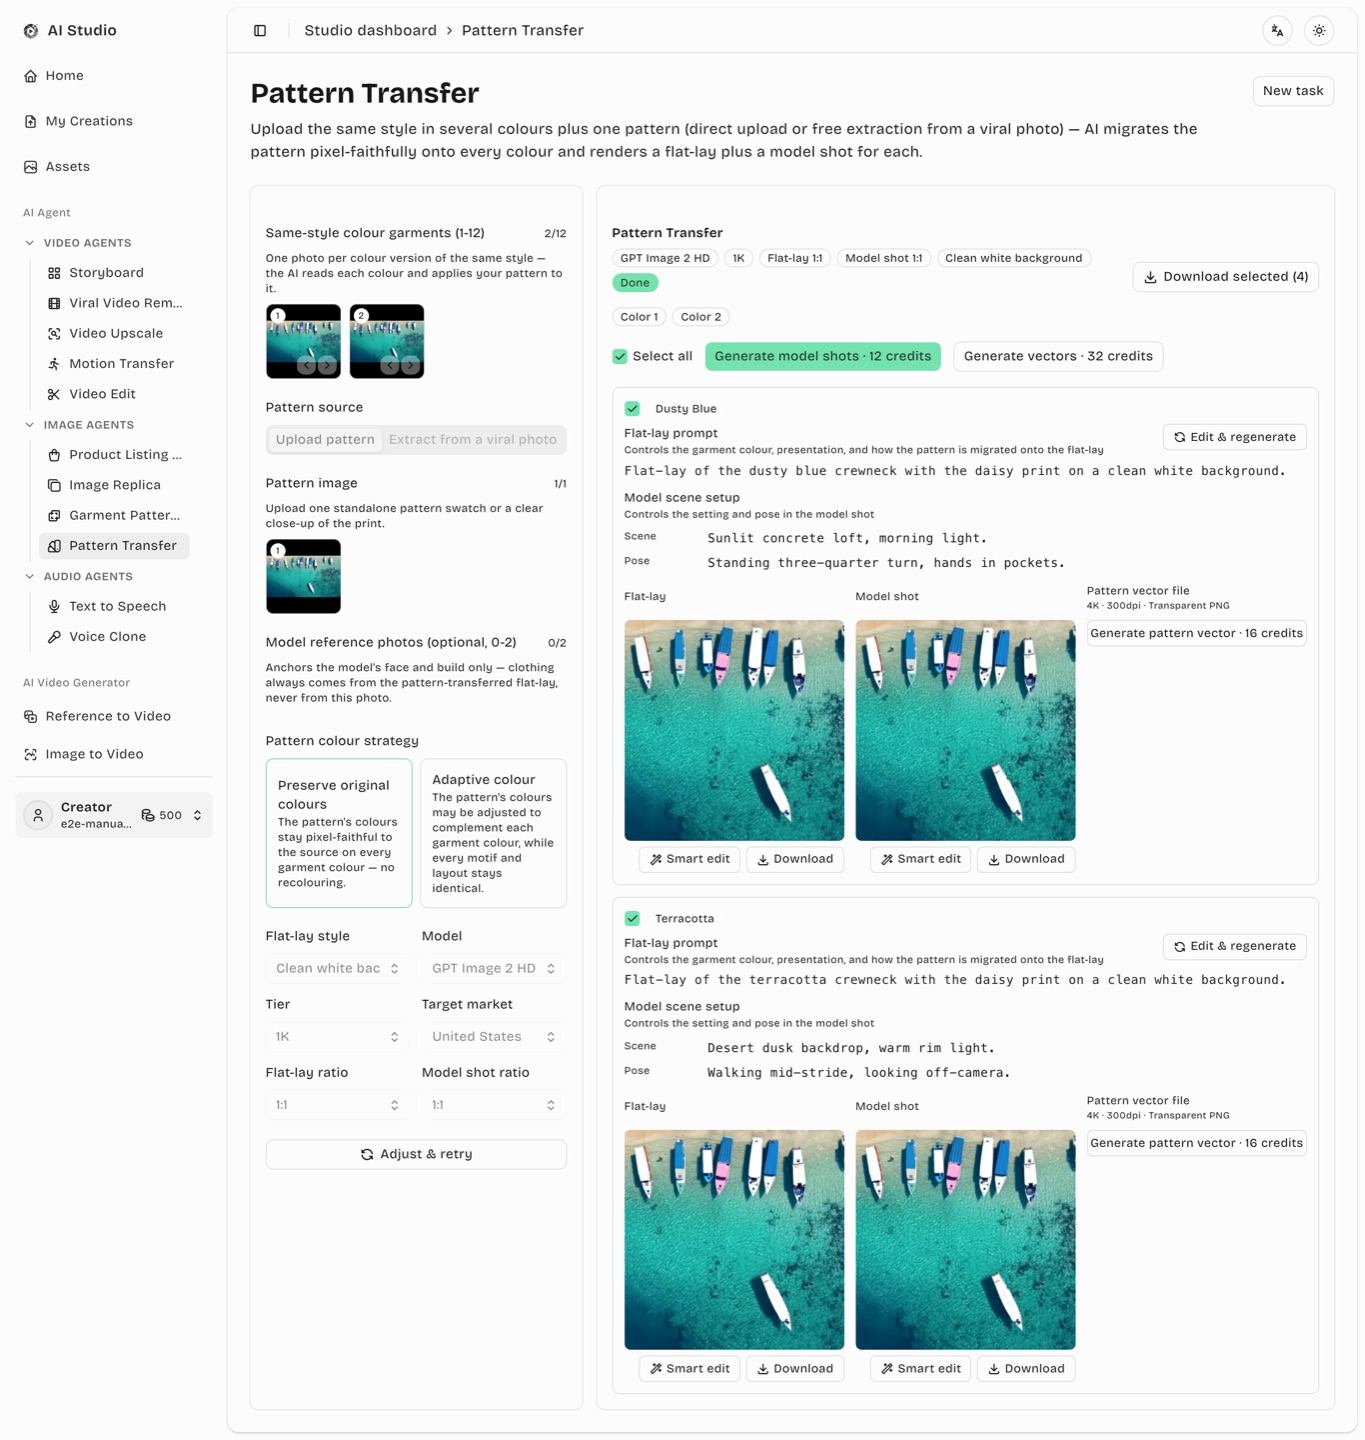
Pattern Transfer: upload the same style in several colours (1–12 photos) plus one pattern (direct upload, or free extraction from a viral photo); AI migrates the pattern pixel-faithfully onto every colour and renders a flat-lay plus a model shot for each — one model throughout, a different scene for every colour.
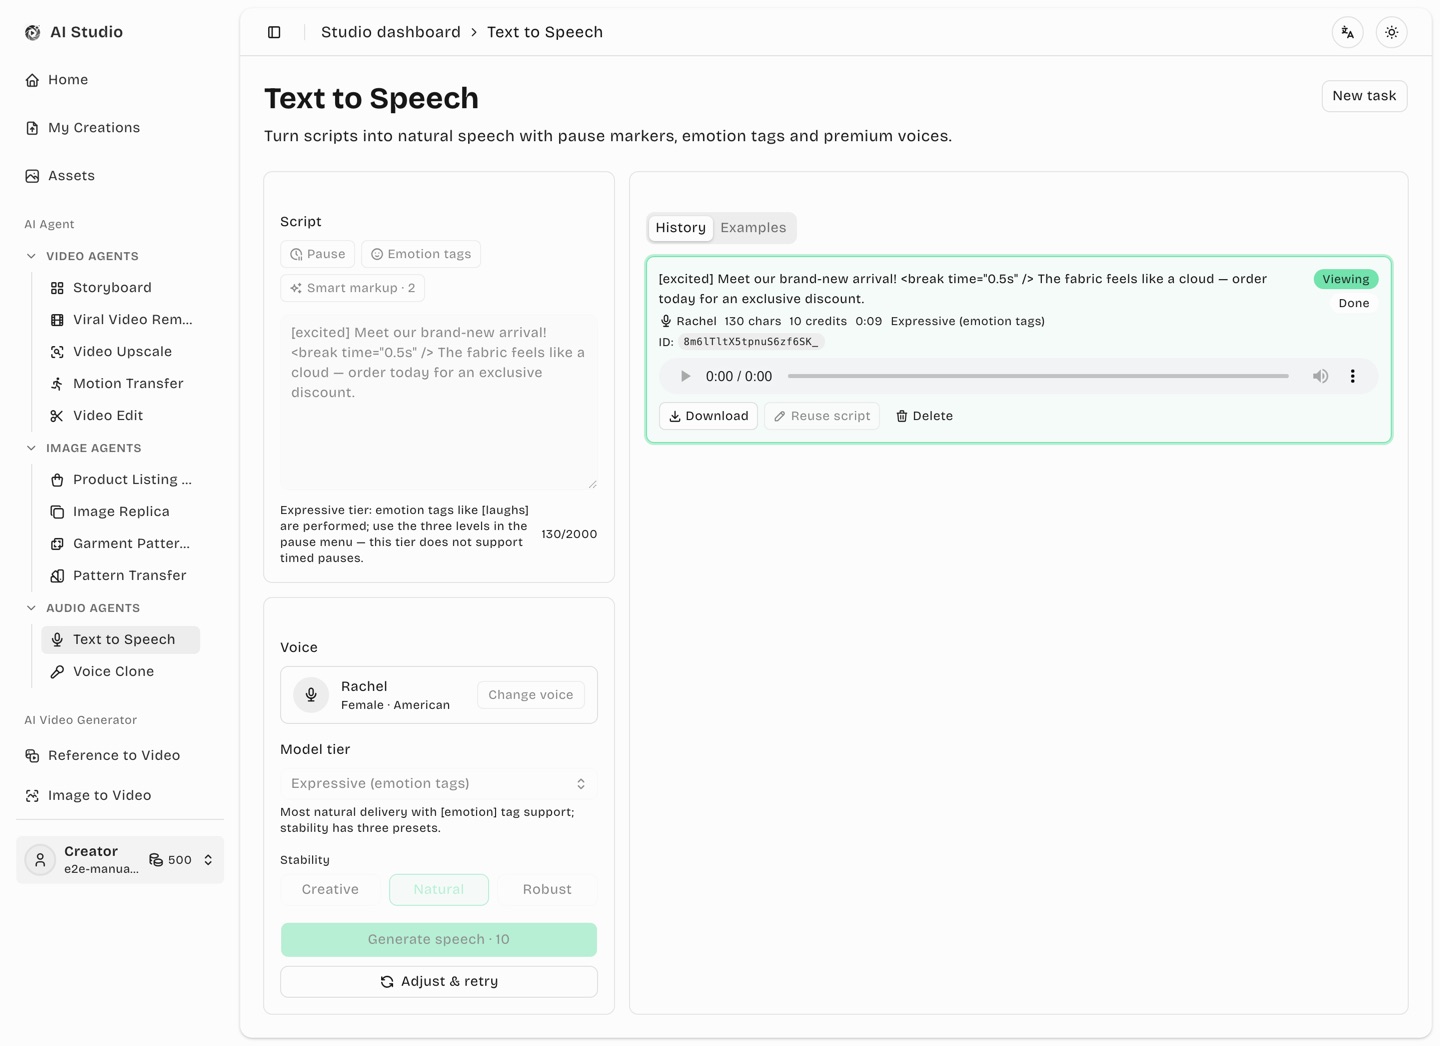
Text to Speech: type a script, pick a curated voice and a model tier, and synthesize natural spoken audio — with pause markers, emotion tags (Expressive tier) and AI script polish.
Motion Transfer: upload one character photo plus one motion video and the subject in the photo (a person or a pet) performs the video's motion — optionally in the video's own setting.
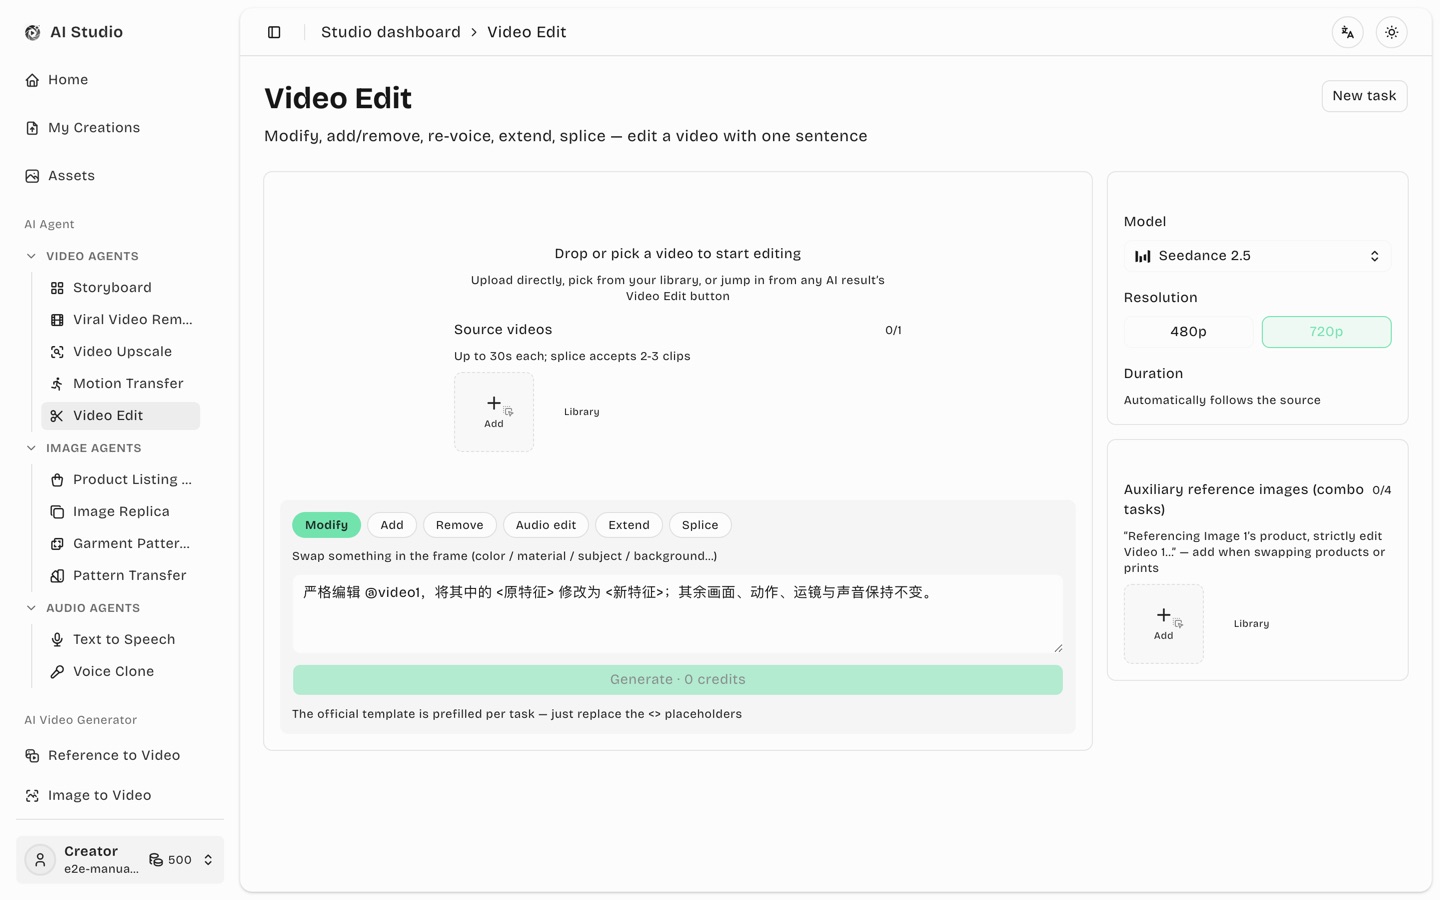
Video Edit: modify / add / remove elements, edit sound, extend and splice an existing video — upload it or bring it in from any result card, then describe the change in one sentence.
Batch Video Remake (Batch Production): one viral reference video + character / scene photos + the product images of a batch of same-style SKUs — one click renders a matching video per SKU with no interaction after launch.
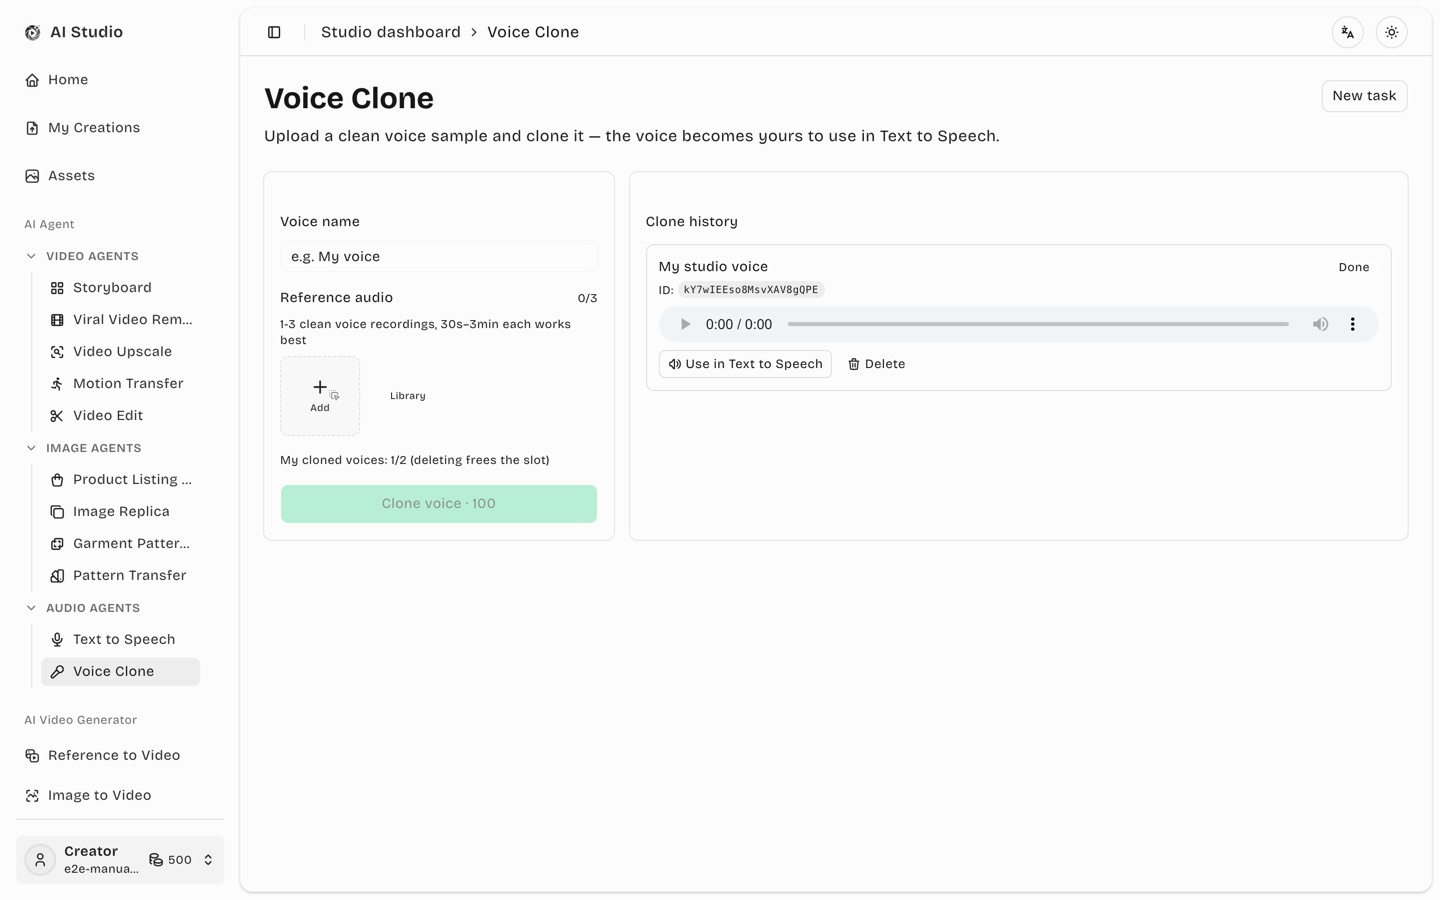
Voice Clone: upload 1–3 clean reference recordings and clone your own voice, then pick it right inside Text to Speech (visible to you only).
Viral Video Remake: upload a viral reference video; AI analyses its camera work and voice-over rhythm, swaps in your own character / product / scene, re-renders segment by segment, and stitches the final cut.
Video Upscale: turn low-resolution footage into a sharp 720p–4K version.
Work & asset management: every result lands in My Creations, and everything you upload is kept in the asset library for reuse.
Quick start in three steps
Open the site, click Sign in in the top-right corner and register or sign in with an email address or Google.
Enter the Studio dashboard and pick a tool from the left menu (Text to Video, Text to Image, Storyboard, …).
Add reference materials by clicking Add, reusing from the Library, or simply dragging files from your desktop onto the material area (the zone highlights; mismatched types are skipped with a notice).
Write your prompt, choose a model and parameters, then click Generate. Credits are charged when you submit; the result appears in the preview panel and can be downloaded.
Tip: the top-right corner switches between light / dark theme and English / 中文. All screenshots in this manual use the light theme with the English interface.
Version updates: After a new release, a notification appears in the top-right corner. Save any unsubmitted edits before choosing Refresh now; choosing Later dismisses that release for the current tab session.
2. Sign up & sign in
The sign-up page offers Sign up with code (default, passwordless) and Sign up with password; the sign-in page offers Sign in with password (default) and Sign in with code, with Google sign-in kept available.
2.1 Email sign-up and sign-in
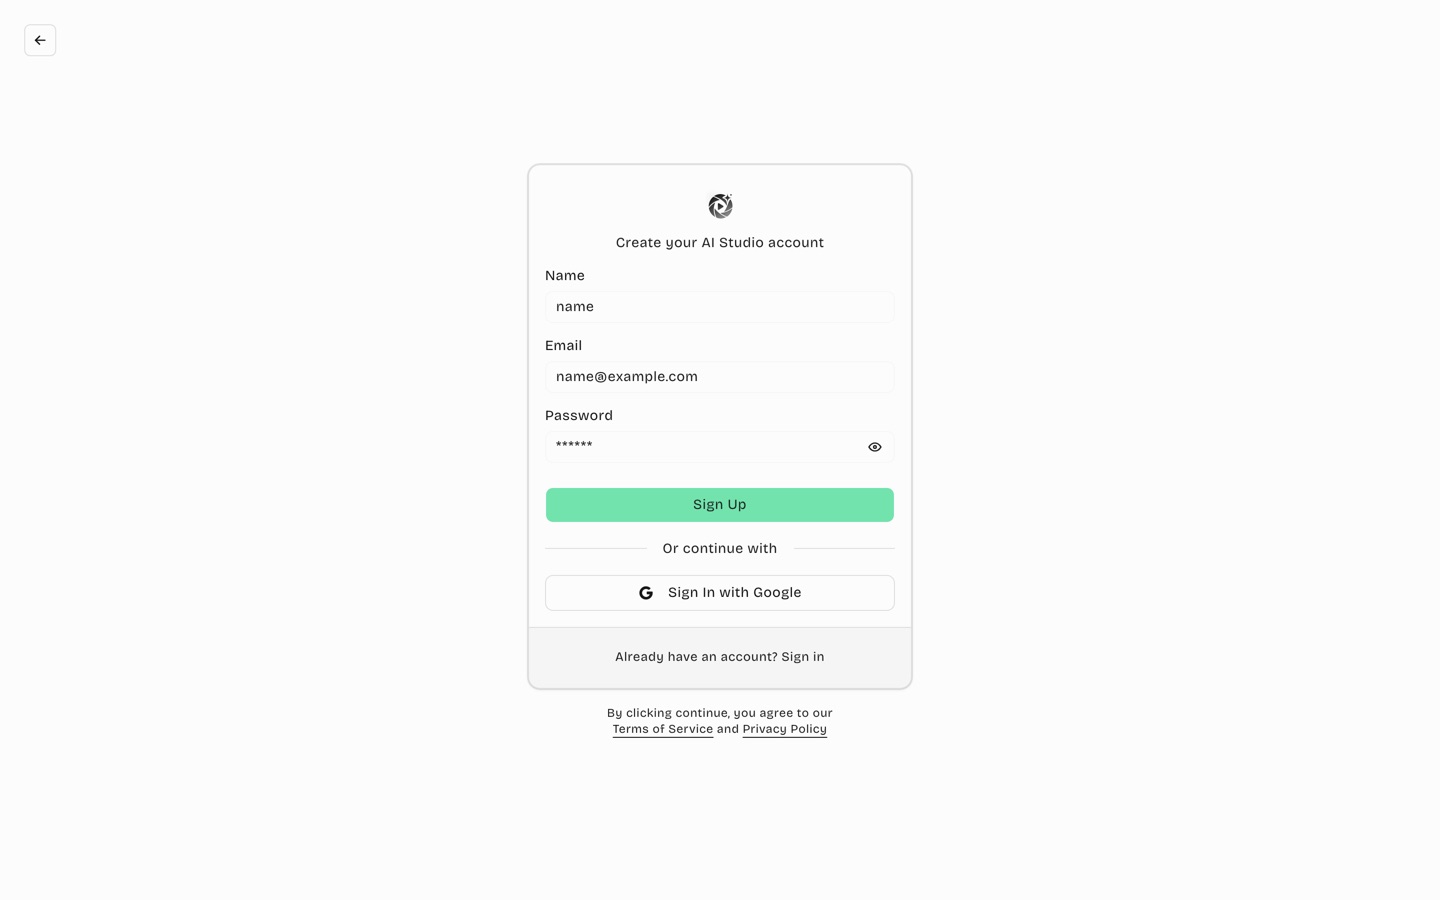
Figure 2-1 Sign-up page (code sign-up by default)
Sign up with a code (recommended, no password needed):
Stay on the Sign up with code tab, enter your email (name optional) and click Send code.
Open your inbox for the 6-digit code (valid for 5 minutes; resend after 60 seconds), enter it and click Create account & sign in.
Once the code checks out you are registered, verified and taken straight to the studio. Next time use the Sign in with code tab; if you ever want a password, set one via "Forgot password" on the sign-in page.
Sign-up and sign-in are kept separate: entering an already-registered email on the sign-up page shows "This email is already registered" with a Sign in with code button that carries the address to the sign-in page; entering an unregistered email on the sign-in page's code tab asks you to sign up first and offers Go to sign-up. No code is sent in either case and the daily send allowance is untouched.
Sign up with a password:
Switch to the Sign up with password tab, fill in name, email, password and confirm password (both entries must match), then submit.
A verification email is sent — open it and click the confirmation link; the original sign-up page then continues to the studio automatically (clicking the link on another device signs you in there as well).
Email verification is required: password accounts cannot enter the dashboard until verified. If the email is missing, check your spam folder. Codes and verification emails have a daily send limit per address.
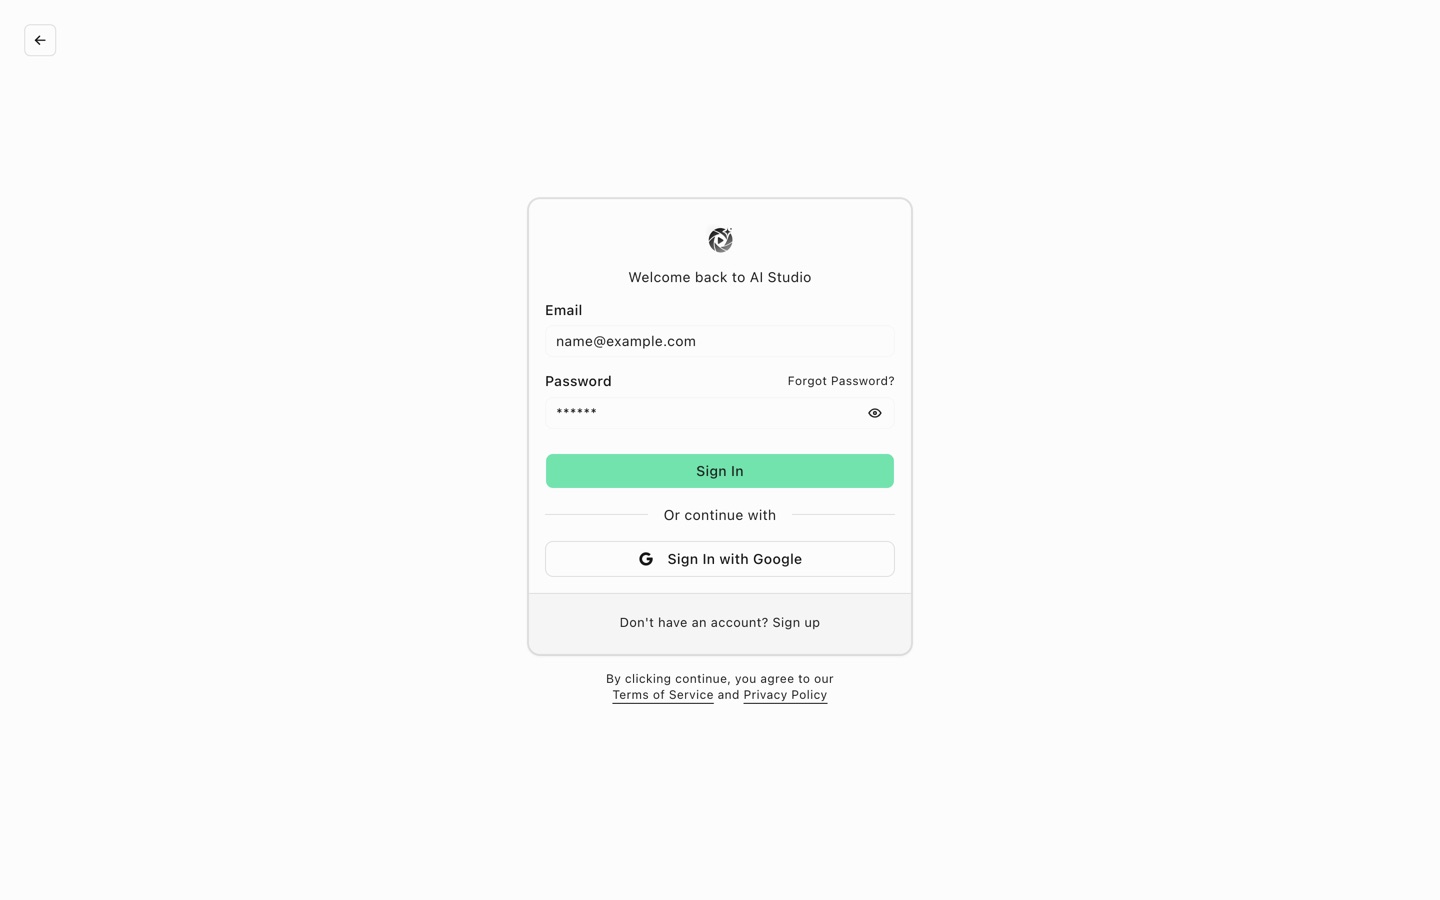
Figure 2-2 Email sign-in page
To sign in:
Open the sign-in page; the email/password form appears directly.
Enter your email and password; the eye icon toggles password visibility.
Click Sign in. Forgot your password? Use Forgot password? above the password field.
2.2 Sign in with Google
Click Sign in with Google and authorise the account in the Google consent screen.
Note: Google blocks sign-in inside embedded browsers (WeChat, QQ, TikTok and similar apps) — this is Google's own policy. The page will ask you to open the link in a system browser; copy it into Safari or Chrome, or use email sign-in instead.
3. Dashboard overview & navigation
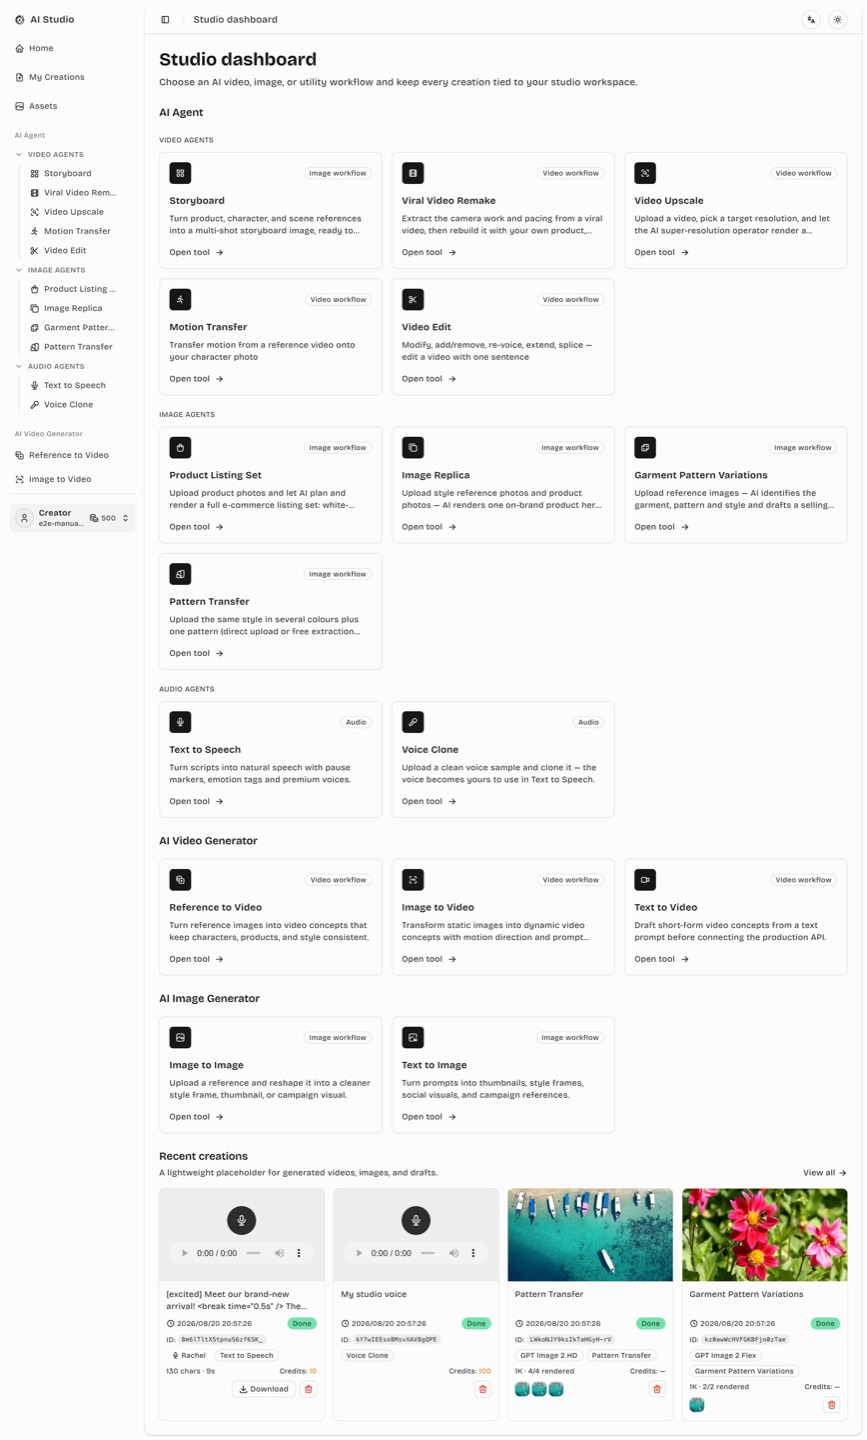
Every sign-in (email, phone code or Google) lands on the Studio dashboard: the tool menu on the left, your own data dashboard in the middle (balance, output, running tasks, spend and failures), recent work at the bottom. There are no tool cards any more — every tool is reached from the left menu.
Compact navigation: On desktop, the narrower left navigation leaves more room for the creation workspace. Collapse it to an icon rail whenever you want to focus on your work. Mobile drawer and existing collapse behaviour are unchanged.
Two-level AI Agents nav: the AI Agents menu group nests three collapsible media categories — Video Agents, Image Agents and Audio Agents — all expanded by default; click the chevron next to a category title to collapse or expand it. The category containing the page you're currently on always stays expanded so you never lose the active link. Audio Agents holds Text to Speech and Voice Clone (see chapter 16).
The unified “New task” button: every creation page carries a New task button in its top-right corner, named identically across the whole product. It clears the current form and returns you to a clean slate; if the form holds unsubmitted work you are asked to confirm first. While you are viewing a past task, the same button simply leaves view mode.
Figure 3-1 Studio dashboard home (data dashboard)
The data dashboard (since 2026-09-12)
The home page no longer lists tool cards — every tool lives in the left menu, and the home page shows your own numbers. Dark is the baseline theme and light is fully supported; the layout works on desktop and phones.
Block
What it shows
Credit balance
Current balance, credits spent in the last 7 days, the resulting daily burn and how many days remain at that pace (red under 7 days); Top up opens the pricing page. A member of a shared team pool sees "Team pool · master X" here instead and tops up through the master account.
7-day KPIs
Videos and images finished in the last 7 days (each with a 7-day sparkline) and the success rate (ok / failed counts).
In progress
How many tasks are queued or rendering plus the latest five; Open jumps straight to that task. While anything is running the dashboard refreshes every 30 seconds.
Daily output / Daily spend
Stacked videos + images per day and the credit-spend line; the 7 / 30 / 90 days toggle (default 30) switches these two charts and every card below them.
Where credits go
Spend share per module inside the window.
Model usage
Runs, average credits and average render time per video model inside the window.
Failures and refunds
Failed tasks, credits refunded and the top failure codes, each with a hint (timeout → already refunded, just retry; moderation → change the material or rewrite the prompt; vendor rejected → retry later or switch provider).
Quality and wizard
Thumbs up / down on finished videos, wizard drafts and rebated credits.
Asset library
Storage used against the quota and the asset count.
Batch remake
Batches in the window and the SKU completion rate (hidden only if an admin switched the module off for this account).
Team spend
A master account sees each member's spend in the window; a member sees a note that they are on the team pool.
Activity calendar
A GitHub-contribution-style heatmap of tasks per day over the last year: month labels on top, Mon / Wed / Fri on the left, the total for the year in the card header, darker cells mean more tasks, hover for the exact date and count; scrolls sideways inside the card on phones.
Time basis: every per-day figure is bucketed in Beijing time; data refreshes once a minute (every 30 seconds while a task is running). A brand-new account with no tasks yet sees a short onboarding empty state instead.
Left menu
Group
Category
Item
Purpose
—
—
Home / My Creations
Dashboard home (data dashboard); all generated work
AI Video
—
Reference to Video
Multiple reference images + prompt
Image to Video
A single image as the first frame
Text to Video
Prompt only
AI Image
—
Image to Image
Repaint an uploaded image
Text to Image
Prompt only
AI Agents
Video Agents
Storyboard
Storyboard-to-video pipeline for product videos
Viral Video Remake
Analyse a viral video and re-render it with your own subjects
Video Upscale
Upscale footage to 720p–4K
Motion Transfer
Transfer a reference video's motion onto a character photo
Video Edit
Modify / add / remove elements, re-voice, extend or splice an existing video
Image Agents
Product Listing Set
Plan and batch-render a full listing image set
Image Replica
Batch-replicate listing images from style references
Garment Pattern Variations
Split one pattern into several colour and motif variants
Pattern Transfer
Migrate one pattern onto several existing colour versions
Account area (bottom left): your name and credit balance. Click it to switch accounts or sign out.
Top right: language (EN / 中文) and theme (light / dark) switches.
Recent work: the dashboard home lists recent results; View all opens My Creations.
Tip: every tool is opened from the left menu; the dashboard cards are read-only statistics — Open in "In progress" jumps to that task, Top up goes to pricing and View all to My Creations.
4. How credits work
Generating images and videos consumes credits. Knowing the rules helps you plan your work.
Where credits come from
Where credits come from: new accounts receive a 50-credit sign-up bonus (since 2026-09-12; only the first account per sign-up IP gets it, shown as "Signup bonus" in billing), and further credits come from topping up.
Top-up purchase (launched 2026-08): open Pricing from the top navbar or the sidebar. Four one-time tiers are available: ¥250 for 5,000 credits, ¥500 for 10,500 (+500 bonus), ¥2,500 for 55,000 (+5,000 bonus), ¥5,000 for 115,000 (+15,000 bonus). Payment is currently by corporate bank transfer: click "Top up now" and contact 路易电商 (Louis E-commerce) as prompted, including your account email in the transfer note. Top-up credits never expire, and top-ups appear in the billing history.
How credits are spent
Every task shows its exact price on the submit button before you commit (for example “Generate · 200 credits”).
Credits are charged up front. If your known balance is too low, the paid action stays clickable and shows a dedicated “Insufficient generation credits” message without starting a task. The server checks again when you submit, so the same message also covers a balance changed in another tab.
The price depends on the model, resolution / quality, duration and number of reference images — higher settings cost more. The number on the button is always authoritative.
Automatic refunds: if a task fails or times out, the charge is refunded automatically and the refund appears in your billing history.
Team accounts (since 2026-09)
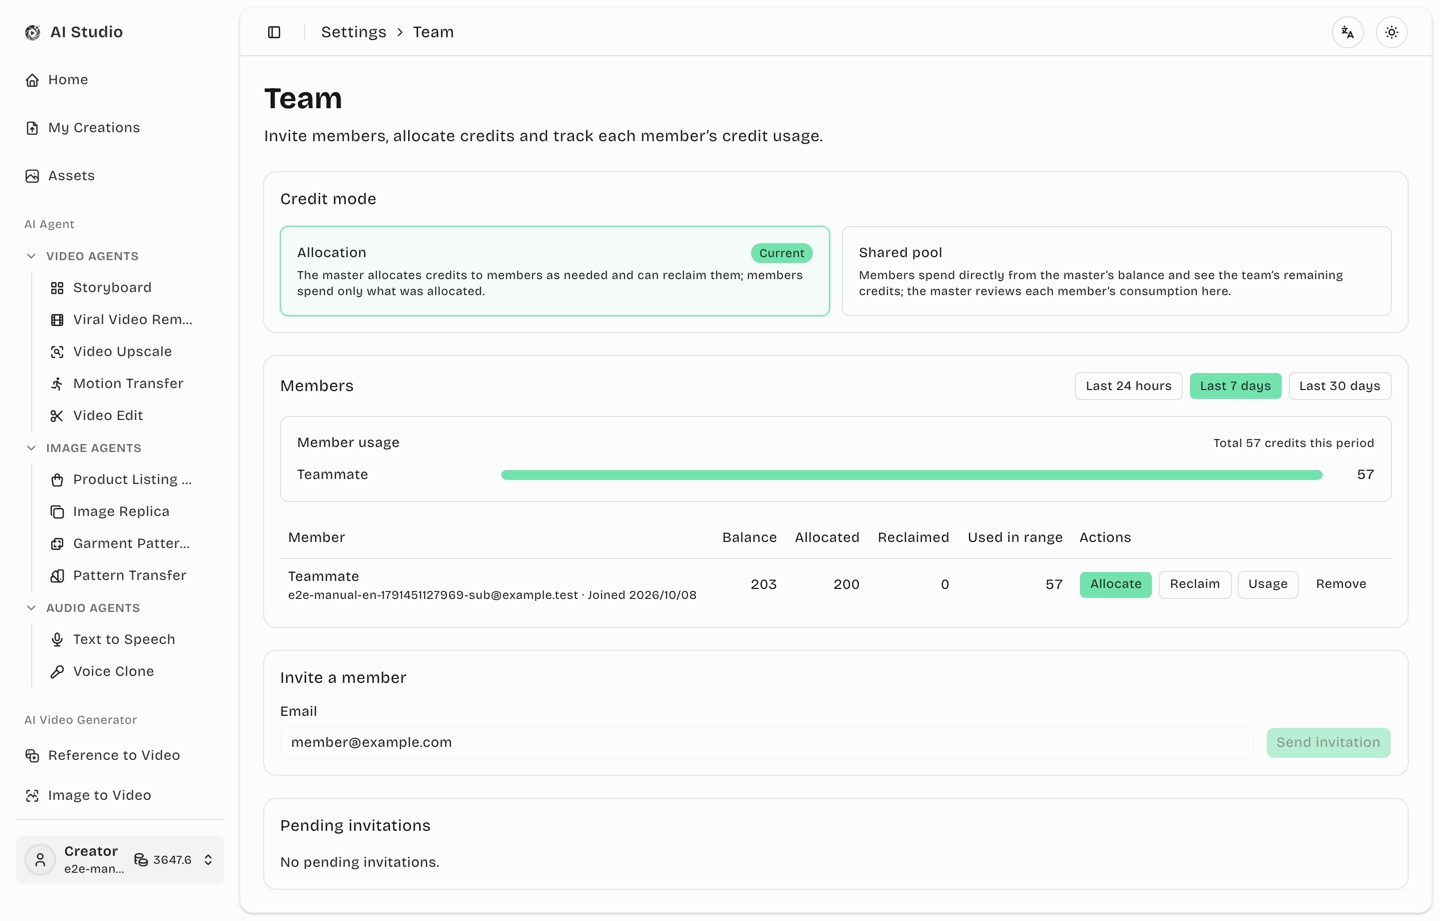
A company or team can top up one owner account and let several member accounts use those credits. Entry point: sidebar Settings › Team. There are two credit modes, chosen by the owner in the "Credit mode" card at the top of the Team page: Allocation (the owner allocates on demand and can reclaim) and Shared pool (members spend the owner's credits directly, since 2026-09-04).
Invite a member: on the Team page the owner enters the member's email and sends an invitation. The member receives an email; the page also shows a one-time invitation link you can copy and share directly (valid for 7 days — afterwards use "New link" or revoke it under pending invitations).
Accept: the member opens the link, signs in or signs up with the invited email address (email-code sign-up works without a password) and clicks "Join team". A member belongs to exactly one owner, and an owner cannot join another team as a member.
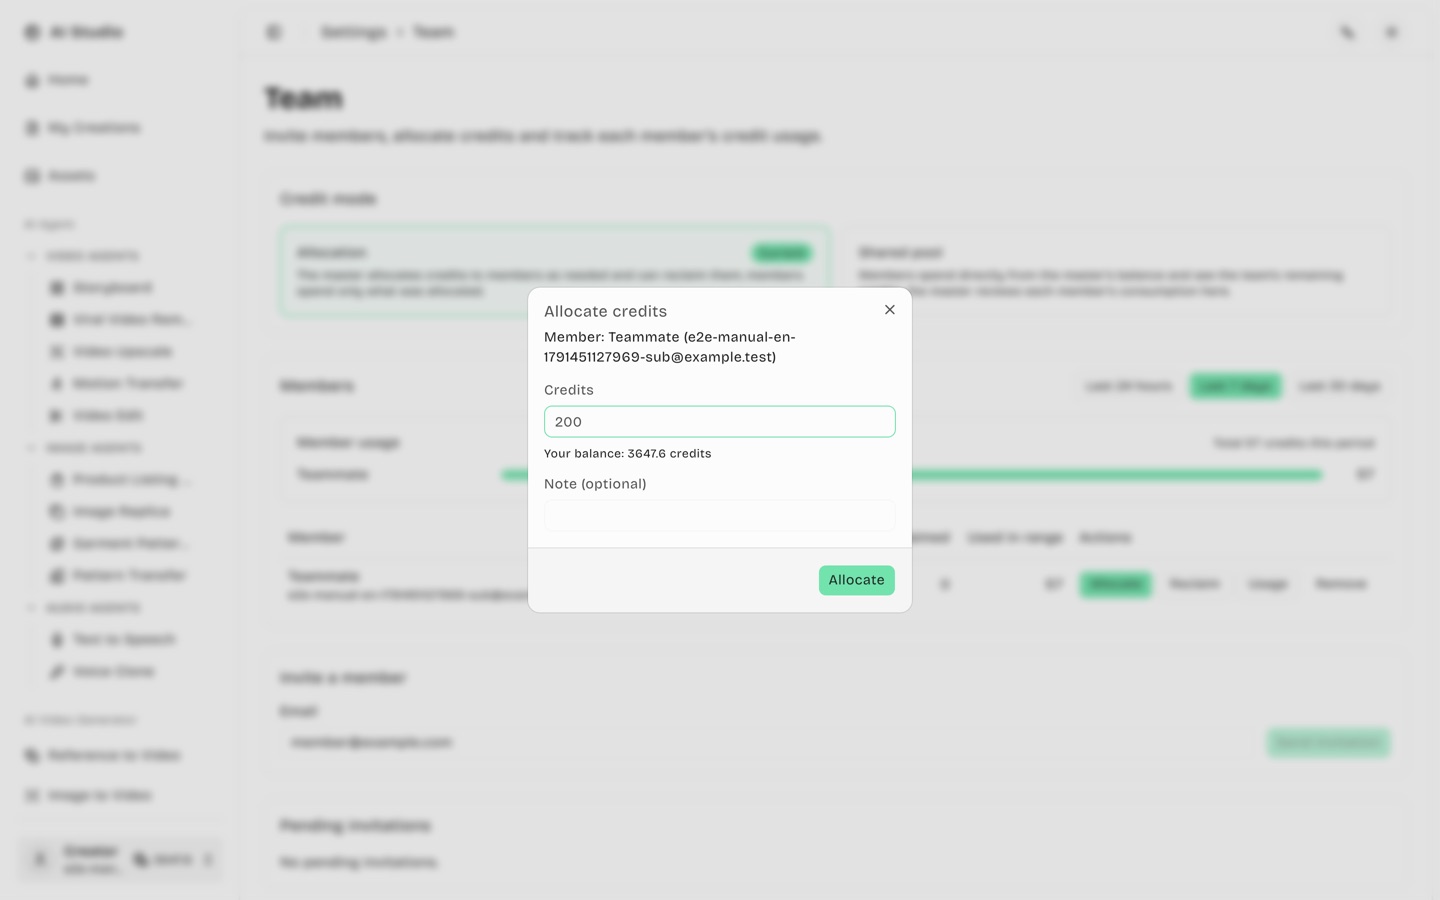
Allocate and reclaim: in the members table the owner allocates credits to a member (they land in the member's own balance) or reclaims what is unused. The reclaimable amount is the smaller of the member's current balance and the owner's net allocation, so sign-up bonuses and other credits that were never the owner's are never taken back.
Usage: a "Member usage" bar chart at the top of the members card ranks every member's consumption for the selected window; the owner can also review each member's credit usage over the last 24 hours / 7 days / 30 days — counted only from the moment the member joined the team, never earlier spending — the breakdown by module and the individual ledger entries (time, type, module, model, credits, balance). The owner never sees a member's creations: prompts, uploads and results stay private to the member.
Remove a member: removal automatically reclaims the member's reclaimable credits; the account becomes a regular account again and the ledger history is kept.
Shared-pool mode: once switched, members no longer need allocations — their spending is charged to the owner's balance; a member's balance reads "Team credits · master X" and shows the team's remaining credits; the owner sees each member's consumption on the Team page, and ledger rows for members' spending name who spent. Switching to the shared pool leaves credits already allocated frozen with the members; switching back to allocation makes members use their own balance immediately. When the pool runs out, members see "The team's credit pool is insufficient. Ask the master to top up."
Figure 4-1 Team page: members table, invitation form and pending invitationsFigure 4-2 Allocating credits to a member
For members: members cannot top up themselves — the pricing and billing pages show "contact your team owner" instead of a top-up button, and the billing page gains a "My team" card: the owner and transfer history under allocation, or the shared-pool explanation under the shared pool.
Processing time and timeouts
Type
Maximum wait
Notes
Image
10 minutes
One limit for every image model (including GPT Image 2 Flex)
Video
~17 minutes
Tasks past the limit fail and are refunded
Viral Video Remake · analysis
8 minutes
The AI shot-analysis stage
Video Upscale
Minutes to hours
Scales with duration / frame rate / target resolution; the UI shows a live estimate
Note: you can leave the page while a task runs — it keeps going in the background and shows its latest state when you come back.
5. AI video generation
Three modes share one interface: Text to Video, Image to Video and Reference to Video. Switch between them from the left menu.
5.1 Text to Video
Generate a short video from a written description — ideal for drafting ideas quickly.
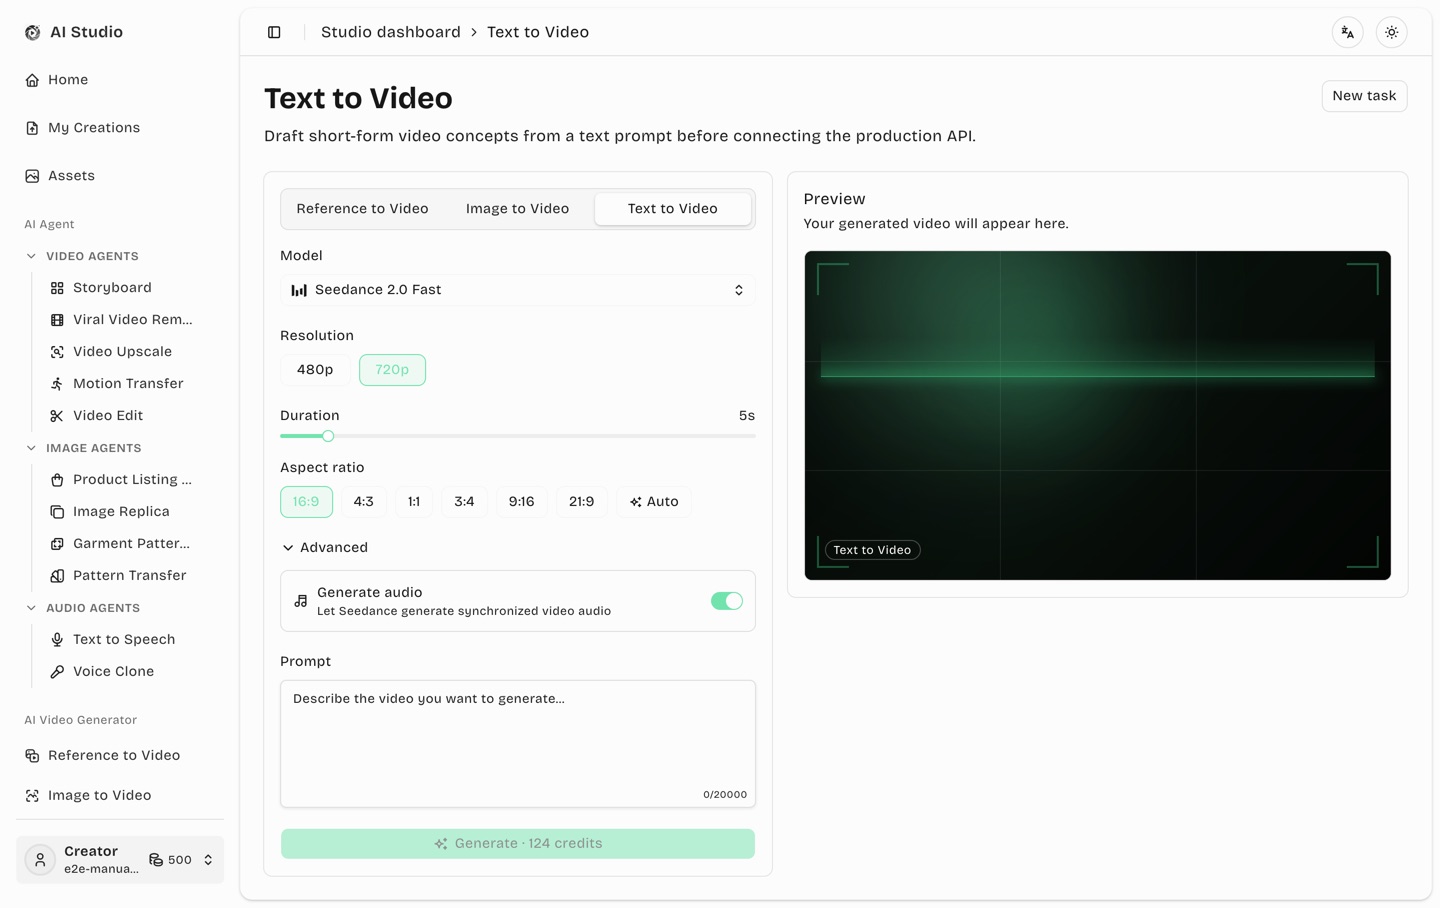
Figure 5-1 Text to Video workspace
Open Text to Video from the left menu.
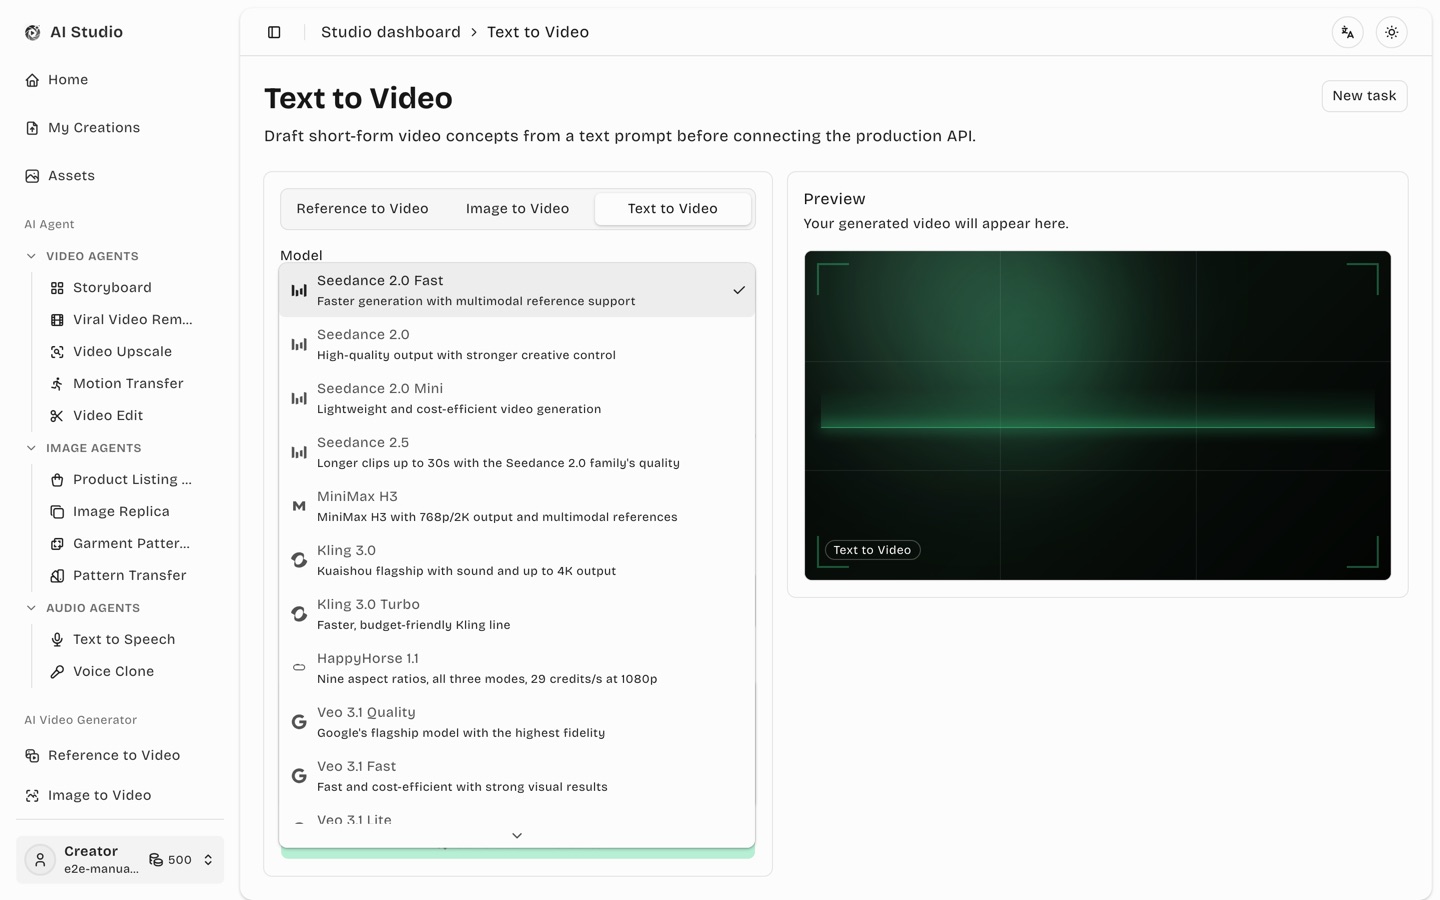
Model: pick a video model from the dropdown (see 5.4). Each entry carries its brand icon.
Resolution: 480p / 720p and so on, depending on the model.
Duration: drag the slider or click a duration button.
Aspect ratio: 16:9, 9:16, 1:1 and others.
Advanced: expand for the audio toggle and, on some models, a random seed.
Prompt: describe the shot, camera movement, lighting and mood.
Check the price on Generate · N credits and submit.
Figure 5-2 Video model dropdown
5.2 Image to Video
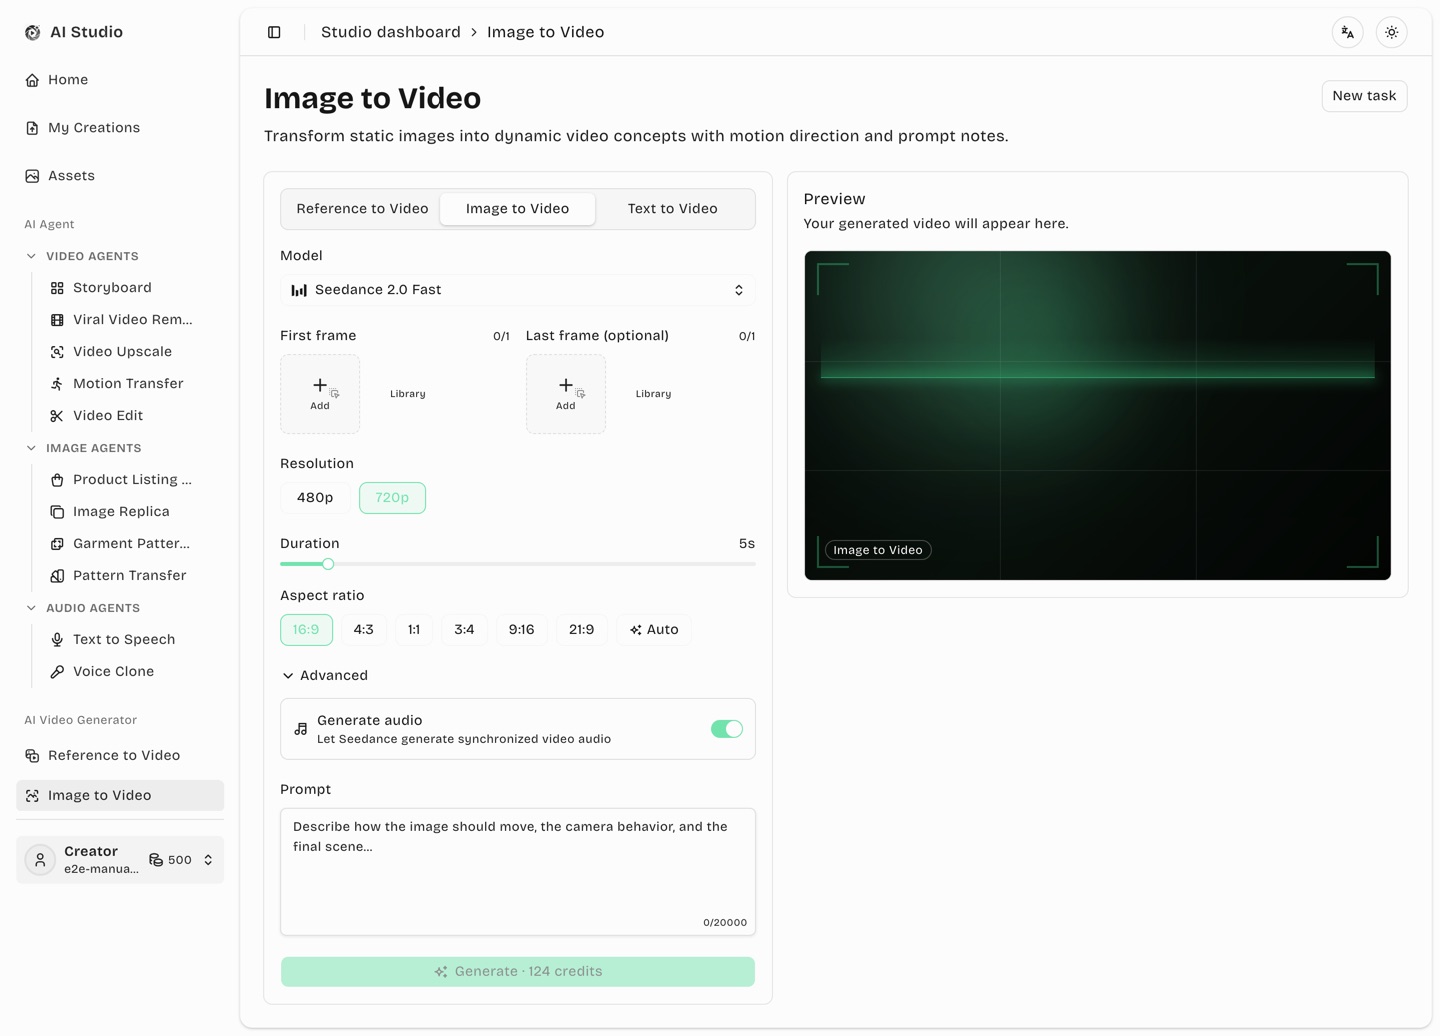
Upload one image as the first frame and let AI bring it to life.
Figure 5-3 Image to Video workspace
Open Image to Video.
Click Add in the first frame slot to upload, or Library to reuse something you uploaded before.
Some models also accept a last frame; single-frame models only show the first slot.
Set model, resolution, duration and aspect ratio.
Describe the motion you want (“slow push-in”, “the subject turns their head slightly”).
Click Generate.
5.3 Reference to Video
Supply several reference images — plus reference video and audio — to keep a character, product or style consistent across a series.
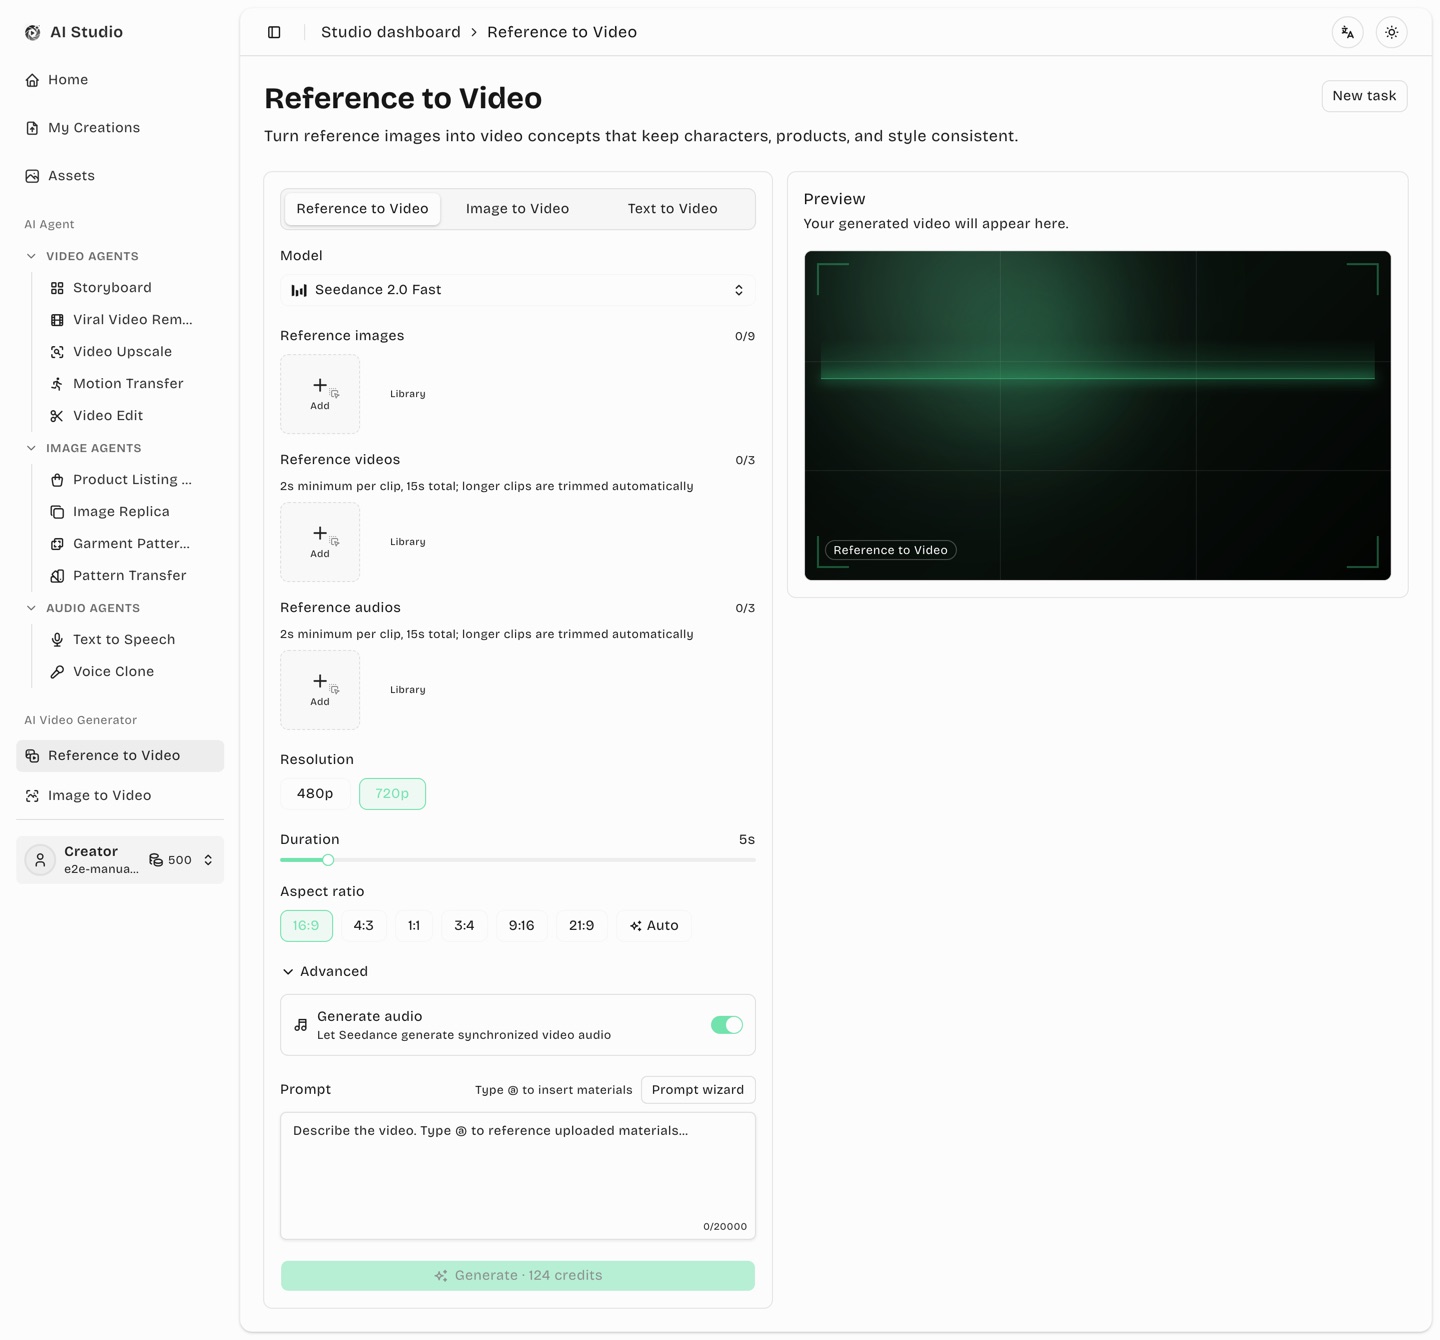
Figure 5-4 Reference to Video workspace
Open Reference to Video.
Upload material into the reference image / video / audio groups. Each group header shows its quota (for example “0/9”), which varies by model. Hovering the reference-image upload area floats the Reference image tips guide (good images get green checks / bad ones red crosses: clean backgrounds, real model shots, close-up details, one-angle-per-image, showing the real size and a brand-text close-up work best; collages/grids, promo-text or watermark overlays, picture-in-picture shots, tiny cluttered products, mixed variants and low-res blurry shots make the model guess and mismatch your product; for people use one frontal portrait plus an optional full-body shot — never a multi-view sheet, and keep other people's clear faces out of worn shots) — it shows on every hover; on touch devices use the Image tips entry beside the group title.
Type @ in the prompt to open the list of uploaded material; picking one inserts a mention chip that refers to that exact asset.
Set the model and parameters. For Seedance the generation route is scheduled automatically by the platform — nothing to choose. Then click Generate.
Tip:@ mentions let you write things like “@image 1 wears the jacket from @image 3”, so the model knows precisely which asset you mean.
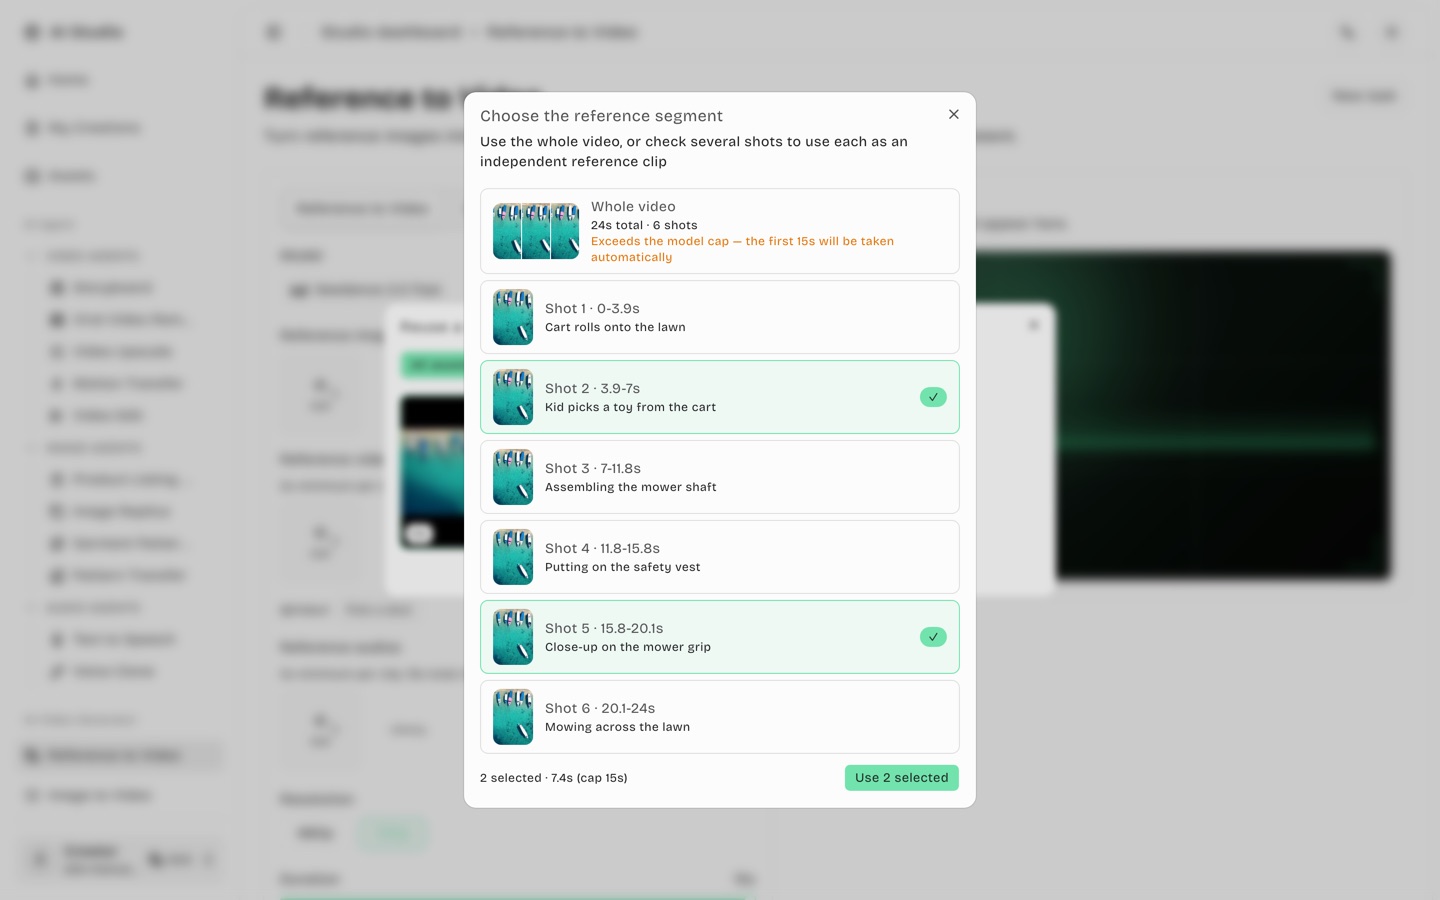
Shot picker (pick reference segments by shot): uploading a reference video opens a selection flow right away: “Detecting shots…” first (skippable — just use the whole video), then choose the whole video (its row shows a three-frame strip, total length and shot count; over-long sources are auto-trimmed to the model’s first 15/30s, called out with a highlighted note) or check several shots — each selected shot becomes an independent reference clip (they are not spliced together), priced by its own seconds. Two caps guard the selection: the total selected duration cannot exceed the model’s per-clip cap (15/30s), and the count cannot exceed the remaining reference-video slots — you’ll be warned when no more can be added. Shots under 2s (the model's reference minimum) are merged into their neighbors automatically. After confirming, the material group shows “N shots selected” with Re-pick shots and a ✕ to restore the whole video; if detection fails or the video is a single shot, the flow continues with the whole video automatically.
Figure 5-5 Choosing the reference segment: whole video or several shots
Duration follows the reference: in Reference to Video the Duration slider automatically follows the total seconds of the reference video (or the selected shots) — no dragging needed; once you move it by hand it stops following. Re-picking shots or restoring the whole video recalculates from the new total.
View and “Adjust & retry” keep the shots: opening a past task shows the reference-video group as “Shot N · start-end s” entries exactly as submitted; after Adjust & retry the shots stay — they never fall back to the whole video. Shot detection does not re-run on its own: only Re-pick shots detects once, the dialog’s whole-video row shows the source’s real length, and the shot list starts unchecked (a clean start; confirming replaces the set, cancelling keeps the current shots).
5.3+ Prompt wizard (Seedance family)
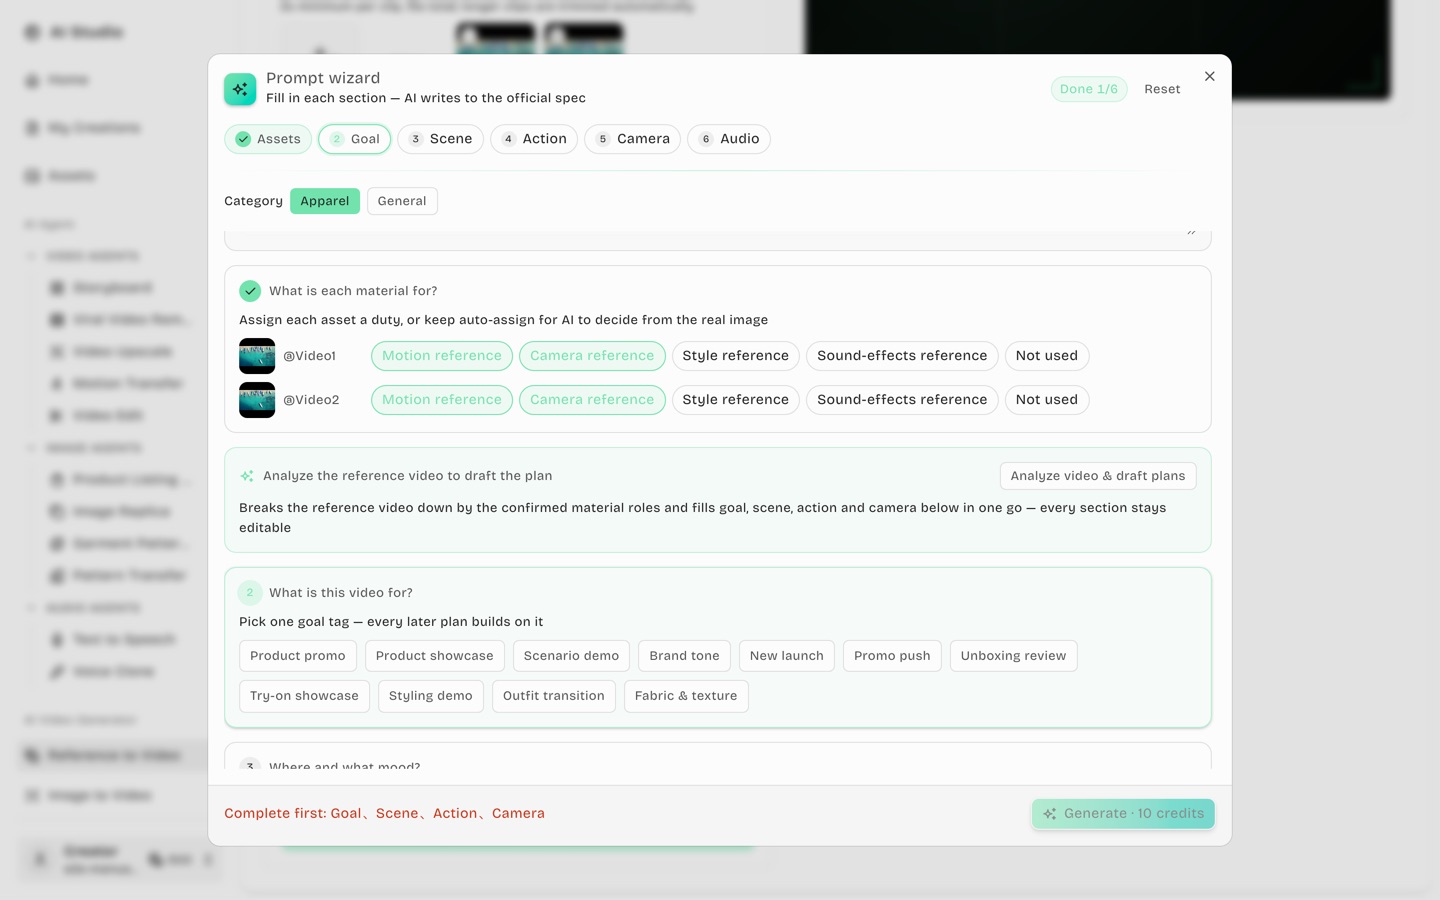
Not sure how to write a video prompt? In Reference to Video with a Seedance-family model or MiniMax H3 selected, a Prompt wizard button appears beside the prompt box (for H3 the draft follows its official English six-section format) (not offered in Image/Text to Video for now). The wizard supports category switching (Apparel and General at launch, Apparel default; media analysis detects the category automatically and never overrides a manual pick) — detail-mining vocabulary and suggested actions adapt per category, with more categories to come. It is a single-page form: an editable analysis card plus six sections (asset roles → goal → scene & mood → subject & action → camera & rhythm → audio) on one screen, always visible and editable. A progress rail on top lights up completed sections, highlights the suggested next one, and jumps on click; fill them in and generate a structured prompt following the selected model's official prompt guide. Closing and reopening keeps your input; Reset clears it.
Figure 5-6 Prompt wizard: asset roles and the one-click analysis card
Every step offers suggested options plus free-form input. When images are uploaded, the wizard first runs a free AI media analysis (product, selling points, audience); suggestions come from it, and the analysed product/selling points/audience prefill the editable card on top — one edit makes it the authoritative fact, and edits ride into the drafting call.
The asset-roles section assigns a purpose to each image/video: single-select for images (product reference, subject reference, …; the default “Auto-assign” lets the AI pick roles from what each image actually shows — the reference images are attached to the drafting call). Videos are multi-select and come pre-checked as “Motion reference + Camera reference” (leave it and the source is mirrored shot by shot); a video marked style-reference only is not shot-mirrored — only its mood and pacing are borrowed. You can also explicitly mark an asset as “Not used”. Every role actually takes effect in the final prompt: first frame = shot 1 starts from that image, last frame = the final shot settles on it, props are reproduced as pictured and actually used in the action, identity photos contribute face/hair/build only (wardrobe from product refs), scene images strictly define the environment.
With a reference video: one-click analysis. Once the roles are confirmed, a “Analyze the reference video to draft the plan” card sits between the assets and goal sections (it waits while the media analysis is still running, then becomes clickable). One click breaks the video down by the confirmed roles and fills in at once the goal tag, the scene & mood (the source environment is restored when no scene image is given; with a “Scene & style reference” image it describes that image instead), the per-shot action plan and the camera plan — every section stays editable, and you can regenerate. With several selected shots (up to 3), the wizard joins them in order into one reference timeline and analyses segment by segment with source labels such as “4-8s (video 2): …”. The breakdown only restores the source; drafting then swaps the source’s people and objects for your subject and product — the source cast’s wardrobe is never copied, and every shot restates the product’s colours and structure. A static display shot of the source product is not mirrored — only its framing is borrowed and the displayed items are rewritten from your product images, without forcing a product image as the first frame (the shot picker flags such shots and suggests leaving them unchecked). With a reference video, assign at least one image as Product reference; the wizard reminds you when none is set. For brand lettering, upload a lettering image and assign it the Logo-reference role (the wizard prompts you automatically; lightweight models are unreliable at letters — use 2.5 or 2.0 Standard). Below the Audio section, a free-form Extra-requirements box takes anything else and the draft fulfils every item. Product-swap mode: when the source is detected as a same-category product demo, the shot picker opens in swap mode — pick one contiguous span (4-30s, Seedance 2.5) and the result keeps the source people, motion, camera and cuts while swapping the objects for your product; the wizard maps source objects one by one (replace / remove / keep) instead of reskinning them. The breakdown also writes an identity card from the subject-reference image (including how the hair looks from behind), and after linting the draft gets a mechanical "Identity lock · top priority" block: one subject throughout, every angle follows the subject image, back shots keep that hairstyle as seen from behind, people in the reference video and product images are only motion sources or mannequins, restated on every turning shot; the block is visible and editable in the draft (not added in product-swap mode or with H3).
Without a reference video: serial cascade. Pick a goal, generate scene & tone ideas (matched to the goal and product), confirm the scene, then the AI drafts three complete timestamped action plans designed inside that scene (choose one, editable), and finally derives three camera schemes from the chosen action — each step builds on the previous confirmation. Assigning an image the “Scene & style reference” role makes the shooting environment strictly follow that image. The Scene / Action / Camera and Audio sections each carry a notes-then-generate bar (“Section notes” input with the generate button beside it; Enter also generates): state your constraints before generating (e.g. “must include an unboxing moment”) and the plans are designed around them from the start; edit the notes and hit Regenerate (or Enter) to redraft.
The audio section decides the clip's sound design: pick Voice-over to generate three per-shot, time-segmented VO scripts (lines in curly braces, pacing matched to each shot's length, product facts drawn only from your confirmed product info; the VO language is selectable — 中文, English, Español, 日本語, ไทย, Bahasa Melayu — defaulting to the site language); or Music only for three per-segment music plans; with a reference video you can also pick Follow source audio. Choose one of three and keep editing; the final prompt embeds the lines per shot in the official curly-brace syntax, or writes the music into each shot's audio slot. Leave it unselected to add no audio constraint. Note: the sound design only takes effect when the Generate audio toggle is on.
Click Generate prompt (10 credits per generation, fully auto-refunded when you apply it and submit a video render within 24 hours — effectively free when used here; the questions, media analysis and video analysis are free). The result is editable, and Apply fills it into the prompt box — asset references become mention chips, and everything downstream works exactly like a hand-written prompt.
Prompt health check and Fix all. A "Prompt health check" panel appears under the draft: every asset referenced, no missing or "not used" assets cited, product shots spelling out colour/material, no "toddler/blogger"-style aliases replacing the defined subject, time segments covering the full duration, voice-over length fitting the duration, and no render parameters such as 4K/16:9 in the body. All-green means it passed; otherwise each finding is listed — edit the text directly (re-checked as you type) or click "Fix all · 10 credits" to patch only the named items while everything else (including your edits) stays verbatim; no charge if nothing could be improved (rebated once applied and rendered). The server runs the same check plus one or two patch rounds during generation.
Video feedback. Under every successful result: "Did this video meet your expectations? 👍 👎" — 👍 submits at once, 👎 lets you tick what went wrong (product looks wrong / person changes / wrong action, camera or scene / voice-over or audio / subtitles or watermark / quality or distortion / pacing) and add a note, editable any time. It never affects the task or credits; feedback is linked to the wizard recipe you used and drives the next round of wizard and prompt improvements.
Note: the wizard writes per model dialect — Seedance 2.0 uses “Shot 1/2/3” organisation with the official constraint tail; Seedance 2.5 only uses timestamps when you supplied a time allocation yourself (e.g. “0-3s close-up”) or a reference video is attached. The fee appears in Billing as its own “Video prompt wizard” line.
5.4 Video model reference
Model
Strengths
Modes
Seedance 2.0 / Fast / Mini
Best all-round value, fast
Text / Image / Reference
Seedance 2.5
Newer Seedance generation, 480p/720p
Text / Image / Reference
Kling 3.0
Optional audio, supports element references
Text / Image / Reference
Kling 3.0 Turbo
The value Kling tier, faster turnaround
Text / Image
MiniMax H3
High-quality motion and multimodal reference control
Text / Image / Reference
Veo 3.1 Quality / Fast / Lite
High fidelity, from Google
Text / Image / Reference
Gemini Omni
Multimodal reference generation
Reference
HappyHorse 1.1
From Alibaba, with nine selectable aspect ratios
Text / Image / Reference
Seedance 2.5 parameters: resolution is 480p or 720p only (no 1080p/4K), with a 4–30 second duration and the same 9-image / 3-video / 3-audio reference budget as the 2.0 trio. Text to Video always generates audio for this model — the audio switch is locked on and cannot be turned off; Image to Video and Reference to Video keep the normal toggle.
Seedance 2.5 pricing: without a reference video, 28 credits/second at 480p or 63 at 720p. Attaching a reference video drops the rate to 17 or 38 credits/second, plus that reference video's own whole seconds. The Seedance family's generation route is scheduled automatically by the platform. Seedance 2.5 is available in the standard Video workspace, Storyboard and Viral Video Remake.
Kling 3.0 parameters: 720p / 1080p / 4K, ratios 16:9 / 9:16 / 1:1, and a 3–15 second duration (5 by default). Audio can be toggled. Image to Video takes a first frame plus an optional last frame. Reference to Video uses named "elements" rather than a flat reference pool: define up to 3 elements, give each an English name and upload 2–4 photos, then reference every one of them in the prompt with @name — an element you never mention has no effect, and submission is blocked with a reminder.
Kling 3.0 pricing: with audio off, 14 credits/second at 720p and 18 at 1080p; with audio on, 20 credits/second at 720p and 27 at 1080p; 4K is a flat 67 credits/second regardless of audio. Kling 3.0 Turbo is the value tier: 720p / 1080p only, no audio toggle, first frame only for Image to Video, at 18 credits/second (720p) and 22.5 (1080p). Both are available in the standard Video workspace only.
MiniMax H3 parameters: 768P by default with optional 2K, and a 4–15 second duration. Text to Video supports 21:9 / 16:9 / 4:3 / 1:1 / 3:4 / 9:16; Image to Video derives its ratio from the first frame (and optional last frame); Reference to Video also offers Auto (adaptive). Reference mode accepts up to 9 images, 3 videos and 3 audio files. Audio cannot be the only input — include at least one image or video.
MiniMax H3 pricing: 8 credits/second at 768P and 13 credits/second at 2K (lowered again on 2026-08-31). Output duration and every reference video's whole seconds are charged at the selected resolution. The first five reference images add no input fee; images 6–9 add 4 credits each; reference audio adds no input fee. The platform chooses and freezes the generation route for each task, without changing your model controls or price. MiniMax H3 is available in the standard Video workspace only — it left Storyboard and Viral Video Remake in August 2026; use the Seedance family there instead.
Seedance generation route: scheduled automatically by the platform — there is nothing to choose. Small capability differences between routes (an always-on audio route shows no audio switch; ratio options may vary slightly) render automatically in the form. A submitted task freezes its route; later scheduling changes never affect it.
Note: switching model filters the resolution, duration and aspect-ratio options down to what that model supports. Prices always follow the number on the submit button.
5.5 Viewing & downloading results
After submitting, the preview panel shows “Waiting / Generating” and then the finished video.
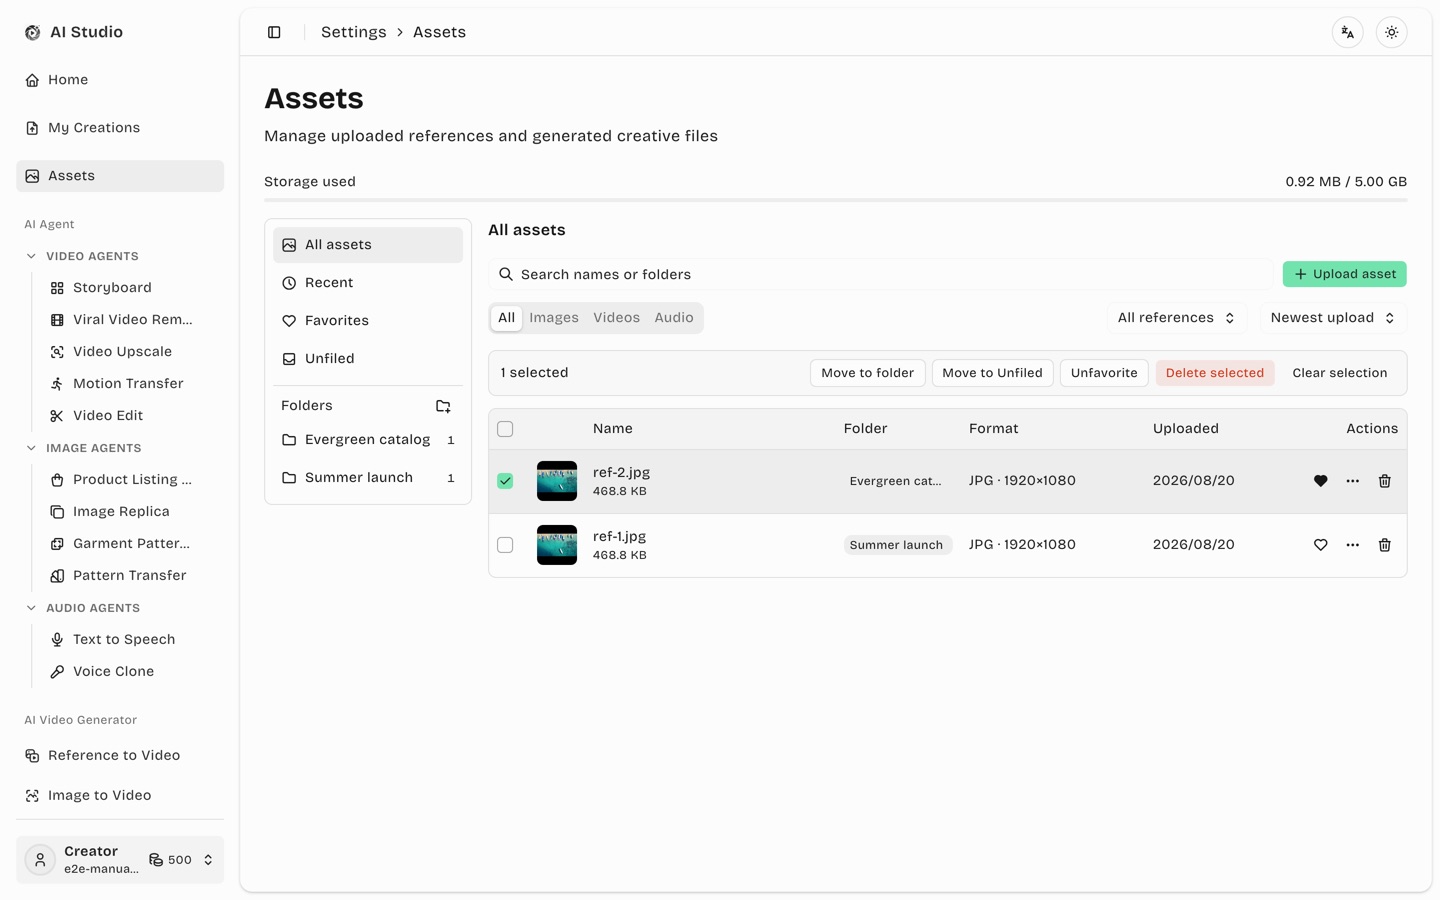
Click to play; use Download to save it locally, or Save to library to copy the finished video into your asset library (free; pick a folder when you have folders, and a repeat click reports it is already there). The copy can then be picked from the library in the video slots of Reference to Video, Video Remake, Motion Transfer and Batch Video Remake. Deleting the original task does not affect the saved copy.
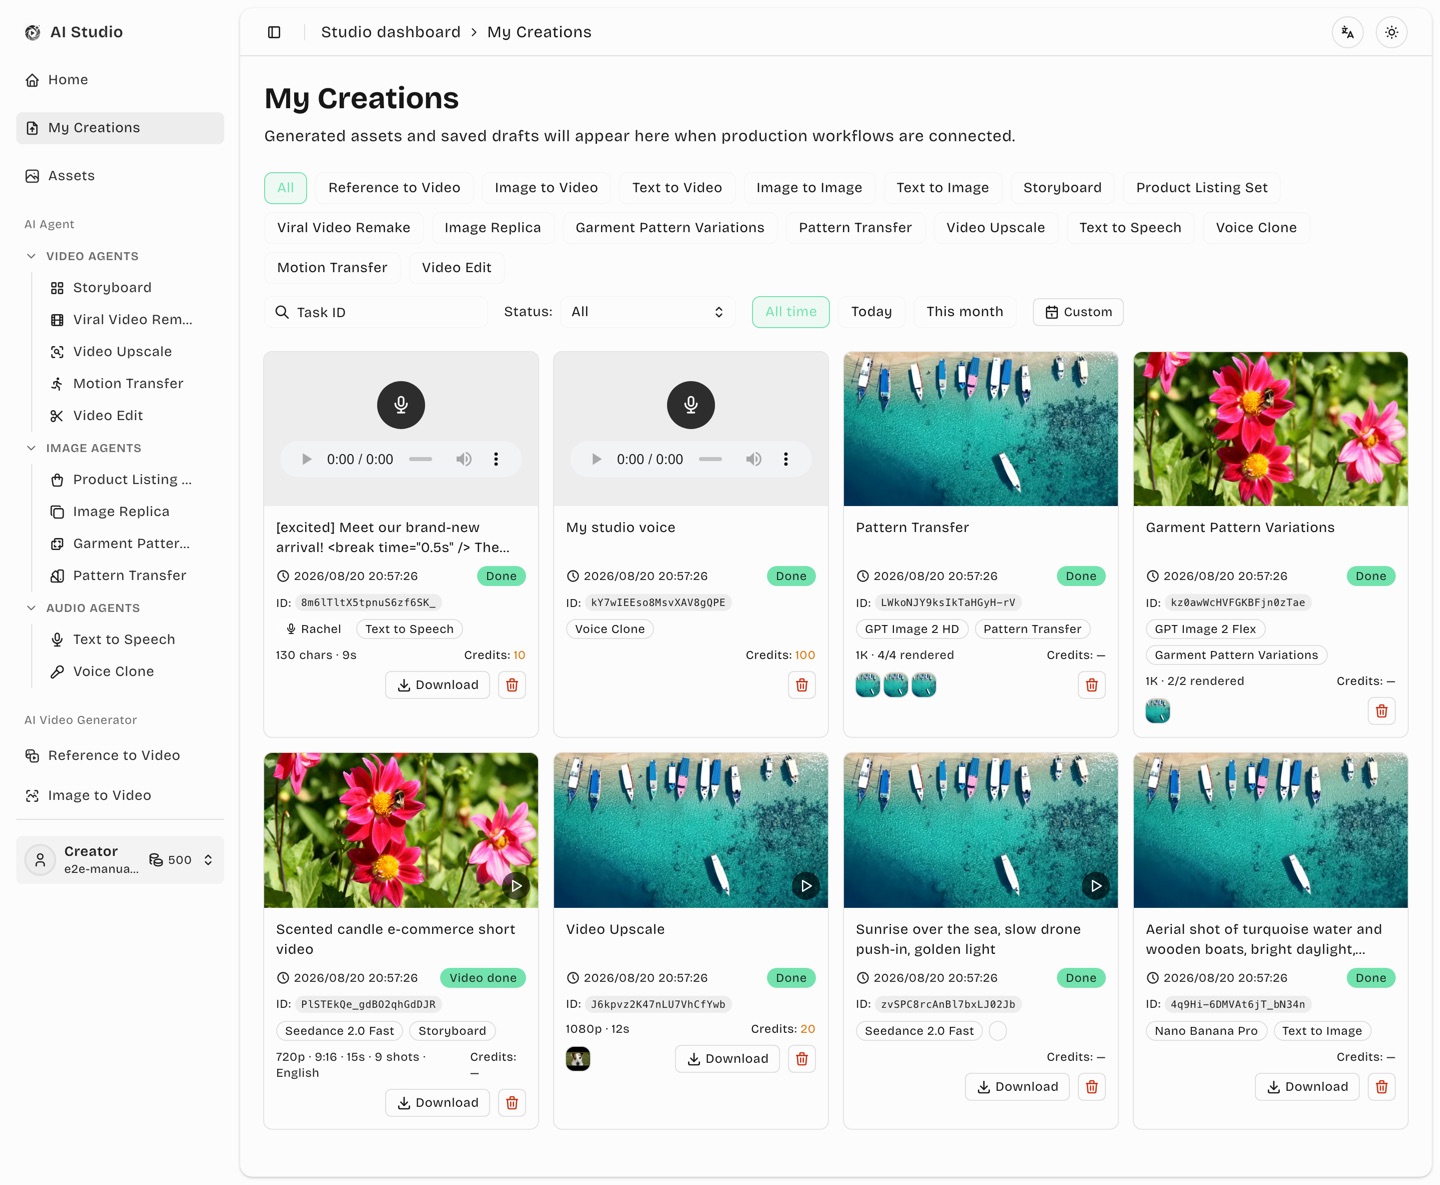
Every task also appears in My Creations (chapter 17) where you can reopen or retry it.
Adjust while it runs: as soon as a task is submitted, Adjust & retry appears in the current workspace. It keeps the same materials and parameters in an editable new-task form while the original keeps running. The adjustment itself is free; credits are charged only when you submit the new task.
6. AI image generation
Two modes share one interface: Text to Image (prompt only) and Image to Image (repaint an uploaded reference).
6.1 Text to Image
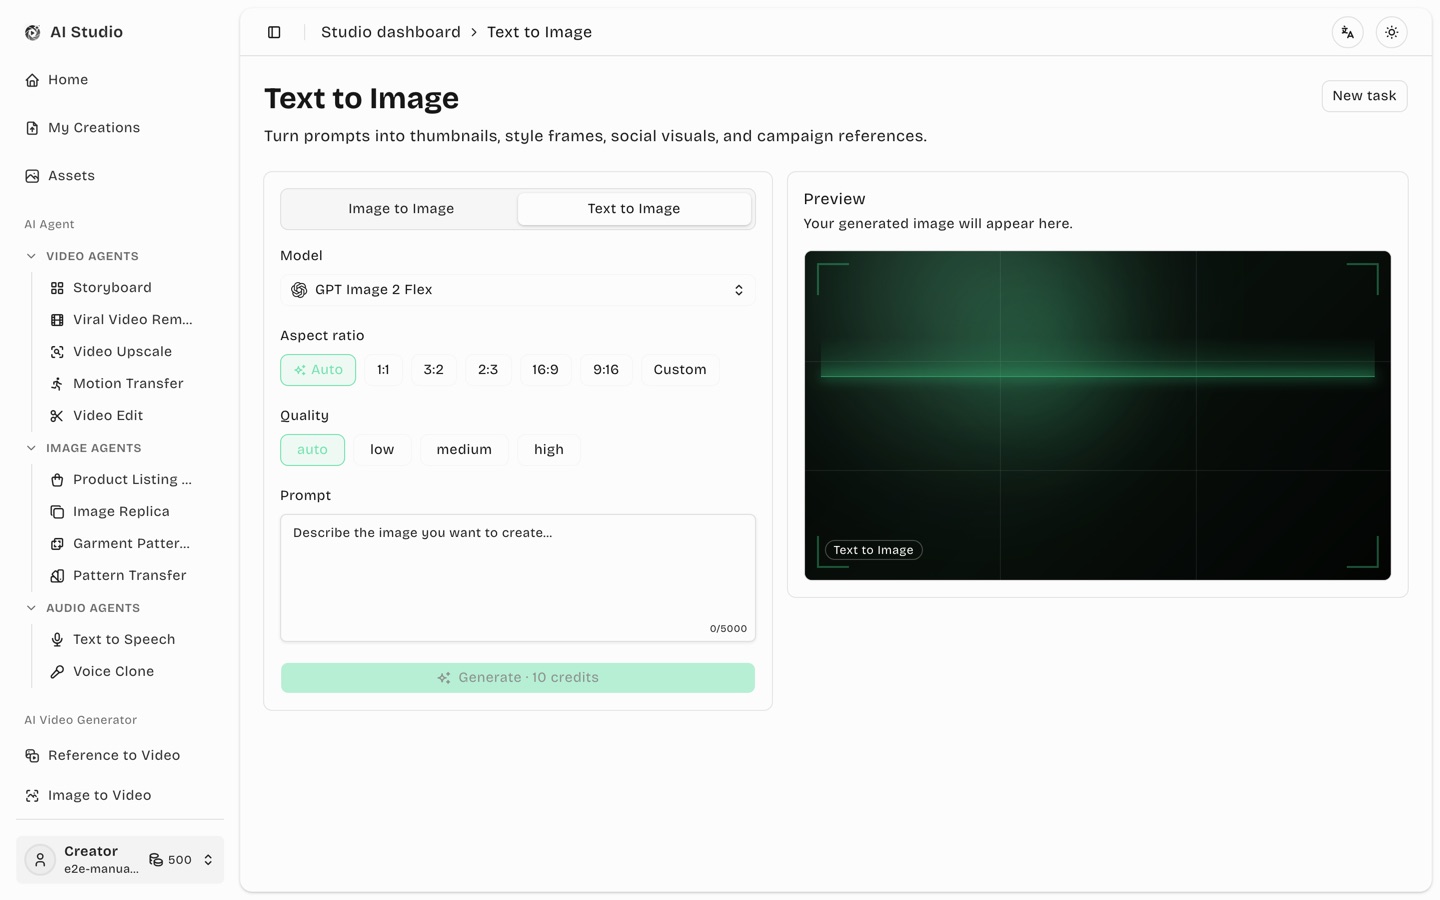
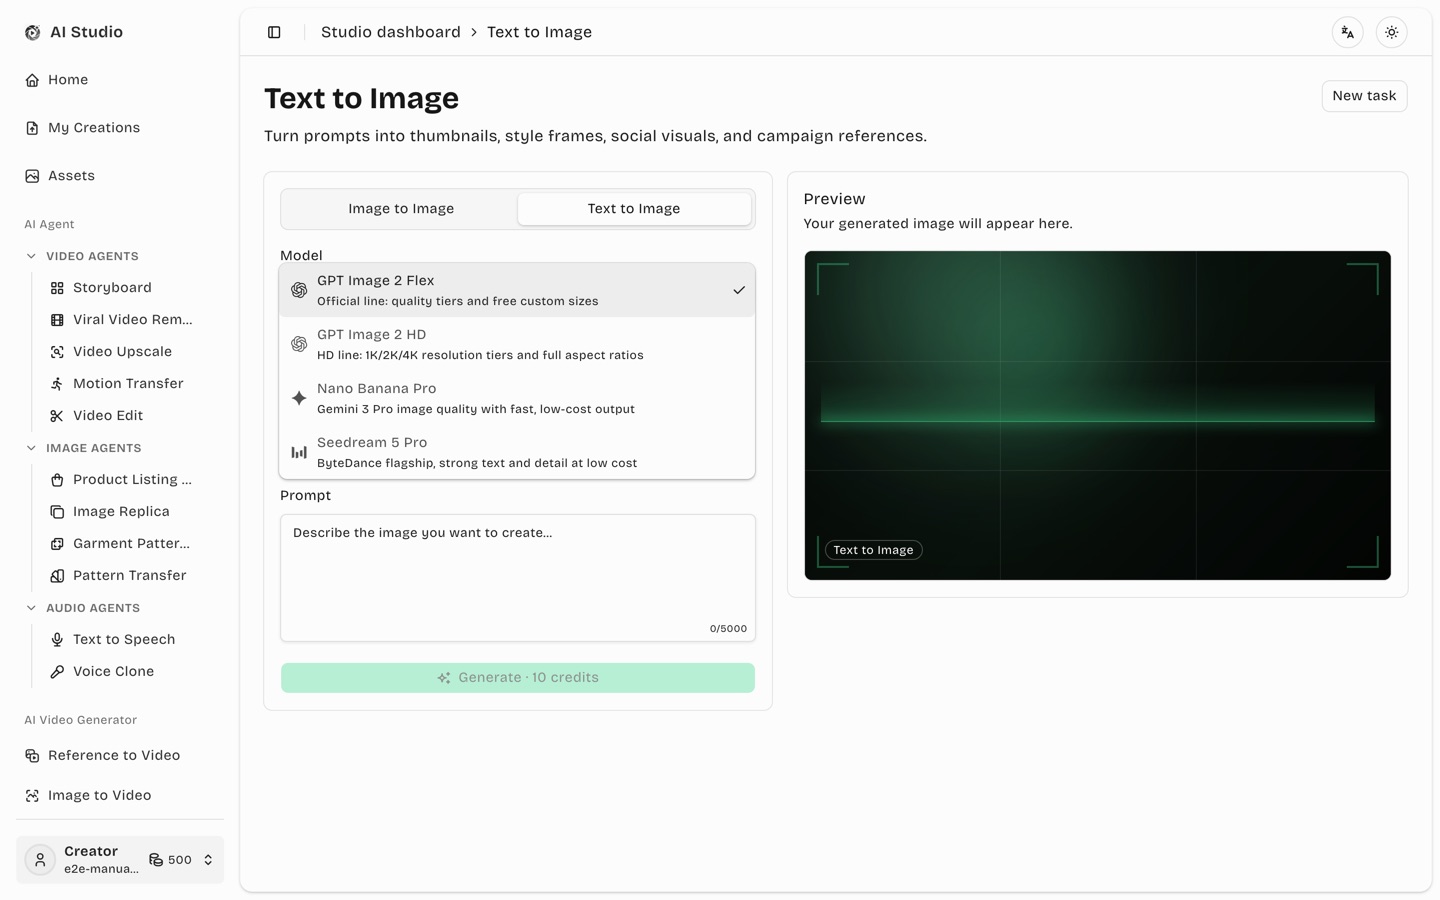
Figure 6-1 Text to Image workspace
Open Text to Image from the left menu.
Model: pick an image model (see 6.3).
Aspect ratio: Auto / 1:1 / 3:2 / 16:9 / 9:16 and more; some models add a Custom size.
Quality / resolution: GPT Image 2 Flex offers auto / low / medium / high quality tiers; other models offer 1K / 2K / 4K.
Background: the GPT Image 2.5 lines add a three-way Background switch (Auto / Opaque / Transparent); Transparent outputs a PNG with an alpha channel.
Prompt: describe the image.
Check Generate · N credits and submit.
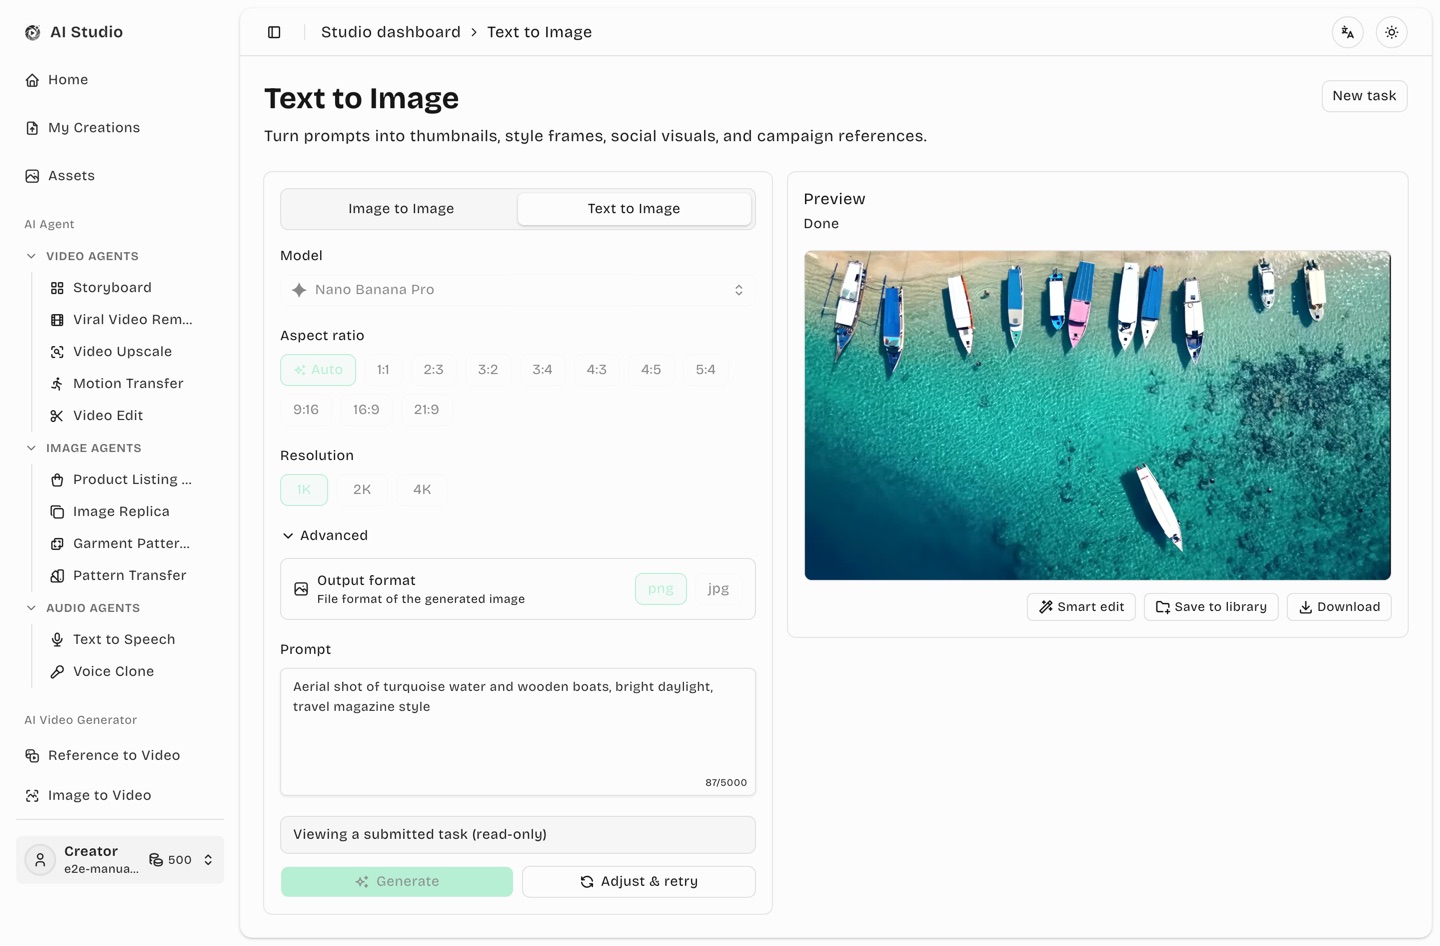
Figure 6-2 Image model dropdown (each model carries its brand icon)
6.2 Image to Image & the asset library
Upload one or more reference images and let AI repaint them.
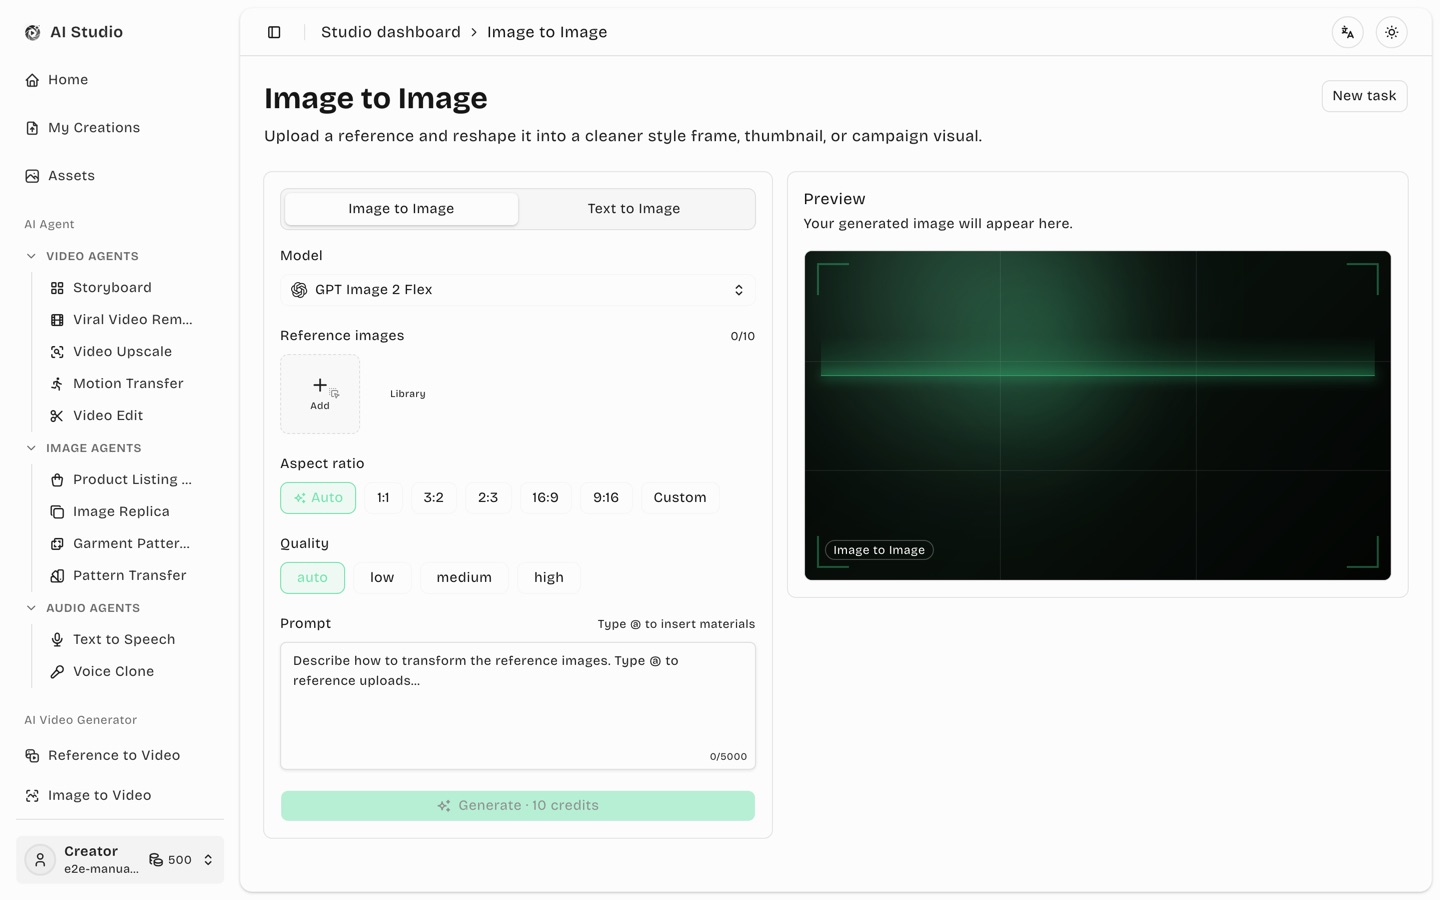
Figure 6-3 Image to Image workspace
Open Image to Image.
Click Add to upload, or Library to reuse an earlier asset.
Describe the change you want (“replace the background with a clean white studio”).
Set the model and parameters, then click Generate.
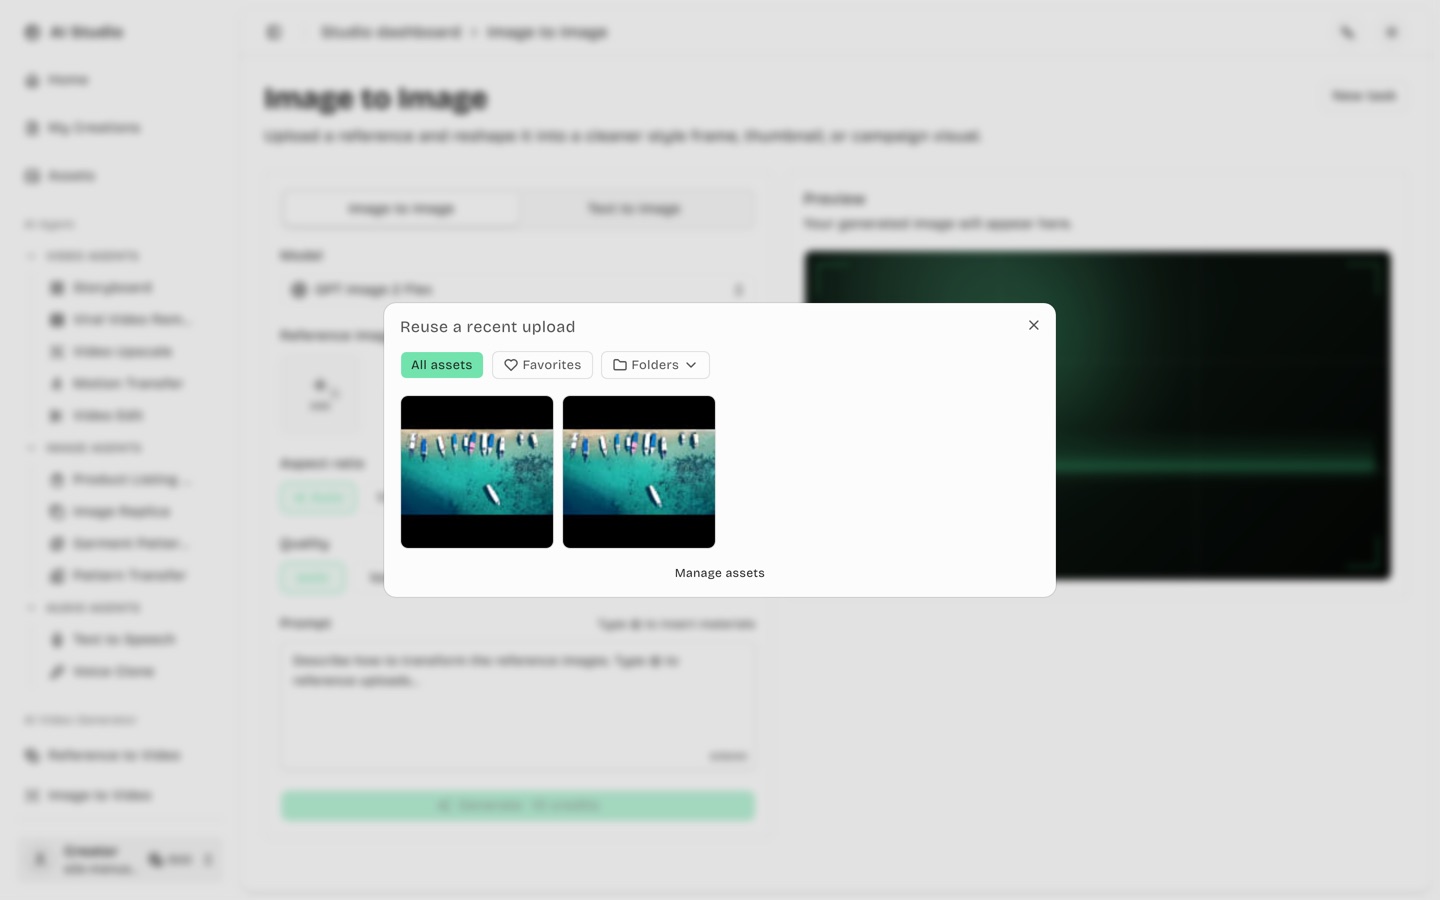
Figure 6-4 Asset picker (multi-select; click a selected item again to deselect)
Working with the picker: use All assets / folder buttons at the top to narrow the list; scrolling to the bottom loads more assets. Clicking a thumbnail selects it and adds it to the upload area (selected items get a coloured outline), and clicking it again removes it without changing the source asset's folder.
Adjust while it runs: after an image task is submitted, Adjust & retry appears immediately. Click it to keep the same prompt, images and parameters in an editable new-task form while the original generation continues. No credits are charged until you submit the new task.
6.3 Image model reference
Model
Character
Precision options
GPT Image 2 Flex
Quality-tier line with custom sizes
Quality auto / low / medium / high
GPT Image 2 HD
Resolution-tier line
1K / 2K / 4K
GPT Image 2.5 Flare
Default line of OpenAI's September 2026 model, fast, transparent output
1K / 2K / 4K
GPT Image 2.5 Sunburst (default)
Premium 2.5 line with more precise edits, transparent output; the default model in every image entry point
1K / 2K / 4K
Nano Banana Pro
Gemini 3 Pro image model, up to 8 reference images
1K / 2K / 4K
Nano Banana 2
Google Gemini 3.1 Flash Image (added 2026-09-13), faster and cheaper than Pro; up to 14 reference images, extra ultra-wide / ultra-tall ratios 4:1 / 1:4 / 8:1 / 1:8
1K / 2K / 4K
Nano Banana 2.1
Refresh of Nano Banana 2 (added 2026-10-08) at a lower price; up to 10 reference images, same ratios as Nano Banana 2 (incl. 4:1 / 1:4 / 8:1 / 1:8)
1K / 2K / 4K
Seedream 5 Pro
ByteDance flagship, 7 fixed ratios
1K / 2K
6.4 AI prompt writer
Not sure how to phrase a prompt? Both Text to Image and Image to Image have an AI prompt writer · 2 credits button at the top right of the prompt box. Write one line describing the result you want; the AI combines your reference images with the official prompting style of the selected model (GPT Image 2 / 2.5, Nano Banana and Seedream each phrase prompts differently) and writes a professional English prompt for you.
Pick the model, aspect ratio and (for Image to Image) the reference images first, then click AI prompt writer above the prompt box.
The dialog lists the current reference images; describe the result in one line under “What you want” (e.g. “white-background hero shot, product centered, soft studio light”). Any text already in the prompt box is carried over.
Click Write prompt · 2 credits. After a few seconds you get an English prompt plus a one-line summary of the key points; the prompt is editable right in the dialog.
Click Rewrite for another attempt (another 2 credits), or Apply to prompt to fill the prompt box and generate as usual.
Chinese interface shows Chinese: with the interface language set to Chinese, the editable draft and the text applied to the prompt box are a Chinese rendering, and the dialog lists the “English prompt sent to the model” underneath. Generate without touching the Chinese and that English is what the model receives; edit the Chinese and your edited text is submitted as-is (the task record shows whatever was actually submitted). In the English interface only English is shown.
Model-specific phrasing: GPT Image prompts go scene → subject → details → constraints, quote any in-image text and spell brand names letter by letter; Nano Banana gets a narrative paragraph with a subject and an action plus camera and lighting vocabulary; Seedream gets 2–4 sentences of subject + action + setting + style + technical specs. For Image to Image the AI also states, per reference image, what to keep and what to change. If the AI produces no usable prompt or the call fails, the credits are refunded automatically.
7. Smart edit
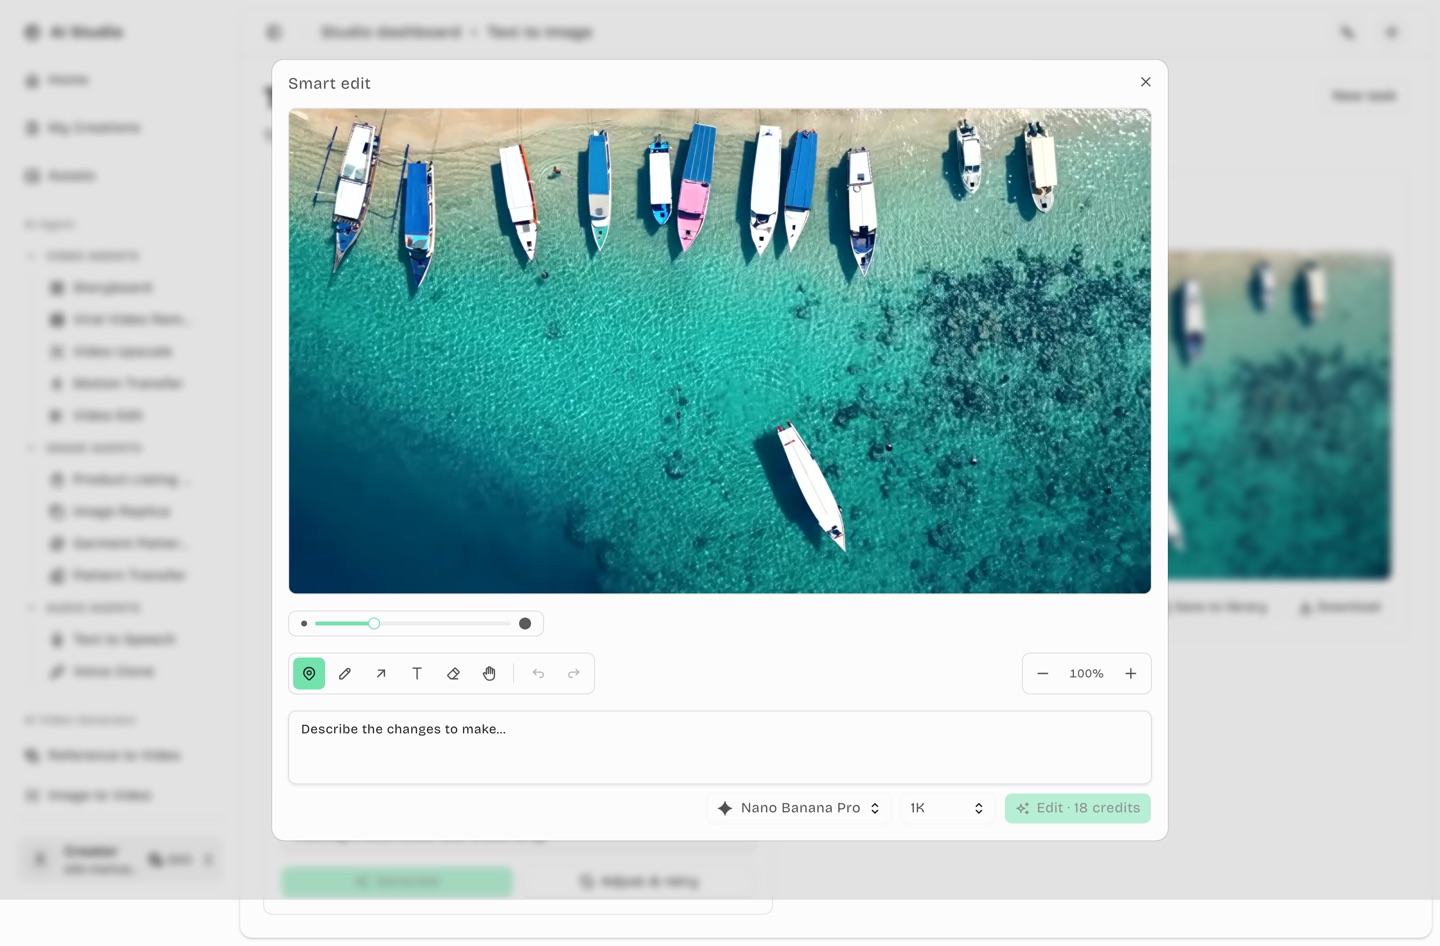
Make targeted changes to a finished image: draw markers, arrows and notes on it, describe what should change, and AI produces a new image from your annotations. An edit never overwrites the original — the pre-edit image stays in the version history and you can switch back at any time. Works on Text to Image and Image to Image results, storyboard panels, and every card in Product Listing Set, Image Replica, Garment Pattern Variations and Pattern Transfer.
Where to find it
Once an image finishes, a Smart edit button appears next to Download in the preview panel. Storyboard boards have the same button in their action row, and listing / replica / garment-pattern / pattern-transfer cards carry their own entry point.
Figure 7-1 Image result · the “Smart edit” entry point
Version history
After a successful edit, a Version history strip appears under the preview: thumbnails of the Original and every Edit N, with the version currently in use marked Current. Click a thumbnail to zoom; every version can be downloaded or saved to the library, and Set as current on any other version swaps it back into the result slot (free, nothing is regenerated) so later downloads, saves and further edits start from it. On Product Listing Set / Image Replica / Garment Pattern Variations / Pattern Transfer cards the same list opens from a History N button; a storyboard board's paid re-render also enters the history, and restoring such a version brings back the script it was rendered from. Up to 20 versions are kept per image — the oldest edits are dropped beyond that, the original never is.
Editor tools
Figure 7-2 Smart edit editor
Tool
What it does
Marker
Click to drop a numbered pin, or drag a dashed box around the area to change (numbers increment automatically and can be referenced in the prompt)
Pen
Free drawing in a colour of your choice (red / yellow / green / blue / black / white)
Arrow / line
Drag to draw an arrow or line indicating direction
Text
Click to place a text box, type, then press Enter
Eraser
Click any annotation to remove it (object-level, not pixel-level)
Undo / redo
Step back and forward through your annotations
Zoom
Use “−/+” or scroll the mouse wheel over the canvas (50%–300%)
Steps
Click Smart edit to open the editor.
Annotate the areas you want changed.
Describe the change in the box at the bottom; you can reference marker numbers (“replace the red apple at marker 1 with a green one”).
Pick the model and resolution for this edit (the original image's model is preselected) and check the price.
Click Edit · N credits. The image shows “Editing…” and the new version replaces the original when it finishes.
The replacement cannot be undone. A successful edit overwrites and destroys the original. If the edit fails, credits are refunded automatically and the original is untouched.
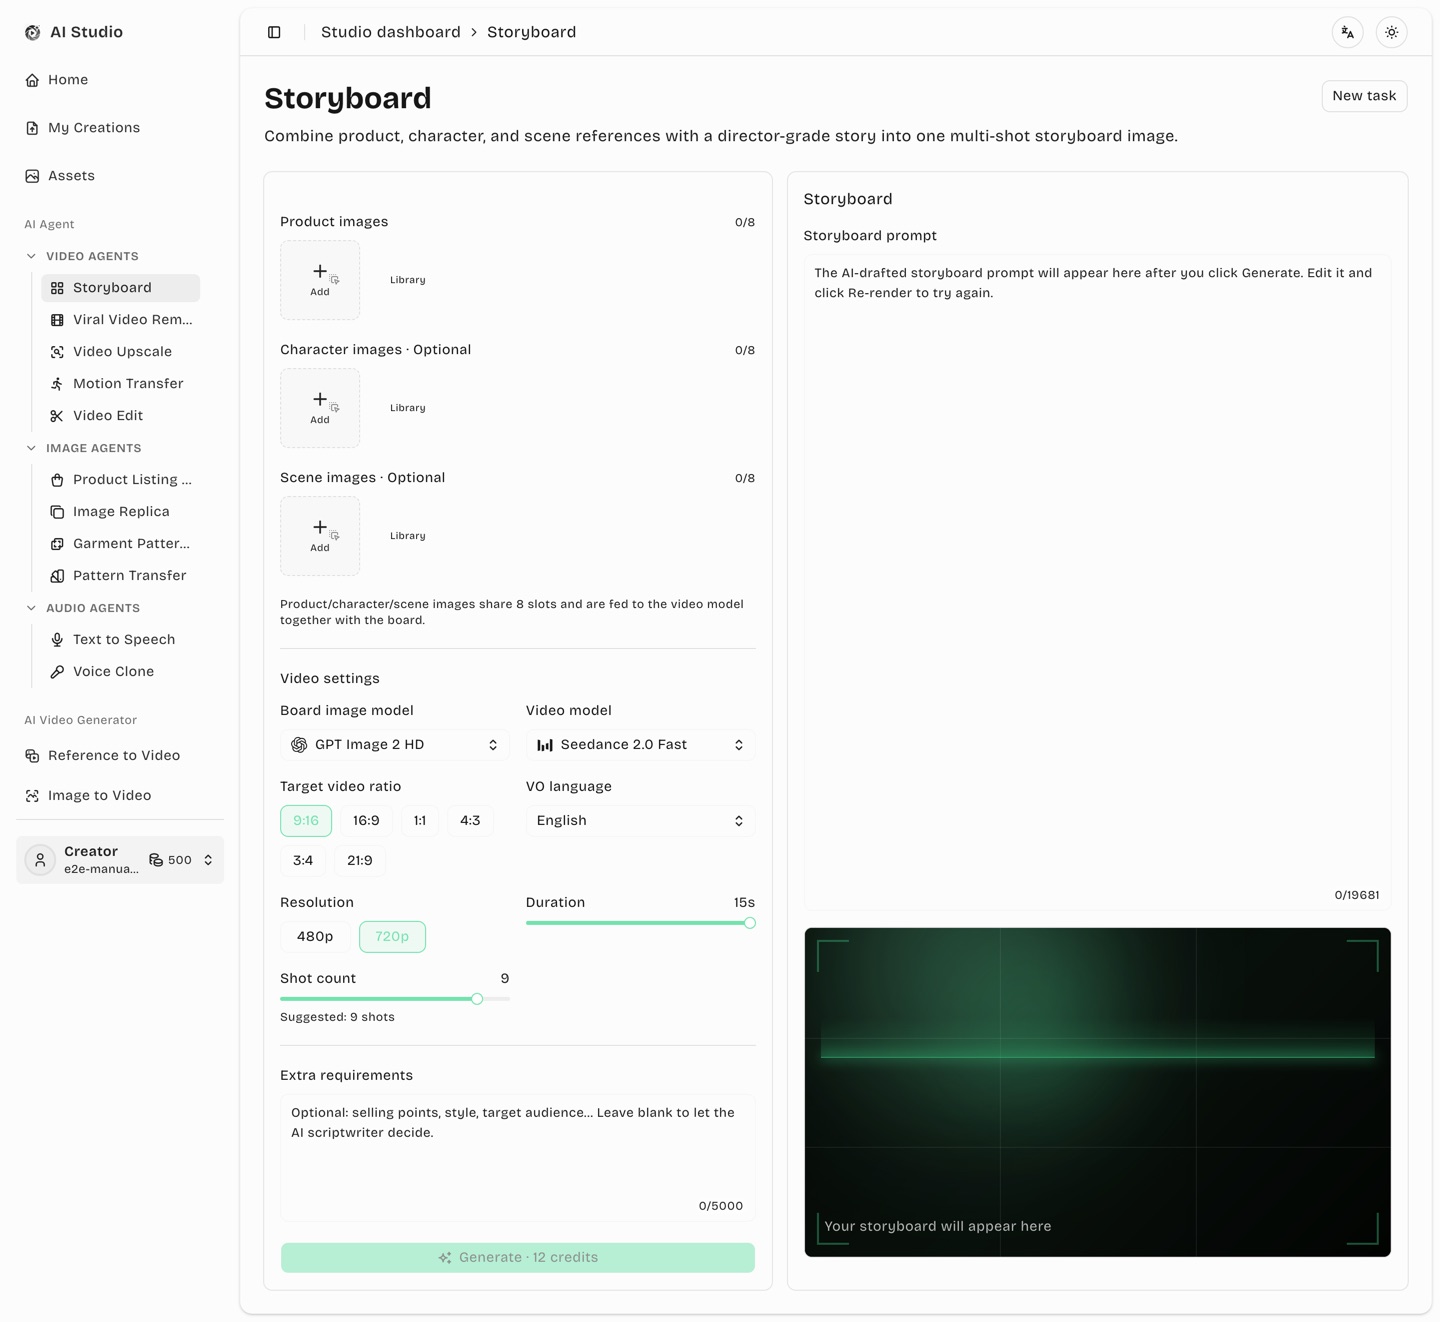
8. Storyboard (AI Agent)
A complete short-video pipeline for e-commerce: upload product / character / scene material → an AI scriptwriter writes the board prompt → an image model renders a multi-shot board → the AI writes the video prompt → a video model renders the final cut.
Figure 8-1 Storyboard workspace
Steps
Upload material: add references to the product (required), character and scene groups. The three groups share one quota (8 images on most models, 6 on Gemini Omni), so you can split it however you like.
Video parameters: target aspect ratio, voice-over language (English / 中文 / Español / 日本語 / Bahasa Melayu / ไทย), prompt model, board model, video model, resolution, duration and shot count.
Extra requirements (optional): selling points, style, target audience — the AI gives these priority.
Generate: the scriptwriter writes the board prompt, then the board model renders the panels. The prompt box on the right fills in live and stays editable.
Video prompt: once the board is ready, click AI Assist in the video-prompt block to have the AI write the video prompt from the board.
Render: confirm and submit — the video model renders the final cut.
Adjust without stopping the Storyboard: after submission, the left-side materials and parameters stay frozen until you click Adjust & retry. That action detaches an editable copy for a new Storyboard; it does not re-render, stop or change the old board, which continues in the background.
Parameters
Parameter
Description
Board model
GPT Image 2 Flex / HD
Video model
Seedance 2.0 / Fast / Mini, Seedance 2.5, Gemini Omni
Seedance generation route
Scheduled automatically by the platform; frozen with the Storyboard task and reused when the final video is rendered
Voice-over language
Controls spoken lines and subtitles; text rendered inside the image is always English (image models are unreliable with non-Latin scripts)
Duration / shot count
Duration suggests a shot count (roughly one shot per 1.7 s); the count stays editable
Seedance 2.5 in Storyboard: appears right after Seedance 2.0 Mini, shares the same 8-image reference pool, and offers 480p/720p only (no 1080p/4K). Its generation route is scheduled automatically by the platform, and the rendered video is priced at the no-reference-video rate (chapter 5.4).
Combine with Smart edit: if a board panel needs a tweak, use Smart edit on the board (chapter 7) before rendering the video.
Note: each step (script, board, video) is charged separately and the button always shows the current price. A finished storyboard appears as a single combined card in My Creations.
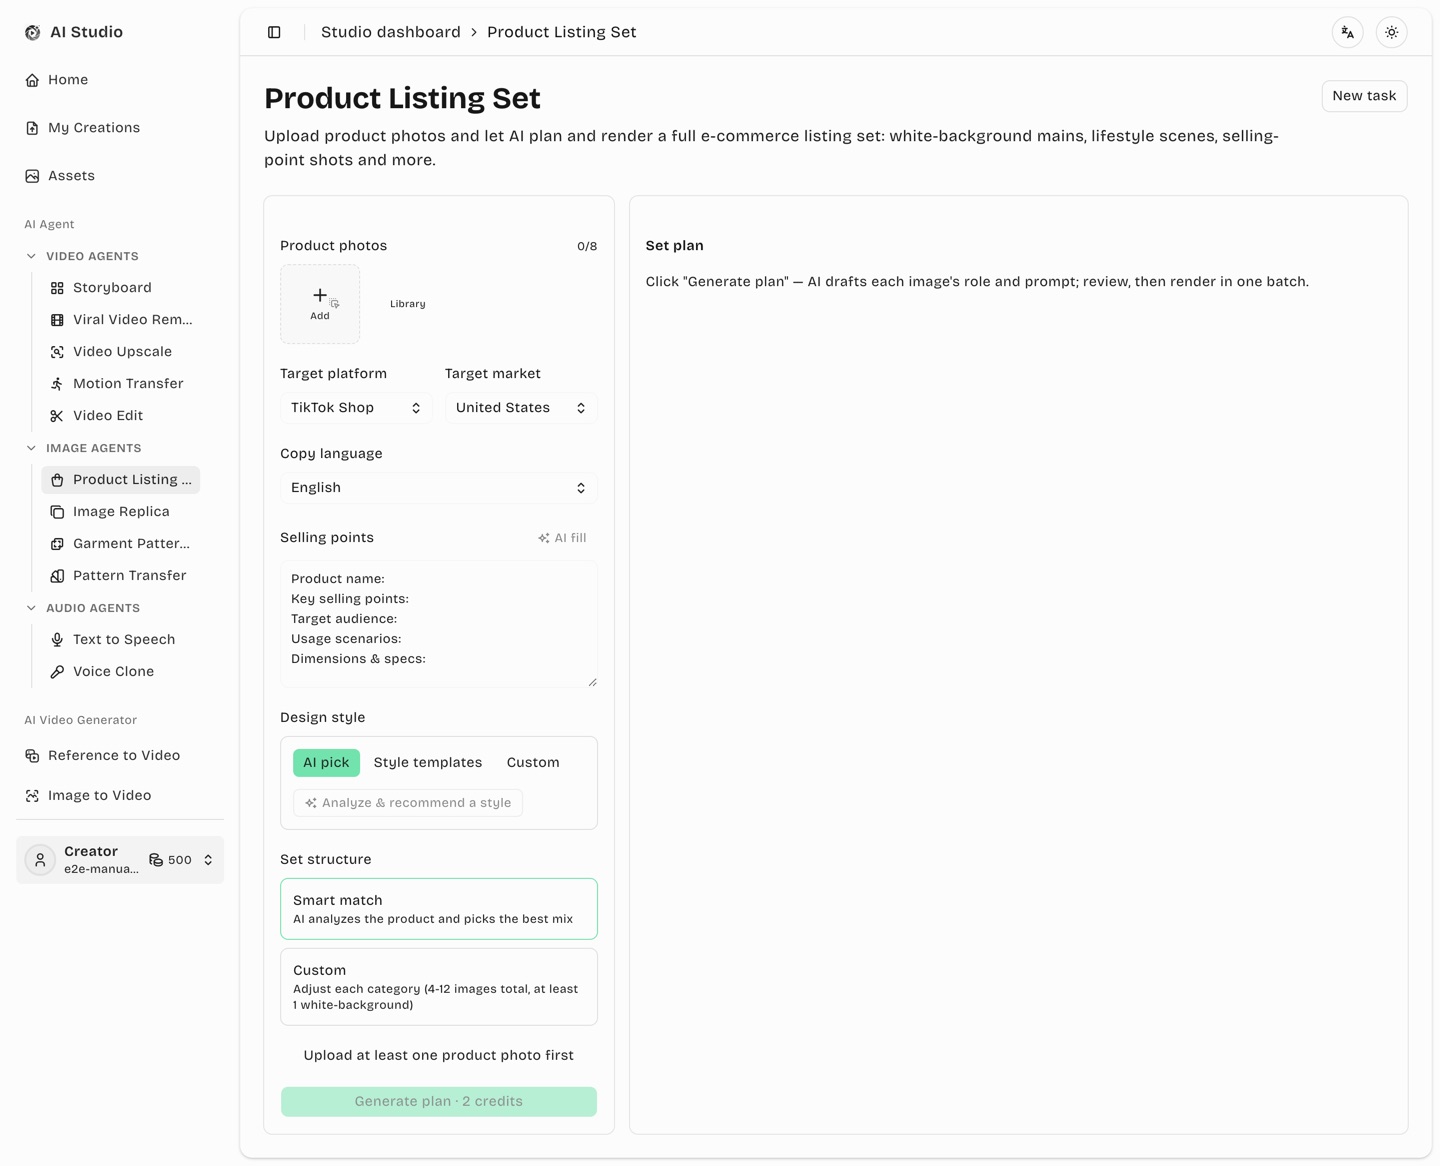
9. Product Listing Set (AI Agent)
Upload product photos and let AI plan and batch-render a complete set of listing images: white-background hero shots, lifestyle scenes, feature callouts and more. Built for Amazon, TikTok Shop, AliExpress and similar marketplaces.
Figure 9-1 Product Listing Set workspace
Steps
Product photos: up to 8, uploaded or picked from the library.
Platform / market / copy language: choose the marketplace (TikTok Shop, Amazon listing set, Amazon A+ Content, AliExpress, own store, …), the target market and the language of on-image copy. The AI plans against each platform's real image conventions (Amazon's pure-white background and ~85% frame fill, for instance); choosing Amazon A+ Content switches to A+ mode (see the end of this section).
Selling points: fill in the five-line skeleton (product name / key selling points / target audience / intended scenes / size & specs), or click AI generate (2 credits) to have the AI draft it from your photos and then edit it.
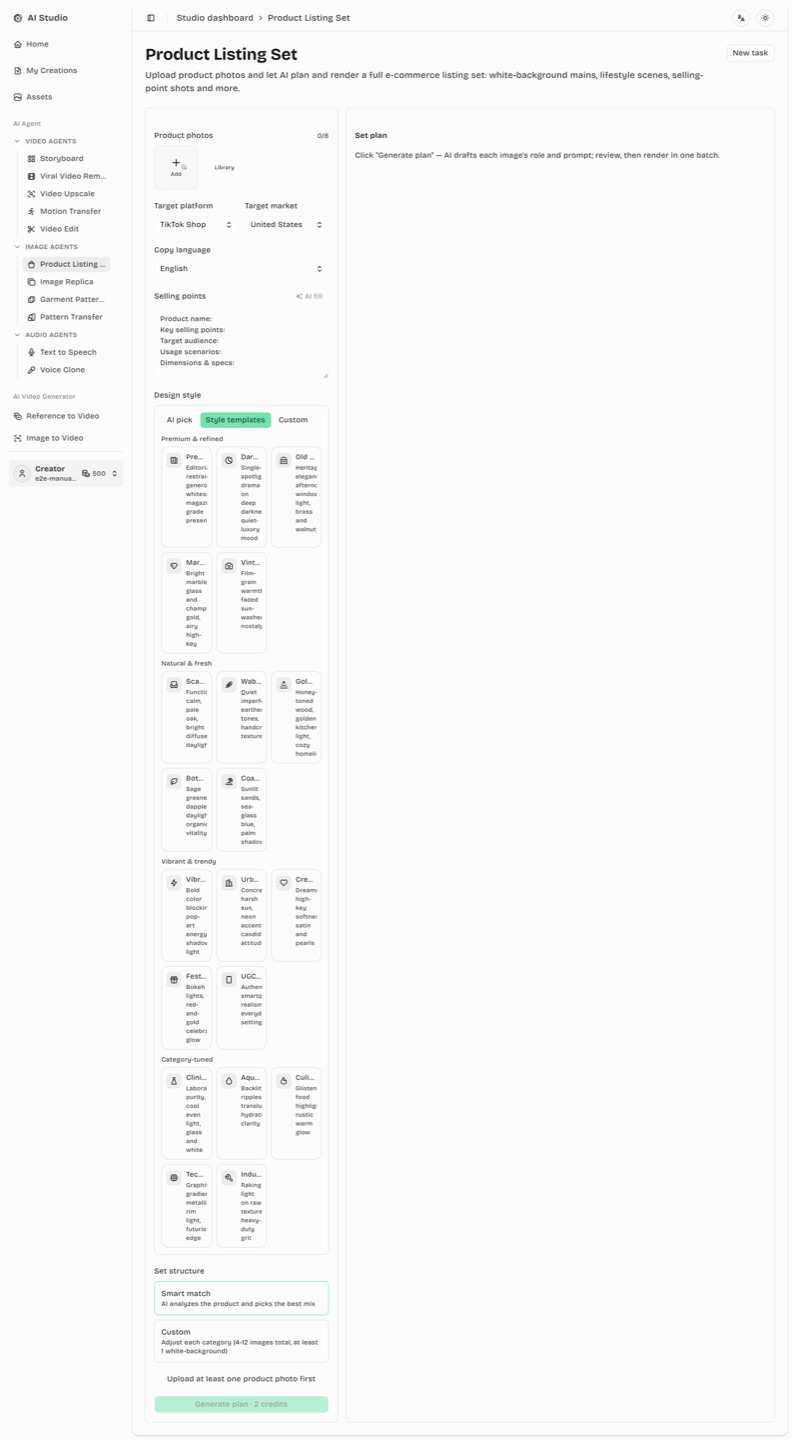
Design style — pick one of three routes:
AI pick: click AI style analysis and the AI proposes a style from your photos (2 credits); the text stays editable.
Style templates: choose one of 20 curated presets (Figure 9-2) across four groups — premium, natural, vibrant and category-specific — such as “Premium editorial”, “Creamy pastel”, “Dark luxury” or “UGC casual”.
Custom brief: type your own requirements: palette, layout, creative direction.
Set structure:Smart match lets the AI decide how many images of each type; Custom lets you set the counts yourself (4–12 images in total, at least one white-background shot).
Generate the plan (2 credits): the AI plans a category, title and English render prompt for every image and lists them as cards. Cards can be selected, deselected and edited.
Batch render: choose the image model (GPT Image 2 / 2.5, Seedream 5 Pro, Nano Banana Pro / 2 / 2.1), quality tier and aspect ratio on the right, then click Generate selected · N credits. Each image is charged and rendered independently and appears as soon as it is ready.
Opens the annotation editor (chapter 7); the edit replaces that image
Zoom / download
View the full-size image or save it
Save to library
Free independent copy in the asset library that survives task deletion (same button as the image workspace); if you have folders, you first pick which folder to file it under (defaults to your last choice, or Unfiled)
Rewrite & regenerate
Edit that card's prompt and render it again (normal charge; the old image is retired)
Tip: planning costs only 2 credits — review the whole set and its prompts first, then batch-render. Not happy? Adjust & retry reloads your inputs into a fresh task.
Note: prompts sent to image models are always in English (models render other scripts unreliably). If you edit a prompt in Chinese, it is translated automatically before rendering. The whole set shows as one card in My Creations, and all its charges are grouped into a single billing entry.
Amazon A+ Content set
Pick Amazon A+ Content as the target platform to switch into A+ mode: the set is planned against Amazon's official standard-module specs across six categories, and every card ships with suggested module copy you can paste straight into Seller Central.
Figure 9-3 Amazon A+ Content · six-category structure with official module sizes
Six categories map to official modules: Brand hero (StandardHeaderImageText, ≥970×600), Wide banner (StandardImageTextOverlay, ≥970×300), Feature blocks (Three Images & Text, ≥300×300), Lifestyle scene (StandardImageSidebar, ≥300×400), Comparison columns (StandardComparisonTable, ≥150×300 per column) and Specs detail (SpecsDetail, ≥300×300). The default mix is 7 images in exactly 5 modules (basic A+ allows at most 5 modules per ASIN), with at least one brand hero.
Minimal-text images + module copy: images stay text-free by default — selling points are proven visually (Amazon reviews text embedded in images against its banned-keyword lists, and small text that is illegible on mobile gets content rejected) — while every card also outputs a suggested module headline (≤160 chars), body text (≤1000 chars) and alt text (image keywords, ≤100 chars — required at submission, read by screen readers and indexed for search) with one-click Copy headline / Copy body text / Copy alt text buttons for Seller Central.
Model and ratio are yours to pick: exactly like the listing set, you choose the render model, quality tier / resolution and aspect ratio (custom size included) at render time; each category row in the structure config shows the suggested ratio closest to its official module (hero 16:9, banner 3:1, feature/specs 1:1, scene 3:4, comparison 1:2) for guidance, and the module-size download centre-crops to the official pixels — the plan's compositions already leave crop margins. Keep renders at or above the module minimum (a 1K 16:9 render is slightly short of 970×600; 2K is safer).
Module-size downloads: finished cards offer a download cropped to the exact official module pixels (970×600 and so on); the Amazon listing set's white-background main image also gains a 2000×2000 direct download.
Compliance built in (aligned line by line with the official A+ Content Guidelines): planning automatically avoids the official prohibitions — pricing/promo and call-to-action wording, warranty claims, satisfaction and "best seller"-style boasts, unsubstantiated certification/award/eco/medical claims, contact details and hyperlinks, competitor references, time-sensitive wording and seller-identity phrasing never enter the images or the suggested copy; comparison shots only compare your own variants, before/after use, or the officially allowed unbranded category comparison (LED vs halogen bulbs).
AI-person disclosure: if a finished image contains photorealistic AI-generated people, tick "AI-generated persons" when uploading it in A+ Content Manager (or tag the file with contains-synthetic-performer metadata) — Amazon requires this disclosure, and the delivery area shows a matching note.
Review expectations: Amazon reviews A+ submissions in up to 7 business days and publishes approved content within 24 hours; if rejected, follow the official best practices — check image sharpness and remove claim/pricing/contact wording.
10. Image Replica (AI Agent)
Found a listing image whose style you love? Upload it as a style reference, add your own product photos, and AI batch-produces listing images in that style — one output per reference image.
Figure 10-1 Image Replica workspace
Steps
Style references: up to 12. Every reference produces one output in its style.
Product photos: your own product. The cap adapts to the model and the number of character photos and is shown live in the UI. Only your product is ever painted — never the one in the reference image.
Character photos (optional): up to 2. Only the face, hair and build are taken from them — the garment always comes from your product photos, which is what makes this work for apparel.
Market / copy language: drives on-image copy and the visual sensibility.
Fidelity — pick one: Layout reference keeps the layout, background structure and subject relationships but designs the palette around your product; Strict replica reproduces composition, layout, palette and detailing, swapping only the product and the selling points.
Key selling points (required): type them or click AI generate (2 credits).
Unified brief (optional): constraints for the whole set, e.g. “all copy in English”, “keep the model's pose unchanged”. Each requirement is written into every card's prompt: numbers (sizes / thickness / angles) verbatim, style names and structural selling words in explicit English; numbers are also machine-checked and auto-repaired once if missing.
Generate the plan (2 credits): the AI writes one render prompt per reference; cards are selectable and editable.
Batch render: choose model, quality tier and ratio on the right, then click Generate selected. Per-card actions (smart edit / save to library / download / rewrite & regenerate) match Product Listing Set.
Copyright reminder: reference images are only used to convey composition and style. Do not commercialise someone else's assets — the product and people in your outputs come from the material you upload.
11. Garment Pattern Variations (AI Agent)
Upload 1–6 garment, pattern, worn or detail references into a local draft. Click Start analysis (free) to create a durable task, review the saved AI interpretation, then click Confirm generation to pay for the plan and flat-lays. Once those finish, batch-generate the model shots with one click.
Figure 11-1 Garment Pattern Variations workspace
Steps
Build the local draft (1–6 images, any mix, no grouping needed): garment shot (the source of truth for cut and silhouette), pattern swatch (style DNA), worn photo (cut plus pattern), or detail reference (context only). Add, remove and reorder freely. Uploading alone makes no AI call and creates no task.
Three optional strict reference groups (new 2026-08-31): below the source area you can also upload a flat-lay base (1 image — flat-lay renders reproduce its exact surface, backdrop and props, replacing the default clean/lifestyle styling), model references (up to 2 — model shots use exactly this person's face, hair and build, while the worn garment always comes from the flat-lay; best with one frontal portrait plus an optional head close-up), and a scene reference (1 image — model shots are staged in exactly this environment). All three are optional: leave any empty and AI matches it to the product; they stay editable during the review step. Extra references count toward that render's input-image total (Seedream adds its small per-input surcharge; GPT / Nano Banana flat pricing is unaffected).
Start analysis (free): this deliberate click creates the task first, then analyses every source in the durable background workflow. The task immediately appears in My Creations; you can leave, close the browser or switch devices without interrupting it. No credits or billing entry are created.
Review the saved analysis (single product, since 2026-08-31): one task fissions ONE product — the full product card (role + summary + analysis fields + variant count) attaches to the single pattern source image only (the first pattern-bearing image by default); every other image collapses to a compact row with a read-only role badge, and its Use as pattern source button moves the whole product card (and the variant count) onto that image instead. A degraded source is marked Needs manual confirmation. Source images and order stay frozen, while the product card's role, summary and analysis fields remain editable.
Category / target wearer / base colour: AI fills these in from the uploads; all editable. Base colour is optional free text (e.g. "black", "off-white").
Style DNA / selling positioning / suggested scene / suggested model persona: four AI-drafted notes (colour & motif, target audience, shoot setting, model styling) — edit any of them directly.
Variant count (single product): the count belongs to the single pattern-source image only (default 10, stepper 0–20); the other images serve as the version anchor or detail references and no longer carry counts of their own.
Model / tier / both ratios: Garment Pattern Variations supports GPT Image 2.5 Sunburst (default), GPT Image 2.5 Flare, GPT Image 2 HD, Nano Banana Pro, Nano Banana 2, Nano Banana 2.1, and Seedream 5 Pro; choose the quality tier plus a separate flat-lay ratio and model shot ratio (both default to 1:1). These settings freeze only when paid generation is confirmed.
Confirm generation (2 credits for the plan, plus every variant's flat-lay priced by the chosen model — the exact total is shown on the button): this is the first paid action. AI drafts the plan and renders every flat-lay immediately.
English Logo and typography: each new variant receives a distinct fictional English brand name, optional slogan and matching typography/layout. Prompt regeneration preserves its frozen design; model shots copy the latest flat-lay's exact visible spelling and layout.
Results (three-column workflow): each variant is one row, showing Flat-lay / Model shot / Pattern vector file in generation order — three columns side by side on desktop, the same order stacked vertically on phones. Each card header has a checkbox — checkable once that card's own flat-lay succeeded, checked by default.
Multi-select batch generation: once every flat-lay has finished (success or fail) and at least one succeeded, a toolbar appears at the top of the results — a select-all checkbox (toggles between select-all and clear-all) plus two independent buttons, Generate selected model shots and Generate selected pattern vectors, each priced live from the cards that are both checked and don't already have that render. Uncheck a card to leave it out of this batch; a card that already has a model shot or pattern vector is never re-charged or re-rendered by either button, even while still checked — the two buttons' eligibility is independent. You can also click Generate model shot on a single card.
Pattern vector file (print-ready, the third result column): once a variant's flat-lay renders successfully, that column shows a Generate pattern vector button (8 credits, regardless of whether a model shot exists) — AI extracts only the printed graphic from that flat-lay and redraws it as a standalone file: white background made transparent, roughly 4096px wide (about 34.7cm at 300dpi, inside the 32-36cm print-size range). The preview renders over a checkerboard backdrop so the transparency is visible; Download saves a PNG with a -300dpi filename suffix. A failed render can be retried in place at the quoted price.
Unified edit and regeneration: the separate regeneration buttons below each image are removed. Use Edit & regenerate at the top-right of the prompt area to edit the flat-lay prompt, model persona, shooting scene and lighting. Changing only model settings regenerates only the model shot. Changing the flat-lay prompt first regenerates the flat-lay, then automatically renders a new model shot from it. The submit button shows the actual scope and credits; the durable two-stage job continues if you leave the page.
Other per-card actions: Smart edit (chapter 7 — annotate and overwrite in place), zoom, download and Save to library (a free independent copy that survives task deletion; with folders you pick which one to file it under).
Two safe stages:Start analysis is free and durable; Confirm generation is the explicit billing boundary. Adjust & retry is available as soon as the first task exists, including while analysis is running. It opens a prefilled new draft without changing or stopping the original task.
Commercial-use reminder: Logo names are creative examples, not trademark-cleared marks. Search target-market availability before commercial use.
Note: free analysis creates no ledger entry. Paid confirmation charges the flat 2-credit plan fee plus every flat-lay; model shots are charged separately. The whole task shows as one card in My Creations, with analysis / awaiting-confirmation copy before real child renders exist and live child progress afterwards. Historical Flex tasks remain viewable; Adjust & retry switches a fresh form to GPT Image 2 HD.
12. Pattern Transfer (AI Agent)
The same style in several colours shares one pattern: upload one garment photo per colour (1–12) plus a pattern (direct upload, or free extraction from a viral photo). Click Start analysis (free) to create a durable task; review the colour list and pattern preview, then click Confirm generation to pay for the plan — the pattern is migrated pixel-faithfully onto every colour and every flat-lay renders automatically. Once a flat-lay is approved, generate its model shot (one model throughout, a different scene for every colour).
Figure 12-1 Pattern Transfer workspace
Steps
Same-style colour garments (1–12 photos): one photo per colour version of the same style; add, remove and reorder freely.
Pattern source: choose either Upload pattern (a standalone swatch or a close-up of the print), or Extract from a viral photo: upload a viral garment photo carrying the target pattern and the system immediately starts a free background extraction — the card shows Extracting…, then switches to Extraction ready with a preview once done. Click Re-extract for another attempt, or switch back to Upload pattern to use a different image instead. Re-using the same viral photo hits a cache — instant and free.
Model reference photos (optional, 0–2): upload to anchor that exact model's identity throughout; leave empty and AI designs one model matching the garment style and target market, kept the same across every colour.
Pattern colour strategy:Preserve original colours (default — pixel-faithful, no recolouring) or Adaptive colour (the motif and layout stay identical; colours are nudged to complement each garment colour).
Flat-lay style / model / tier / target market / both ratios: Pattern Transfer supports GPT Image 2.5 Sunburst (default), GPT Image 2.5 Flare, GPT Image 2 HD, Nano Banana Pro, Nano Banana 2, Nano Banana 2.1, and Seedream 5 Pro, with a separate flat-lay ratio and model shot ratio (both default to 1:1). These settings freeze only when paid generation is confirmed.
Start analysis (free): this deliberate click creates the task first, then reads every colour's name (English + local), category, gender, and checks whether every garment photo is genuinely the same style. The task immediately appears in My Creations; leaving the page never interrupts it. No credits are charged at this stage.
Review analysis_ready: the colour list (a thumbnail plus editable English/local names for each colour), the pattern preview, and editable category/gender. A garment photo that looks like a different silhouette surfaces a non-blocking consistency notice — continuing is your call.
Confirm generation (2 credits for the plan, plus every colour's flat-lay priced by the chosen model — the exact total is shown on the button): this is the first paid action. AI migrates the pattern onto every colour and renders every flat-lay immediately.
Results (colour card grid): one card per colour, headed by a colour-name badge, with Flat-lay / Model shot / Pattern vector file below it in generation order — three columns side by side on desktop, the same order stacked vertically on phones. Each card header has a checkbox — checkable once that colour's own flat-lay succeeded, checked by default. Once a colour's flat-lay is a terminal success with an archived thumbnail, the model-shot column's Generate model shot button unlocks — it renders that colour's own scene and pose with the same model identity, priced independently.
Multi-select batch generation: once every flat-lay has finished (success or fail) and at least one succeeded, a toolbar appears at the top of the results — a select-all checkbox (toggles between select-all and clear-all) plus two independent buttons, Generate selected model shots and Generate selected pattern vectors, each priced live from the colours that are both checked and don't already have that render. Uncheck a colour to leave it out of this batch; a colour that already has a model shot or pattern vector is never re-charged or re-rendered by either button, even while still checked.
Pattern vector file (print-ready, the third result column): once a colour's flat-lay renders successfully, that column shows a Generate pattern vector button (8 credits, regardless of whether a model shot exists) — AI extracts only the printed graphic from that flat-lay and redraws it as a standalone file: white background made transparent, roughly 4096px wide (about 34.7cm at 300dpi, inside the 32-36cm print-size range). The preview renders over a checkerboard backdrop so the transparency is visible; Download saves a PNG with a -300dpi filename suffix. A failed render can be retried in place at the quoted price.
Unified edit and regeneration: use Edit & regenerate at the top-right of a card's prompt area to edit the flat-lay prompt, scene and pose together. Changing only scene/pose regenerates only the model shot. Changing the flat-lay prompt first regenerates the flat-lay, then automatically renders a new model shot from it.
Other per-card actions: Smart edit (chapter 7 — annotate and overwrite in place), zoom, download and Save to library (a free independent copy that survives task deletion; with folders you pick which one to file it under).
Two safe stages: pattern extraction and Start analysis are both free and durable; Confirm generation is the explicit billing boundary. Adjust & retry is available as soon as a task exists — it opens a prefilled new draft without changing or stopping the original.
Note: pattern extraction is always free; its result is content-addressed to the source photo, so re-extracting the same viral photo costs nothing extra. Paid confirmation charges the flat 2-credit plan fee plus every colour's flat-lay; model shots are charged separately, and character reference photos never count toward the flat-lay's own input images. The whole task shows as one card in My Creations, grouped in billing as one "Pattern Transfer" entry (tracked and filtered separately from Garment Pattern Variations).
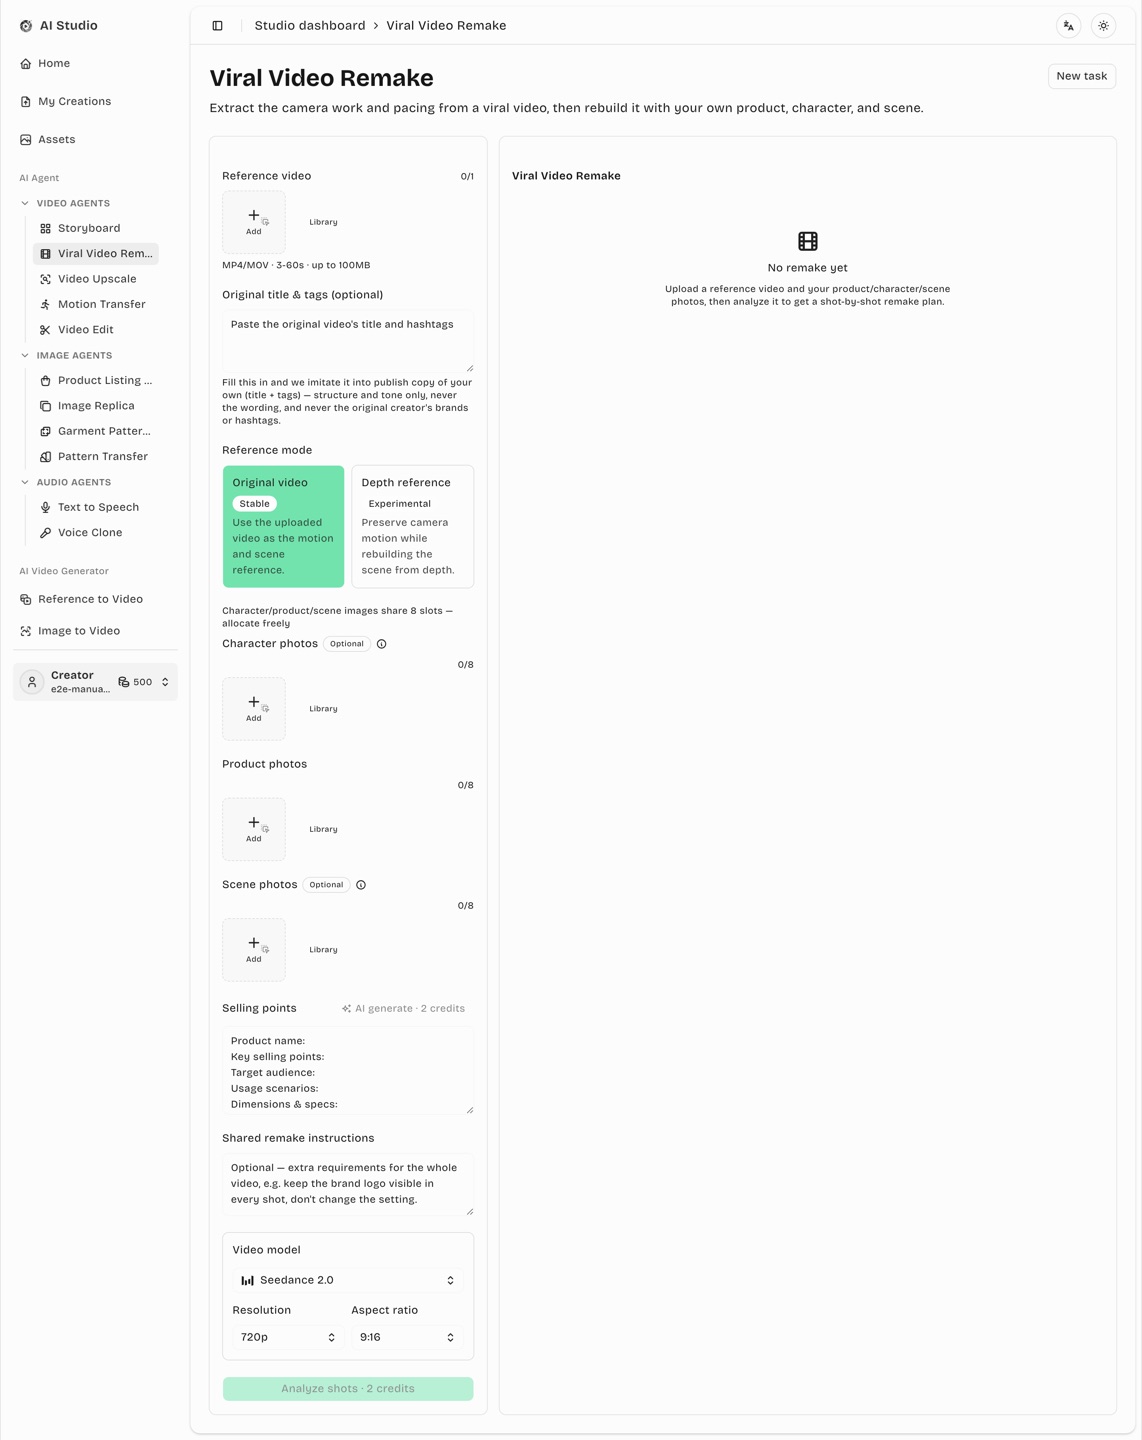
13. Viral Video Remake (AI Agent)
Upload a viral reference video. AI analyses its camera work, pacing and voice-over, swaps in your own character / product / scene, re-renders it segment by segment, and stitches the final cut with one click. Eligible test accounts can also compare the stable Original-video path with an experimental Depth-reference path.
Figure 13-1 Viral Video Remake workspace
Steps
Reference video: MP4/MOV, 3–60 seconds, up to 100 MB. After upload the system detects the voice-over for free and transcribes it word for word. The same analysis always creates a publish title plus 3–5 directly copyable #tags. Pasting the original title and tags is optional and only helps match their structure and tone.
Reference mode (controlled test accounts only):Original video · Stable is the default and gives the video model the trimmed source clip. Depth reference · Experimental converts each segment into a depth-motion video before rendering, preserving body/object geometry and motion while suppressing the source clip's colour, texture and identity. The selector is hidden when the experiment is not enabled for your account; saved historical tasks still show the mode they used.
Replacement images: a product image is required; character / product / scene share 8 slots. Character photos receive a free automatic white-background pass (“White ✓”). In Original mode an empty group can retain or infer an equivalent from the source, and an empty scene group may use the cleanest source frame. In Depth mode source appearance is deliberately unavailable: only your uploaded replacement images anchor identity, product and scene, so upload every appearance you need.
Selling points and unified requirements: add factual product selling points (required; AI fill is available) and optional whole-video requirements for camera, styling or messaging. These inputs are shared by every segment.
Voice-over — pick one: AI rewrite writes a new script from the visible product facts and your selling points; Keep original (editable) reuses the detected transcript after your edits. Keeping an empty transcript preserves the reference audio; rewrite can add narration to a silent reference. Subtitles are off by default, and the language picker covers English, Chinese, Spanish, Japanese, Malay and Thai.
Choose video-generation parameters: before pressing Analyse, choose the model, resolution and ratio. The whole Seedance family's generation route is scheduled automatically by the platform; Seedance 2.5 appears right after Seedance Mini and offers 480p / 720p only. This complete parameter set freezes when analysis is submitted, and later top-ups and re-renders reuse it.
Analyse shots (2 credits): the AI returns a segment-by-segment script — each 4–15 seconds with camera movement, action and its voice-over line. The same analysis call writes directly for the final model, with no extra request or fee: Seedance uses its media-role syntax. Voice-over lines are individually editable.
Render: select the segments to render (or select all), then click Generate. Segments render as a sequential chain: the previous segment's final frame is supplied to the next one.
Compose the full video: once every segment succeeds, Compose full video appears (free) and stitches the cut. Re-rendering a segment lets you recompose.
Depth render-requirements preview: unrendered Depth segments show their complete render requirements in the current site language and update live as you add directions, so you can review them before submitting. The generation request still uses a model-optimised English internal prompt; spoken lines are not translated to English and always remain in the voice-over language you selected.
Seedance 2.5 in Viral Video Remake: every segment render always attaches a materialized reference clip, so pricing always uses the cheaper with-reference-video rate from chapter 5.4 (never the plain flat rate). The same automatic recovery that retries a moderation-rejected or copyright-flagged segment (prompt rewrite, then muted clip + generated music) applies to Seedance 2.5 segments too.
Staying in control
Action
Description
Stop generating
Stop at any time: unfinished segments are marked failed and refunded, finished ones are kept and can be re-rendered individually later
Retry failed / rewrite & regenerate
Re-render a single segment (normal charge); it chains from the nearest earlier successful segment
Adjust & retry
Loads the model, resolution, ratio and other inputs from this submission (or recovers them from a historical first child) into an editable brand-new task
Choosing a mode: use Original for the established path and when the source scene/appearance is useful. If Depth is visible on your test account, use it to evaluate motion transfer with stronger appearance isolation. Depth preparation can add processing time; if it cannot be prepared, the segment fails safely and is refunded — switch back to Original and retry.
Billing: mode selection adds no separate fee. Analysis costs 2 credits; every segment is charged separately by model / resolution / duration; a failed predecessor cancels and refunds the segments that follow; composing the final cut is free. All charges for one task are grouped into a single billing entry.
Content moderation: occasionally a reference frame is rejected by the model's content moderation (the system first retries with a sanitised prompt and muted audio). If a segment reports that its reference frame was blocked, swap the reference video or adjust that segment.
14. Video Upscale (AI Agent)
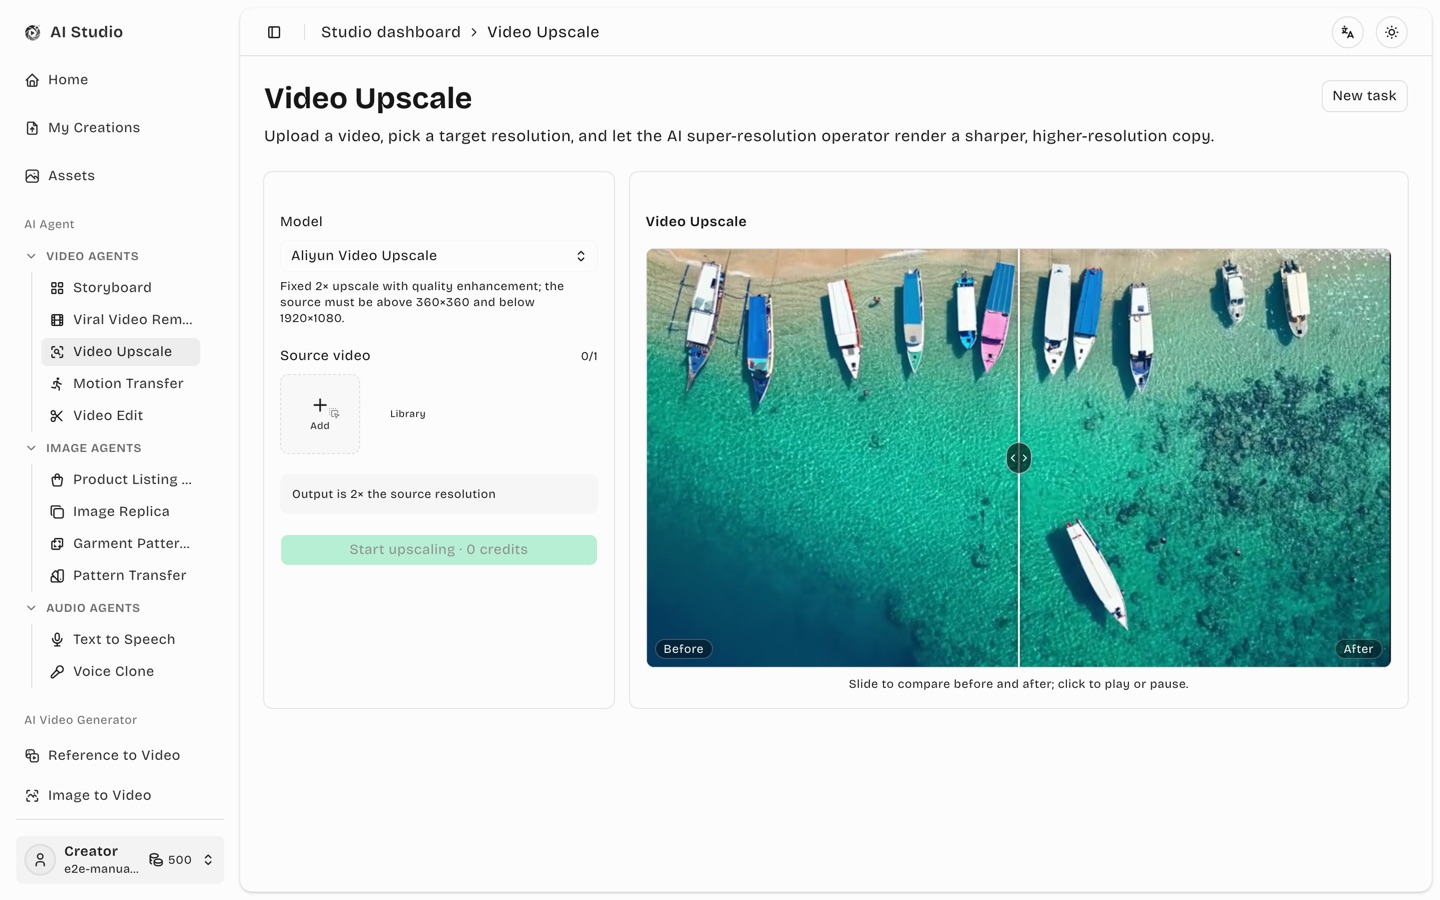
Turn soft, low-resolution footage into a sharp 720p / 1080p / 2K / 4K version — an AI super-resolution operator rebuilds detail frame by frame. The empty workspace shows a real before/after demo: drag the divider to compare.
Figure 14-1 Video Upscale workspace (slider comparison demo on the right)
Steps
Pick the upscale model (one of two): Volcengine Video Upscale — choose a target resolution from 720p to 4K, any source size; or Aliyun Video Upscale — a fixed 2× upscale with quality enhancement, requiring a source above 360×360 and below 1920×1080, up to 1 GB, priced by duration at a flat 2 credits/second.
Upload the source video: up to 600 seconds (10 minutes); the library works here too.
Pick the target resolution (Volcengine mode): 720p / 1080p / 2K / 4K. Portrait footage is measured on its short edge (portrait 1080p outputs 1080×1920). Aliyun mode skips this step — output is always 2× the source.
Check the quote: the button shows the exact price — it scales with duration, frame rate and target resolution — alongside an estimated processing time. Duration and frame rate are probed server-side, which is what the charge is based on.
Click Upscale. The task runs in the background with a live “time remaining” estimate; you can leave the page.
When it finishes, the result appears on the right — click Download to save it.
Price guide: 720p is the cheapest tier; 1080p costs about 3×, 2K about 5× and 4K about 11×, and footage above 30 fps carries a frame-rate multiplier. A one-minute 30 fps clip upscaled to 720p costs roughly 53 credits.
Note: long footage at a high target resolution can take hours; the system waits up to 24 hours and refunds automatically on timeout or failure. Deleting a running task refunds it too.
15. Motion Transfer (AI Agent)
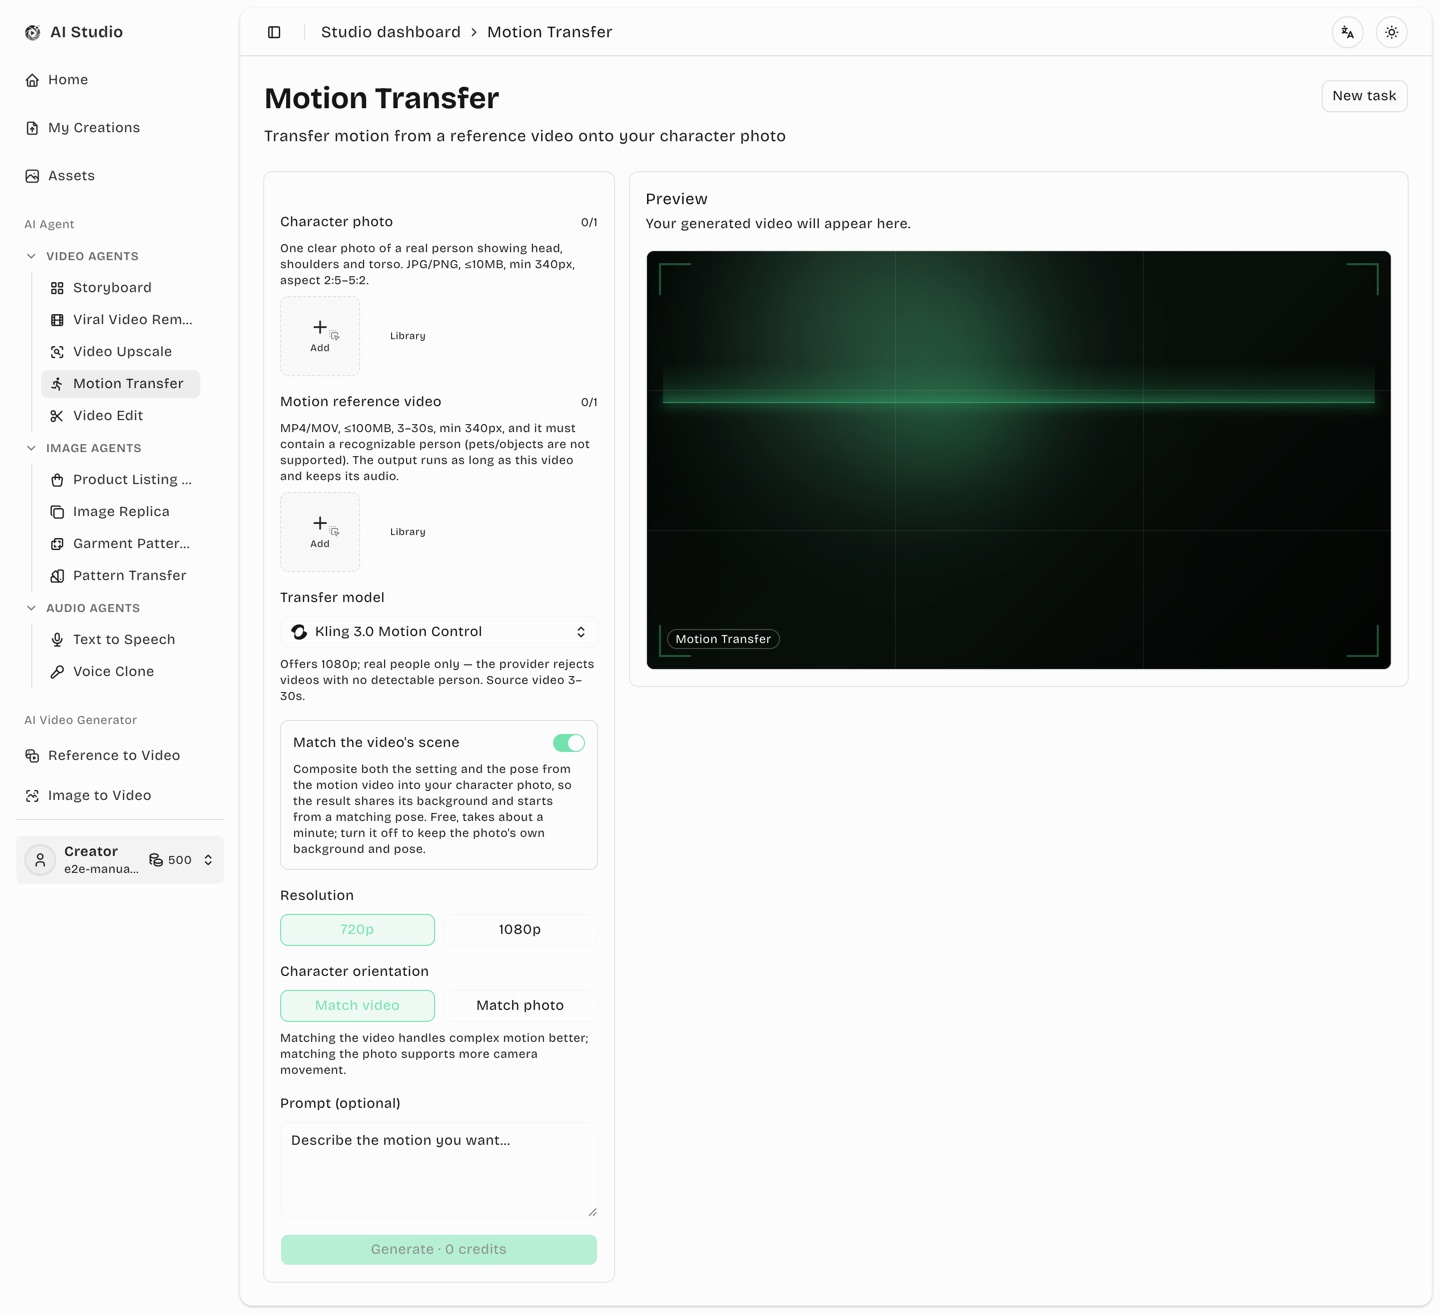
Transfer the motion from a reference video onto your own character photo: upload one character photo plus one motion video, and AI makes the subject in the photo perform the motion from the video. The result runs as long as the motion video and keeps its audio.
Figure 15-1 Motion Transfer workspace (materials and parameters on the left, preview on the right)
Choose a model first
The page offers two complementary models; the choice changes both the available parameters and the price:
Wan 2.2 Animate
Kling 3.0 Motion Control (default)
Subject
Not limited to people — pets and toys work too
Real people only (the model runs person detection and rejects pets and objects outright; such failures cost no credits)
Resolution
480p / 720p
720p / 1080p
Video length
5–120 seconds
3–30 seconds
Price
8 credits/s at 480p, 16 credits/s at 720p (billed as 5 seconds minimum)
20 credits/s at 720p, 27 credits/s at 1080p
Keeping the video's scene
Native — pick "Into the video"
Needs our "Match the video's scene" preprocessing
In short: pick Kling when you need 1080p, otherwise pick Wan — it is cheaper, takes longer videos, and is the only one that handles non-human subjects.
Steps
Upload the character photo (1 image): it must clearly show the subject's head and torso. JPG / PNG, up to 10MB, min 340px on the short side, aspect ratio between 2:5 and 5:2.
Upload the motion reference video (1 clip): MP4 / MOV, up to 100MB, min 340px, and its length must fall inside the selected model's range (see the table above).
Transfer mode (Wan only):Into the video (default) swaps the subject in the video for your character and keeps the video's own scene and camera; Onto the photo applies the motion to your character photo and keeps that photo's own background.
Match the video's scene (Kling, and Wan's "Animate the photo"): before submitting, the system composites both the setting and the subject's pose from the motion video's first frame into your character photo for free — the result then shares the video's background and starts from a matching pose, so the motion picks up naturally. Turn it off to keep the photo's own background and pose. Compositing takes about a minute, during which Generate stays disabled. Once it finishes, the character photo is replaced by the composite, so you can confirm exactly what will be rendered before submitting. If you don't like the result, add a line of extra direction in the box below (for example "stand closer to the camera" or "no glasses") and press Regenerate the scene image — the extra direction applies only when you press that button. Wan's "Into the video" already uses the video's setting natively, so the switch is hidden there.
Pick a resolution: follows the model (Wan 480p/720p, Kling 720p/1080p).
Pick the character orientation (Kling only): "Match video" reproduces complex motion more faithfully; "Match photo" supports more camera movement.
Prompt (optional): can be left empty. Add one only when you want to emphasise a specific detail of the motion.
Click Generate. The button shows the exact credit cost.
Pricing
Both models are charged by the length of the motion video (the result runs exactly as long; partial seconds are not counted). Wan 2.2 Animate: 8 credits/second at 480p and 16 at 720p, billed as at least 5 seconds. Kling 3.0 Motion Control: 20 credits/second at 720p and 27 at 1080p. An 8-second motion video at 720p therefore costs 128 credits on Wan and 160 on Kling. The server re-reads the video's real duration before charging, so the final amount always follows the true length.
Shooting tips: a front-facing, evenly lit photo with the whole subject in frame works best; the clearer the subject and the more definite the movement in the motion video, the more accurate the transfer.
About the scene: apart from Wan's "Into the video", the result's background comes from the character photo. That is what the "Match the video's scene" switch is for — it composites the video's setting and opening pose into the photo first, so the result looks like it was shot in the video's environment and the motion picks up cleanly. If compositing fails, rendering continues with the photo's original background instead of aborting, and the workspace says so.
16. Video Edit (AI Agent)
Change a finished video with one sentence: modify / add / remove visual elements, edit the sound, extend it, or splice 2–3 clips with seamless transitions. Upload a video directly, or jump in from the “Video Edit” button on any AI result card.
Figure 16-1 Video Edit workspace (canvas + filmstrip + instruction bar, parameters on the right)
Six task types
Task
What it does
Modify element
Swap something in the frame for something else (color / material / subject / background…)
Add element
Insert a new element at a given position and moment
Remove background music / change the voice / add sound effects; the picture stays unchanged
Extend
Continue the video with seamless style and narrative
Transition splice
Bridge 2–3 clips into one seamless video
Selecting a task prefills the officially recommended sentence template — just replace the angle-bracket placeholders. Text you have edited yourself is never overwritten when switching tasks.
Steps
Add the source video: upload, pick from the library, or bring in a result. Per-clip length caps follow the model: 30s on Seedance 2.5, 15s on the 2.0 family; splice accepts 2–3 clips.
Browse the filmstrip: a CapCut-style timeline under the player (evenly sampled to fill the width, no scrolling) — tap or drag to move the playhead.
Scope the edit range (Seedance 2.5): press and drag directly across the strip to select the range (the outside dims; edge handles fine-tune, a single click still seeks); “within Ns–Ms” is written into the instruction automatically so the edit only touches that window. Drag back to full width to clear it.
Pick a task and finish the instruction: replace the placeholders, or write your own.
(Optional) auxiliary reference images: for combo tasks like swapping products or prints, attach a product photo and reference it as “referencing Image 1’s product…”.
Choose model and resolution: all four Seedance models. Seedance 2.5 edit tasks automatically match the source’s length and aspect ratio (locked by the official spec); the 2.0 family and extend tasks set an explicit output length.
Click Generate (the button quotes the price live). When done, use the Original / Edited toggle on the player for instant A/B comparison; continue editing the result for chained iterations, or send it to Video Upscale.
Pricing
The existing reference-video rate applies: (output seconds + floored source seconds) × credits per second. Example: editing a 13s source on Seedance 2.5 at 480p = 17 × (13+13) = 442 credits; the same task on 2.0 Mini at 480p with a 5s output = 2.4 × (5+13) ≈ 43.2 credits. Splice output is the sum of the clips plus ≈1s per transition. Failures refund automatically.
Three tips for a good edit instruction: ① open with a clear verb (edit / modify / remove / add); ② describe the target with recognizable traits (color, position, material); ③ keep the closing “everything else stays unchanged” — the official guide stresses that stating what to keep markedly improves fidelity of the untouched parts (the template includes it, and the system restores it if deleted).
About results: an edit is a guided re-generation, not pixel surgery — untouched parts are highly faithful but not bit-identical. If unsatisfied, adjust the instruction and retry (a new task; the original is never altered).
17. Text to Speech (AI Agent)
Turn a script into natural spoken audio: type or paste the copy, pick a voice and a model tier, and synthesize an mp3 in one click. Pause markers, emotion tags (Expressive tier) and AI script polish are built in; history and examples live on the right side of the workspace.
Figure 17-1 Text to Speech workspace (script and parameters on the left, history/examples on the right)
Steps
Enter the script: up to 2,000 characters (billing counts characters, inserted markers included). The toolbar inserts pause markers — the menu follows the tier: the Standard tier offers exact durations (0.3 / 0.5 / 0.8 / 1 / 1.5 / 2 / 3 s, read as silence of that length), while the Expressive tier offers short / medium / long semantic pauses (about 0.5 / 1.5 / 2.3 s) because that model does not support timed pause markers; Smart markup (2 credits) analyzes the script and inserts fitting pause markers and emotion tags (pauses only on the Standard tier) without changing a single word.
Pick a voice: "Change voice" opens the catalog — 16 curated female/male voices with gender filter, name search, previews and favorites; the "Custom voices" tab lists the voices you cloned (see the "Voice Clone" section below). Your voice is remembered — the workspace preselects the one you used last time (falling back to the built-in default if that voice was deleted).
Pick the model tier:Standard (3 credits / 100 chars) is fast and economical with full speed / stability / similarity / style sliders; Expressive (5 credits / 100 chars) delivers the most natural read and unlocks emotion tags — the toolbar groups 50 common tags under Laughter / Emotion / Breath & mouth / Delivery / Other (e.g. [laughs], [whispers], [professional], [warmly]); the model accepts open-ended descriptors, so you can also type your own, such as [frustrated sigh]. Stability comes as a three-preset control (Creative / Natural / Robust).
Click Generate speech (the button shows the live price; under 100 characters bills as 100). The task appears under History and refreshes to completion automatically.
Play the result right on the card, Download the mp3, Reuse script to edit again, or Delete (which also destroys the result file).
Examples: the Examples tab ships three tagged sample scripts with preview audio — "Try it" loads one straight into the form.
Note: Chinese is driven by the multilingual model and accent varies slightly per voice — preview before you pick. Failed or timed-out tasks refund automatically. My Creations and Credits & Billing are fully wired: the polish fee and the synthesis fee group into one "Text to Speech" billing entry.
Voice Clone
Upload your own reference audio and clone a personal voice — once ready it appears in the Text to Speech voice catalog under "Custom voices", and every history card offers one-click "Use in Text to Speech".
Figure 17-2 Voice Clone workspace (name and reference audio on the left, clone history on the right)
Name the voice and upload 1–3 reference recordings (30 s–3 min of clean speech each works best — no background music or noise; the asset library works too).
Click Clone voice (100 credits each). Cloning usually finishes within a minute, and the finished card carries an auto-generated preview.
Hit "Use in Text to Speech" to jump straight into synthesis with that voice — or pick and favorite it any time from the voice catalog's "Custom voices" tab.
Note: cloned voices are visible and usable by you only; each account keeps up to 2 cloned voices, and deleting one frees the slot (audio you already generated is unaffected). Failed or timed-out clones refund automatically. Reference quality drives similarity — use clear speech without reverb or background music.
18. Viral Video Insights (Ops Agent)
The first ops agent: upload a benchmark viral video with its original link. The model watches the footage and listens to the audio, then breaks it down into 31 dimensions across 7 modules and keeps the result automatically as the final version in a library shared by your team (the master account and its members) — accumulated over time to guide AI video generation later.
Figure 18-1 Viral video insights workspace (upload and link on the left, the team library on the right)
Steps
Upload the video: a single downloaded benchmark clip (≤180 s). It is used for this breakdown only — the copy is destroyed as soon as the analysis finishes and only the link and metadata are kept.
Enter a tag: required — a label that groups this breakdown, such as "Top 100 apparel" or "trending now"; keep one spelling per tag. Tags your team used recently are listed under the field for one-tap fill, and your last value is pre-filled. Analytics filter by tag.
Paste the original link: it records the source and identifies the platform (TikTok / Douyin / Instagram / YouTube / Xiaohongshu / Kuaishou). Views, likes, comments, price and other platform data are not entered in this phase; the fields are reserved and show "Pending API".
Press Start breakdown; it usually finishes in 20–60 seconds and the page refreshes itself.
Read the breakdown: the detail page expands 31 dimensions under 7 modules (source, script & structure, garment selling points, model & on-body proof, native feel & audiovisual, comment feedback, reuse & shooting conclusions). Every dimension carries an observation, evidence timestamps and one of four labels — Fact (verifiable on screen or in the audio), Inferred, Not shown, N/A. A finished breakdown is kept as the final version automatically (no manual confirmation since 2026-09-09); the 31 dimensions are read-only, and changing them means a new upload.
Check the coding: the "Coding" card on the detail page shows the 12 fields the model assigned from the codebook (opening hook, shooting style, editing, audio mode …). They can still be corrected after the breakdown is kept; corrected fields carry a "Corrected" badge. These values are what the Analytics page aggregates, and a correction counts within about a minute.
The library: the library is scoped per team: a master account and its members share one library, and an account without a team sees only its own records. A record stays with the team it was created in — leaving a team does not take it along and joining one does not bring it in. Only the submitter, the team master or an admin can delete a record. The Analytics page's "library" likewise covers your team only. The list filters by tag (including "Untagged") and every row carries a tag badge; records from before this field existed have no tag — tick several rows (or select the whole page) and enter the tag once in the bulk-tag bar, or edit a single record on its detail page.
Discipline: the model only records what can be seen or heard; anything absent is "Not shown", reasons-it-went-viral and audience judgements are always "Inferred", and height, size or price are never guessed from appearance — review with the same yardstick.
Note: the module is hidden by default and enabled per account from the ops dashboard; it is free in this phase, uses no credits and does not appear in My Creations. Breakdown text is written in Simplified Chinese in this phase.
19. Viral Insights Analytics (Ops Agent)
See the patterns across every confirmed breakdown: how viral videos open, allocate time, which shooting / editing / sound / caption choices they make, which selling points they show and how the body proves them, which technique combinations keep recurring, and how reliable the evidence in the library is. Only confirmed breakdowns are counted, and every chart can be compared against the whole-library baseline after filtering.
Figure 19-1 Analytics (filter bar, KPIs, structure and audiovisual sections)
The codebook underneath
Breakdown observations are free text; counting them directly only yields fact / not-shown rates and tag frequencies. So after every breakdown the system runs a text classification pass that maps 12 key fields onto a codebook: category, opening hook, ending CTA, shooting, editing, audio mode, captions, scene, angles (multi), comparison, selling methods (multi) and reusable elements (multi). Model codes take effect by default; operators only correct mistakes in the "Codes" card on the detail page — while a breakdown is under review the dropdowns and chips are editable, edited fields carry an "Edited" badge, and "Recode" reruns the model without ever overwriting a human correction. When the codebook changes, the analytics footer shows how many confirmed rows still use the old version and an admin can recode them in one click.
What the page shows
Entry points: sidebar "Ops Agents → Analytics", or the "Analytics" button in the breakdown library header. It shares the module switch with Viral Video Insights.
Filter bar: confirmed time (all / last 30 / last 90 days), platform, category, duration bucket (≤12 s / 12–25 s / >25 s), tag (including "Untagged" — once picked, every chart and KPI counts only breakdowns under that tag). With "Show library baseline" on, the short tick on each bar is the whole-library share, so a category's difference from the whole is visible at a glance. The right side reads "Filtered n / library N".
KPI row: confirmed count, new in 30 days, median duration, median segments, voice-over / captions / one-take shares, platform-data progress (pending API).
Selling points & on-body proof: how often each of the six selling-point dimensions is shown (with a callout for how many viral videos never address sizing), angle coverage, comparison type.
Combinations: pairs and triples across opening hook / shooting / editing / audio / captions that keep appearing together, with support and counts.
Style tags, evidence quality, trend: normalized top tags and co-occurrence; fact rate per module and the dimensions most often "not shown" (the gaps a reshoot can fill); confirmations per week and key shares by month.
Recent reshoot plans: the reshoot plans of the five latest confirmed breakdowns, ready for the shooting team.
Export CSV: the top-right button exports the confirmed rows under the current filter, one per row, with the 12 codes, the 31 evidence labels, normalized tags, source link and summary.
Rules: a chart with fewer than 5 filtered samples shows "not enough samples" and 5–19 is marked as a small sample; the baseline is always the whole library; drafts under review are never counted; performance correlation (views / likes by technique) opens once platform data is connected.
20. Listing image insights (ops agent)
The second ops agent: batch-upload a benchmark product's Amazon listing and A+ images by folder. The model reads every image for composition, lighting, subject presentation, typography, copy and color, then looks at the whole set for structure, narrative order, visual system and selling-point coverage; each set is kept in your team's library and coded automatically the moment it finishes, ready for "Image analytics".
Pick the set type, then upload folders, zip files or images
Pick the set type: click "Listing set" or "A+ set" before anything else — one type per batch, and the three upload entries stay disabled until you do. A Listing set is the main and secondary images (images whose folder or file name carries an A+ hint are still recorded as A+); an A+ set is A+ page modules only, with no main image, and is analyzed and coded as an A+ page.
Prepare and upload (any of three ways, mixable): (1) several folders — each folder holds one set's images directly (main.jpg or a MAIN file name marks the main image, the rest sort as 1.jpg, 2.jpg…; the ASIN-product-images.zip and ASIN-A+-images.zip a scraping tool exports work too); drag them together onto the drop zone, or click "Choose folders" and pick their parent directory — the page groups by sub-folder (the browser's directory dialog picks one folder at a time, so the parent directory is the multi-set entry); (2) several zip files — "Choose zip files" takes many zips at once, each zip is one set, titled by the ASIN in the zip name with an Amazon link; (3) several images — "Choose images" collects loose files into one set. A leading index in a folder name (such as "3 B00D1ARZMC") is dropped. Within a set the main image comes first and the rest follow file-name order; no per-set image limit (sets over 10 images are analysed in batches of 10 and each batch is saved as it finishes; a 200-image safety ceiling only guards against mistakes); up to 20 sets per batch. The page previews the groups first, with the image and A+ counts of each.
Analysis progress: images are analysed 10 at a time and every finished batch is written to the record — the list row shows "x / y images analysed", the detail page shows the per-image breakdowns of the finished batches, and the set-level dimensions, summary and style tags are compiled once every image is done. If a batch fails, the finished batches are kept and Retry analysis on the detail page resumes from there without re-running finished images.
Enter a tag: required, one per batch (e.g. "Top 100 apparel", "trending now"); keep one spelling per tag. Recently used tags are listed under the field and your last value is pre-filled. A set that belongs under another tag can be changed on its detail page.
Start: press "Start breakdown (N sets · M images)". Images are resized to 1600px in the browser before upload (4 at a time); each set starts analyzing as soon as its upload lands, and the list header shows how many sets of this batch are done or failed. A failed upload voids only that set.
Review: open a record from the list: an image strip at the top (click to enlarge), then the summary, the codes card, the 6 set-level dimensions and the 9 per-image dimensions (first impression, style reference, presentation, composition, lighting, background & palette, main purpose, typography, copy — redefined on 2026-09-12 after a design-direction table). Every observation carries a fact / inferred / not shown / n/a tag; the copy dimension transcribes on-image text verbatim, and typefaces are classified by style only (bold sans, serif, script…) with font names as guesses at most.
Privacy and retention: resized images are stored with the record and destroyed when it is deleted; they never enter the asset library or any generation. The library is team-scoped: a master account and its members share one, nobody outside the team sees it. The module is hidden by default and enabled per account in the ops dashboard's module visibility card; members inherit the master's exception. The list filters by tag (including "Untagged"); tick older records and tag them in one go from the bulk-tag bar.
21. Image analytics (ops agent)
See the patterns across every kept image-set breakdown: how main images are composed and what background they use, how lighting and color are handled, how type and copy are laid out, how the product is shown, in what order sets tell their story, which combinations keep recurring and how reliable the library's evidence is. Only kept sets count, and every chart compares the filtered slice with your team's whole library.
The codebook
Each finished set is classified once into 12 enumerated fields: category, main-image composition, main-image background, lighting style, typography style, text density, copy focus (multi), subject presentation (multi), color scheme, set structure, A+ modules (multi) and reusable elements (multi). Model codes apply by default; operators only fix mistakes on the detail page's codes card, and corrected fields carry a "corrected" badge. "Recode" re-runs the model values and never overwrites manual corrections. After a codebook upgrade the analytics footer shows how many sets use an older version, and an admin can recode them in one click.
What the page shows
Entry points: sidebar "Ops agents → Image analytics", or the "Image analytics" button on the library page. Same module switch as listing image insights.
Filters: kept date (all / last 30 / last 90 days), category, type (Listing / A+ sets — main-image composition, background and pure-white share count Listing sets only), tag (including "Untagged" — once picked, only sets under that tag are counted); with "Show library baseline" on, the short tick on every bar is the whole-library share. The right side reads "Filtered n / library N sets".
KPI row: kept sets (with the last-30-day count), median images per set, and the shares with A+, with on-image text, with a model wearing the product and with a pure-white main image, each against the baseline.
Main image: composition, background, and a composition × lighting heat map.
Lighting and color, text and copy, subject presentation: lighting style and color scheme; typography style, text density and copy focus; subject presentation and category.
Set structure: narrative structure, images per set, A+ module types.
Combinations, style tags, evidence quality, trends: recurring combinations of composition / background / lighting / typography / color; normalized tags and co-occurrence; fact rate per dimension and the most often "not shown" dimensions; sets kept per week and the model-wearing / on-image-text shares by month.
Recent takeaways: what the latest five kept sets are worth borrowing and where they fall short, for the design team.
Export CSV: the current filter's kept sets, one row per set, with the 12 codes, per-dimension fact rates, normalized tags and the summary.
Rules: fewer than 5 sets after filtering shows "not enough samples", 5–19 is flagged as a small sample; the baseline is always the team's whole library; failed sets never count.
22. Ops Board (Ops Agent)
The third ops agent: connect your own TikTok Shops and the system pulls sales, products, stock, reviews, videos and creators, the category market and the shop rank list from EchoTik every day, then shows it all on one page with charts — the one page ops opens every morning.
Figure 22-1 Ops Board: shop tabs, header and alerts, KPIs, trend and category share, product table
Connecting a shop
Add shop: click Add shop top right → search EchoTik by shop name (exact match first, fuzzy as a fallback) and pick a hit to fill the seller ID and name, or enter the seller ID directly. Leave the level-3 category blank to detect it from the shop's main category (the category drives the market and rank sections); the low-stock threshold defaults to 10 and the daily call cap to 300.
First backfill: saving claims a one-time backfill — 180 days of shop history, 90 days per active product, 180 days of category market, every review and the existing videos — about ten minutes; the header shows "Backfill" while it runs.
Daily update: every day after 21:00 Beijing time the previous day (T+1) is synced; category rank lists publish in the afternoon, so lagging blocks are re-checked at 23:00. Refresh can be triggered manually once a day (again after a settings change); when the day's data is already complete it says so.
Several shops, one team: switch shops with the tabs at the top; shops are configured per team, so master and sub-accounts share one list. Shop settings changes the category, threshold and cap, pauses sync, or deletes the shop together with all of its history.
What the page shows
Header and alerts: shop name (linked to the shop page), rating and followers, the data date (switchable to earlier days), sync state and usage (calls today / this month), and the range (last 7 / 30 / 90 / 180 days). Alerts are rule-based: sync lag / failure / call cap, stale data, low-stock SKUs, new negative reviews, a 7-day sales drop of more than 30%, and new products / videos / creators, plus videos your own account posted yesterday.
KPIs: yesterday's units and GMV, 7 / 30-day units and GMV with period-over-period change, active products, creators, videos, shop rating, positive-feedback and response rates.
Trend and category: daily units (columns) and GMV (line); the level-3 category's daily GMV and your share of it.
Products: a top-10 bar of 7-day GMV; the product table (1 / 7 / 30-day units, 7-day GMV, rating and reviews, stock with a low-stock SKU badge, discount, videos, sparkline) listing active products only, with a low-stock filter, sortable headers and 10 rows per page (changing the filter or sort returns to page 1); clicking a row opens a drawer with the 90-day trend, SKU stock and prices, and that product's reviews and videos.
Own account: the shop's official TikTok account (EchoTik's shop profile names the account ID; the board searches TikTok by shop name and claims the handle by that ID) plus any marketing accounts entered under Shop settings → Marketing accounts (handles separated by commas or new lines, with or without @); with more than one account the section switches by account and adds an "All accounts" total. Per account: followers with the 7-day change, videos posted, likes received, videos posted in the last 7 days; the 30 most recent videos with publish date, plays, 1-day / 7-day play increments, likes, comments, shares, saves, engagement rate, plus product-link and new badges, sortable by latest or plays, 10 rows per page; six charts above the table: daily plays (columns), followers (line), posting cadence (columns), top 10 by plays, plays distribution (<100 / 100–999 / 1K–9.9K / ≥10K) and the engagement mix (likes / comments / shares / saves with the overall engagement rate), plus total-plays (average per video) and engagement-rate tiles. The data comes from realtime endpoints snapshotted daily, so increments are differences between snapshots and appear from the second day; while the account has not been matched yet the section says the next sync will retry.
Reviews: star distribution, the 30-day average rating, the latest reviews and negatives (≤3 stars) on their own, each with SKU spec and time.
Content and creators: top videos (10 rows per page; views / engagement / units / GMV / GMV per 1k views, linked to TikTok), linked creators (followers, units, GMV, 30-day GMV, email), live streams.
Category standing: the shop's daily rank over time (>50 when outside the top 50), weekly rank, and the ten shops at the top with yours highlighted.
Export: products / reviews / videos / own videos as CSV (UTF-8 BOM, opens directly in Excel).
Figure 22-2 Product drawer: 90-day trend, SKU stock and prices, the product's reviews and videos
Scope and limits: data comes from EchoTik (T+1 estimates), not from the shop's own order records; shop and product trends only include days with sales, other days count as 0; the daily rank scans the top 50 only; a shop EchoTik has not indexed is flagged so you can check the seller ID. Only re-hosted image copies are shown. The module is hidden by default and enabled per account by an administrator in the ops console's module visibility card; sub-accounts inherit the master account's grant.
23. Batch Video Remake (Batch Production)
"Batch Production" is a new top-level group beside AI Video, AI Image and AI Agents. Its first module is Batch Video Remake: one viral reference video + character photos + a scene photo + the product images of a batch of same-style SKUs; press "Generate batch" once and every SKU gets its own video with the same shots and the right product — nothing to do after launch.
Figure 23-1 The workspace: form on the left (reference video / character / scene / SKU groups / parameters / quote), one card per SKU on the right
Steps
Reference video: upload one viral clip (or pick it from the library). Every SKU video mirrors its action, camera work and pacing shot by shot. When the source is longer than the model's reference cap (15s for the Seedance 2.0 family, 30s for 2.5) a "Reference span" block appears: drag the "Start" and "Length" sliders to pick the span to replicate; the output length follows that span.
Character and scene photos: 1–2 character photos (one clear front-facing face per person — face, hair and build come from here; do not upload several angles of the same person); an optional scene photo — when given, the environment is rebuilt from it, otherwise the reference video's environment is kept.
SKU groups: one card per SKU with a label (e.g. "Navy", "Wine") and 1–5 product images — the first is the main image (silhouette and colours), the rest are detail shots (fabric, seams, hardware). "Add SKU" adds a card, up to 20; a batch must be different SKUs of the same style, and the first SKU produces the master prompt.
Parameters: model (Seedance 2.0 / Fast / Mini / 2.5), resolution, aspect ratio, audio handling (follow the source rhythm / music only / voice-over / no constraint); optional product facts (construction, selling points, audience) and extra requirements every prompt must follow.
Voice-over (added 2026-09-13): picking it reveals the VO language (six options, defaulting to the site language) and a Subtitles toggle. After submission the AI writes one voice-over from the reference video's shot pacing and your product facts (the same writer the prompt wizard uses); each SKU's script is rewritten from its own product facts (when they match the master's, the master script is reused with only the product wording swapped), keeping the master's time segments and pacing. If no usable script can be written the whole batch fails and the analysis fee is refunded — it never silently ships a clip without the voice-over. Filling in the product facts and selling points makes the script noticeably better.
Per-SKU product facts (added 2026-09-13): the product info card is shared by the batch and whatever you type wins for every SKU; style and selling points you leave empty are read by the AI from each SKU's own product images (only what is visible), while the audience stays one per batch. If that read fails the SKU falls back to your typed facts only — it never reuses the first SKU's inferred facts.
Quote and launch: the quote block shows "Analysis 2 + SKU count × (plan 2 + current render price) = total" plus the output / reference seconds; press "Generate batch · N credits". Only the analysis fee is charged at submission; each SKU's plan and render fees are charged when its turn comes.
How the batch is replicated
One analysis for the whole batch: the reference video is broken down into the goal, shot-by-shot visuals, camera work and environment — the same logic as the prompt wizard's "Analyze the video" step in Reference to Video, without the per-section confirmations.
Master prompt + per-SKU rewrite: the first SKU's product images produce a master prompt that is lint-checked and patched automatically; every other SKU only rewrites the product description on top of it (colours, materials, signature details and the referenced image numbers), and a rewrite that does not pass falls back to composing that SKU on its own — same shot plan, correct product each time.
One render per SKU: each SKU is an independent reference-to-video task rendered on the chosen model and archived automatically.
Identity lock and environment-free actions: the actions broken down from the reference video describe only the person's movement and orientation, and the environment comes only from the scene photo and scene text; after linting, every SKU prompt gets a mechanical "Identity lock · top priority" block (one person throughout, every angle follows the character photo, back shots show that hairstyle as seen from behind, people in the reference video and product images are only motion sources or mannequins), restated on every turning shot. The block is visible in "View prompt". For steadier identity, add a side-back or back view of the character and prefer flat-lay or white-background product images.
Figure 23-2 A finished batch in view mode: the form is frozen, one card per SKU on the right (status, video, prompt, download)
Review, stop and re-render
Grid cards: each SKU shows queued / writing prompt / ready to render / rendering / completed / failed; the first SKU carries a "Master" badge. A finished card plays and downloads, and "View prompt" shows the exact prompt used for that SKU and where it came from (master / rewritten from master / composed separately).
Stop: while a batch runs, "Stop" in the top-right corner (with confirmation) refunds the plan fee of SKUs not started, stops and refunds renders in flight, and keeps finished videos.
Re-render: a failed SKU card offers "Re-render · N credits" to render that one again at the current price.
Adjust & retry: in view mode, "Adjust & retry" loads this submission's materials, span, SKUs and parameters into a new form so you can change them and launch another batch.
My Creations and billing: My Creations shows one card per batch (type filter "Batch Video Remake") with the SKU count and the net credits of the whole batch; billing folds the batch into one "Batch Video Remake" entry that expands into the analysis fee, every SKU's plan / render fees and refunds.
Visibility and pricing: the module is visible to every account (since 2026-09-17; an admin can still switch it off for a specific account in the ops dashboard's module visibility card, and members inherit the master account's setting); the entry is the sidebar "Batch Production → Batch Video Remake" (the dashboard's "Batch remake" card only shows batch and SKU completion statistics; it is not an entry point). Render fees follow the chosen model's current Reference to Video price (the with-reference-video tier), the same as a single workspace submission; plan fees do not take part in the wizard's rebate.
24. Batch Image Swap (Batch Production)
The second module in "Batch Production": upload a finished set of shots plus the product photos of your other SKUs, press once, and every SKU gets the same set — same person, pose, framing, background, layout and on-image text, with only the product swapped.
24.1 How to use it
Reference shots: upload the finished images of one SKU (up to 12), or pick them straight from the asset library.
SKU product photos: one card per SKU (up to 10), 1-3 photos each — the first sets colour and pattern, the rest are detail views of that same product. A colour or variant name per SKU goes into the prompt.
Choose the model and tier (Nano Banana 2 · 2K by default) — GPT Image 2 / 2.5, Nano Banana Pro / 2 / 2.1 and Seedream 5 Pro — and add one line of extra requirements if needed ("keep the buttons silver").
Press Swap batch. The quote before you submit is shots × SKUs = total images. Nothing to do after launch.
24.2 Pricing
Prompts are built mechanically with no AI planning step, so there is no analysis or plan fee — only the per-image render price.
Charged cell by cell, right before each render, and refunded per cell on failure. Cells that never start are never charged, so stopping a batch or running out of credits costs nothing extra.
24.3 The result matrix
Results are grouped by SKU, each group holding that SKU's full set. Any single cell can be zoomed, downloaded, saved to the library or re-rendered at the current price.
Download all packs the batch into one zip with a folder per SKU, keeping the order and names of the reference shots.
24.4 Product lock: the product follows your photos, the reference only sets the layout
Each SKU's product photos are that SKU's product lock. The two sides have strictly separate jobs:
The lock decides: the colours and their proportions, the pattern (motif, scale, direction, repeat and the colours inside it), and the structural parts and hardware with their placement, such as collar, placket, buttons, pockets, piping, cuffs, hems, waistband and drawstring. The colour name you give a SKU is only a hint; where it disagrees with the product photos, the photos win.
Buttons are locked separately: visible buttons follow the product photos' spacing, colour, shape and finish, so how many appear is set by the product's own spacing, and a close-up of half a placket never crams in the whole garment's buttons. They are never added, removed, recoloured or reshaped.
Structural parts appear only where the reference shows them: when the reference is a fabric macro, or a crop that shows no buttons, pocket, piping, collar, cuff or waistband, none of them are added, even though the product has them.
The reference decides how the shot looks, never what the product is: composition, framing and crop, whether a model appears and their face, body, hands and pose, the scene, background and props, the lighting, the way details are presented (inset panels, call-out boxes, their number, size and placement), and the surface feel of the cloth, plus where the product sits in frame and how large it is.
On-image text keeps the reference's position, font, size and colour; only words naming the old product's colour or pattern change to fit the new SKU, and every other word stays as written.
Extra requirements reach the model as their own section: where they conflict with the rules above they win, but the product always stays this SKU and never turns back into the reference's product.
The product's colour, pattern and structure are never taken from the reference: for a check or a stripe, the width and order of every band, the colours inside it, the direction and the proportions of the repeat all come from that SKU's own product photos. The reference's own pattern is discarded entirely: not a single line of it survives, even when fabric fills the whole frame.
A fabric detail follows only the reference's way of shooting: the fold, stack, exposed edge or seam, magnification, crop, angle and lighting. The pattern is rebuilt from the product photos and laid into the reference's folds; only the cloth's surface feel, such as brushed nap, softness and sheen, may follow the reference.
Product photos are fact sources, not layout sources: their framing, background, lighting and the way the product is worn or laid out never carry into the result, and whether a person appears is decided by the reference alone — with a person-less fabric reference, the result has no model even when every product photo is worn by one.
Fixed 2026-09-17: the first production batches showed two cells drifting — one SKU's close-up came back in the reference's original navy plaid, and another SKU's fabric macro came back in the reference product's colours. The first prompt told the model to keep the product's structure from the reference, so in frames with no model or scene it simply copied the reference product. The product-lock wording above replaces it; re-rendering a single cell of an older batch applies the new wording.
Known limit for fine checks and stripes: the model redraws them as the standard pattern of that kind. Colours and the overall style are right, but the order, width and spacing of the lines are not guaranteed to match the product, and a high-resolution close-up of the product fabric does not change that. When the exact line order matters, use a real photo for the fabric detail. The 2026-09-17 change fixes two things only: reference colours no longer leak into results, and pure fabric close-ups no longer gain buttons or piping.
Seedream 5 Pro and the frame: it only has seven fixed ratios and no auto, so results take the ratio closest to each reference shot: close to the reference's proportions but not always identical, with only plain background extended or trimmed at the edges, never the product, a person or text. For an unusually wide or tall reference, pick a model with auto (GPT Image, Nano Banana) whose output follows the reference exactly. Its prompt cap is 3000 characters, so overly long extra requirements are rejected at submit with a prompt to shorten them.
Same-style SKUs only. A SKU with a different structure — another collar, another sleeve length — keeps the reference structure; render those in the image workspace instead.
25. My Creations
All of your work in one place — videos, images, storyboards, listing sets, replicas, garment pattern variations, pattern transfers, remakes and upscales — as cards you can filter, open, download and delete.
Figure 25-1 My Creations (task-type filter row at the top)
Filtering
Task type: a row of buttons across the top (All / Reference to Video / Image to Video / Text to Video / Image to Image / Text to Image / Storyboard / Product Listing Set / Viral Video Remake / Image Replica / Garment Pattern Variations / Pattern Transfer / Video Upscale / Batch Video Remake) — click to switch.
Status + time: the second row filters by status (generating / done / failed) and by time (today / this month / custom range).
Filters are remembered: your chosen type, status and time range are restored automatically the next time you open the page.
Card contents
Thumbnail and status badge: generating / done / failed at a glance; video results carry a play icon.
Prompt, model, parameters and task ID below the thumbnail; agent tasks also show render progress and a strip of source material.
Credits used: the total for that task (agent tasks show the net total for the whole pipeline).
Common actions
Open / retry: click the card body to open that workspace in view mode; Adjust & retry there loads the parameters into a new task.
Download: save the result with the Download button.
Delete: the trash icon in the bottom-right corner of the card, with a confirmation dialog. Deleting removes the work and its result files, and refunds anything still running.
Note: a storyboard with a linked video shows as one combined card rather than two; Product Listing Set, Image Replica, Garment Pattern Variations, Pattern Transfer and Viral Video Remake likewise appear as a single card per task.
26. Asset library
Materials is one searchable library for your uploaded images, videos and audio. One-level folders keep a large library manageable without making extra file copies.
Figure 26-1 Materials · All assets and folders
18.1 Views, search and folders
All assets shows the complete library. Recent is ordered by assets you used most recently, Favorites keeps marked assets together, and Unfiled contains assets that have no folder.
Folder names appear in the Materials page's own rail on desktop and in the view selector on mobile. Create, rename or delete one-level folders from the same navigation.
Use the search field to find a filename or folder. Type, reference-status and sort controls narrow the results; pages are loaded from the server, so older assets remain discoverable as the library grows.
18.2 Organize without copying
Select one or more rows, then Download selected, Move to folder, Move to Unfiled, favorite or delete them in one batch.
Download selected always delivers the original files: a single selection downloads the file itself; several are packed into one zip (original upload names, duplicates suffixed -2 / -3) with no trimming, transcoding or recompression — videos longer than 15 s come down whole. One archive is capped at 500 MB in total, so split larger selections; any asset that cannot be fetched is skipped and named in the notice.
Each asset has at most one primary folder. Moving it only changes organization metadata; the underlying file remains stored once.
Deleting a folder never deletes its materials. They remain in All assets and move to Unfiled.
18.3 Use folders from a workspace
Uploads made inside video, image and agent workspaces enter Unfiled by default. Organize them later from Materials.
The Library picker (Figure 6-4) can filter All assets by folder. Picking records Recent use only and never moves the source asset.
18.4 Deletion rules
Use a row action or the batch bar to delete the underlying asset. Batch deletion reports deleted and skipped rows separately.
If an asset is still referenced by a task, deletion is blocked and the protected row is skipped. Moving or favoriting it is still safe.
Tip: folder membership and task references are separate. Deleting a folder never breaks previous work.
Deployment status (August 7, 2026): the folder replacement is live. Production migration 0039_asset_folder_management.sql has been applied and the replacement Worker has been deployed.
27. Account settings
The Settings group in the left menu holds your profile, security and billing pages.
27.1 Profile
Figure 27-1 Profile page
Open Settings → Profile.
Update your name, avatar and other details, then save.
27.2 Security & phone binding
Figure 27-2 Security page (with phone binding)
Phone binding remains available as an account-security capability; the product sign-in page itself offers email/password and Google:
Open Settings → Security and find the Phone card.
Enter your 11-digit number and click Send code.
Enter the code and click Bind. The card then shows the masked number.
The same page lets you change your password — enter the current and new password, then save.
Note: this release supports binding only; rebinding and unbinding are not available yet.
27.3 Credits & billing
Figure 27-3 Credits & billing page
Balance: your current balance plus lifetime earned and spent totals.
History: sign-up bonuses, task charges/refunds, top-ups and adjustments with their time and linked task; related task movements are grouped for readability.
Grouped agent tasks: the sub-charges of one storyboard, listing set, replica, garment pattern variation, pattern transfer or remake are merged into a single row (“Storyboard · 3 entries”); Details expands them and View task opens the work.
Export your usage: click Export details on the Credit history card and choose the last 7 / 30 / 90 days, a custom range (up to 366 days), or all records. The UTF-8 CSV keeps one row per logical task and lists total deducted, total refunded, net consumed, balance movement and the balance after the latest movement; sign-up bonuses, top-ups and manual adjustments remain separate rows. An all-time export includes the newest 10,000 grouped records and shows a warning if older records were omitted.
Current plan: shows your plan (Free). Online credit purchase is coming in a later phase.
28. FAQ
Q1 It still says “Generating” — how long should I wait?
Images usually take tens of seconds to a few minutes and videos a few minutes. The limits are 10 minutes for images, about 17 minutes for videos, and up to several hours for video upscaling depending on the job (the UI shows a live estimate). Anything past its limit fails and is refunded. You can leave the page while a task runs.
Q2 My task failed — do I get the credits back?
Yes. Tasks that fail or time out are refunded in full automatically, and the refund appears in your billing history. A failed smart edit leaves the current image untouched.
Q3 I'm not receiving the phone-binding SMS code.
Make sure you are using a mainland-China (+86) number and that international SMS is not blocked. Retry later or contact support if it persists; you can still sign in directly with your email and password.
Q4 Can I recover the original after a smart edit?
Yes. Edits never overwrite the original: the version history under the preview keeps the original and every edit, and Set as current switches back for free. Edits completed before the version history shipped (2026-09-15) did not keep their originals.
Q5 Why do some older images have no “Smart edit” button?
Smart edit needs a high-resolution working copy of the image. Very early results predate that copy, so the button is hidden for them. Everything generated since then supports it.
Q6 Text inside my images comes out wrong in Chinese.
Image models are unreliable with non-Latin scripts, so text rendered inside images is always English in the storyboard and agent flows. Spoken voice-over and subtitles can be in any supported language.
Q7 I've run out of credits.
Clicking a paid generation action shows an “Insufficient generation credits” message and does not create a task or charge your account. Top up from the Pricing page (top navbar or sidebar): four one-time tiers, currently paid by corporate bank transfer via the contact shown in the dialog. The top-up shows in your billing history.
Q8 How is Viral Video Remake charged, and can I stop midway?
Shot analysis costs 2 credits; after that each segment is charged separately (by model, resolution and duration) and failed segments are refunded automatically; composing the final cut is free. You can hit Stop generating at any time — unfinished segments are refunded, finished ones are kept and can be topped up later.
Q9 Are “planning” and “rendering” charged separately in Product Listing Set / Image Replica?
Yes. Planning (the AI writing the set plan and prompts) costs only 2 credits. Review the plan, then batch-render — each image is charged independently by model. If you don't like the plan, Adjust & retry starts over; the small planning fee is not refunded.
Q10 What does Video Upscale cost and how long does it take?
The price scales with duration, frame rate and target resolution (720p is the cheapest tier, 4K about 11× that). The exact quote and an estimated processing time are shown before you submit. Long footage at a high resolution can take hours — you can leave the page — and failures or timeouts are refunded automatically.
Q11 Why does the Garment Pattern Variations workflow render the flat-lay before the model shot?
Upload your images and AI freely auto-identifies each one's role plus an overall style; confirm or edit it and submit once, and the system drafts the plan and renders every flat-lay automatically (2 credits for the plan plus every flat-lay priced by the chosen model — the total is shown right on the submit button), with no separate plan-review or per-card render-selection step. The place you still approve before spending more is the model shot: a card's Generate model shot button only appears once that flat-lay has rendered successfully, so you never pay for a model shot on a pattern you don't like — once every flat-lay is done, a batch toolbar appears at the top of the results, pre-checking every card whose flat-lay succeeded; uncheck any card you don't want, then click Generate selected model shots or Generate selected pattern vectors, each priced live from the checked-and-not-yet-rendered set, never re-charging a card that already has that render. For later changes, use Edit & regenerate in the prompt area: model-only edits charge one model shot, while a flat-lay prompt edit clearly prices and durably runs the flat-lay then model-shot chain, keeping the model on the latest flat-lay. The whole task (plan + every flat-lay + every model shot) is grouped into one "Garment Pattern Variations" billing entry.
Q12 Does pattern extraction in Pattern Transfer cost credits? How is it different from Garment Pattern Variations?
Pattern extraction is always free: upload a viral garment photo and the system starts a free background extraction immediately; the result is content-addressed to the source photo, so re-extracting the same photo again is instant and costs nothing. A failed extraction can be retried with Re-extract, or you can switch to Upload pattern instead. The difference from Garment Pattern Variations is the input shape and the goal: Garment Pattern Variations turns "1 garment photo + a pattern reference" into 10–20 different pattern variants, while Pattern Transfer turns "1 pattern + 1–12 existing colour versions" into that SAME pattern migrated pixel-faithfully onto every colour — better suited to when you already know the exact pattern and just want to cover every colour you sell it in. Both share the same flat-lay-then-model-shot two-stage billing and the "approve the flat-lay before spending on the model shot" gate, and are tracked and billed as separate entries in My Creations and on your ledger.
Need more help? If your question isn't covered here, get in touch through the contact details on the site and we'll help you out.